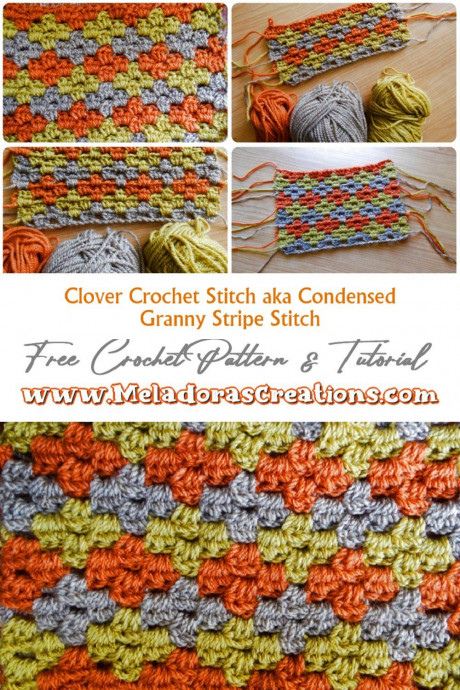
Crochet Clover Stitch: A Charming and Versatile Technique

Introduction to the Crochet Clover Stitch
The Crochet Clover Stitch is a charming and versatile stitch that adds a lovely touch to your projects. It is created by combining basic crochet stitches in a unique way, resulting in a beautiful clover-like design. This stitch is perfect for adding texture and visual interest to various items like blankets, scarves, and even clothing. Whether you're a beginner looking to expand your crochet skills or a seasoned crocheter searching for a new stitch to try, the Crochet Clover Stitch is a fun and rewarding technique to master. With its intricate yet simple pattern, this stitch is sure to impress and bring a touch of whimsy to your handmade creations. Give it a try and watch as your projects blossom with this delightful stitch!
Materials Needed for the Project
For this project you will need:
Hook
Any size, but I used a 5 mm hook or size H hook for the US.
Yarn
Any size, but I used worsted weight yarn, 4 ply US, 10 ply AU. Each skein was – 100 grams / 3.5 oz or 240 meters / 262 yards.
Abbreviations Used in This Pattern
ABBREVIATIONS
- ch = Chain
- sl st = Slip Stitch
- YO = Yarn Over
- HDC = Half Double Crochet
- sk a st = Skip a stitch
- sk 2 sts = Skip two stitches
- beg = beginning
- * = Repeat what’s in between * for rest of round.
Color Changes in the Pattern
In this pattern, you will be doing many color changes. I will only give the instructions for 3 color changes, and if you’d like to add more, it’s as simple as going back to the 1st color in the directions and following again from there but with your new color.
Stitch Multiples
This stitch is done in multiples of 3 + 1.
Row Instructions
Row 1 with 1st Color
HDC in the 4th ch from hook. HDC 2 more times in the same st and ch 1. *Skip 3 and HDC 3 into next st.* Repeat for the row.
Note on Row Ending
Because we are working with odd and not even numbers, the ending of the row and the beginning of a row may vary. So I will tell you both ways how to end and how to begin a differing row.
End of Row
ch 1, sk a stitch and HDC in ending ch. (OR you’ll HDC 3 in last space.)
New Color Addition
We’re going to be adding our second color now. This is how you will add your new color into the beginning of a row. Chain 1 with the 1st color then bring the 2nd color back up through the slip knot (the loop) and ch 1 with the new color. Now you’re ready to use the new color.
Row 2
ch 1 with new color and HDC 2 and ch 1 in the next space, working over your 2nd color to carry it with you. (OR Ch 3 and HDC 3 in the next space over).
SWITCH BACK to 1st color.
ch 1 and HDC 3 and ch 1 in the next space, working over your 2nd color to carry it with you.* Repeat pattern of color changes through the row.
End of Row
Work last set of 3 HDCs in the ending ch 2 space. Ch 3 and turn.
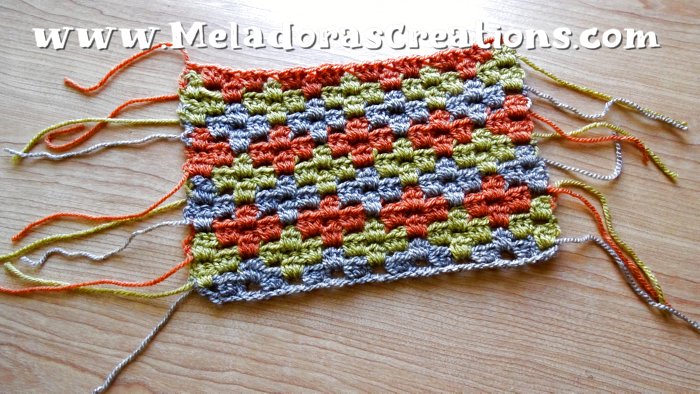
I ended with my 2nd color. If you end with your first color, that’s okay. You will just have to ensure you’re using the correct color when starting your next row. Use the picture for color reference if you need. Keep in mind you are making a clover in the color pattern.
Row 3
You can cut the 1st color here and just use your 2nd color.
Tip: Crochet OVER the tails of the previous row where you carried your yarn along with you; it will make for a much cleaner look.
HDC 2 into the first space, Ch 1.
Continuing Rows
HDC 3 and Ch 1 into all spaces. Repeat for the row.
End of row: Ch 1 and HDC in the ending ch 3.
Row 4
This is how you will add your new color into the beginning of a row.
Change to 3rd color and ch 1. Bring 2nd color back up through and ch 1.
Working with 2nd color, crochet over the yarn of the 3rd color so that you carry it with you.
HDC 2 into the first space, Switch to 3rd color and ch 1.
Switching Colors
HDC 3 in the next space. Remember you are crocheting over the other yarn as you move to carry the other color with you.
*Switch back to 2nd color and ch 1. HDC 3 into the next space. Switch to 3rd color and ch 1. HDC 3 in the next space.*
HDC 3 into all spaces. Repeat for the row.
End of row: Work last set of 3 HDCs in the ending ch 2 space. Ch 2 and turn.
Row 5
You can cut the 2nd color here; just use your 3rd color this row. HDC 2 into the first space, Ch 1.
HDC 3 and Ch 1 into all spaces. Repeat for the row.
End of row: Ch 1 and HDC in the ending ch 3.
Row 6
You will add your new color into the beginning of a row, but with this row take note that you’ll need to use the new color first this time. Change back to your 1st color and ch 2.
Working with 1st color, crochet over the yarn of the 3rd color so that you carry it with you.
HDC 2 into the first space, Switch to 3rd color and ch 1. HDC 3 in the next space.
Continuing Switches
Remember you are crocheting over the other yarn as you move to carry the other color with you. *Switch back to 1st color and ch 1. HDC 3 into the next space. Switch to 3rd color and ch 1.
HDC 3 in the next space.* HDC 3 into all spaces. Repeat for the row.
End of row: Ch 1 and HDC in the ending ch 3.
Row 7
You can cut the 3rd color here. Just use your 1st color this row. HDC 2 into the first space, Ch 1.
HDC 3 and Ch 1 into all spaces. Repeat for the row.
End of row: Ch 1 and HDC in the ending ch 3.
Repeat rows 3 – 7.

