Crochet Lacy Motif Flower Shawl

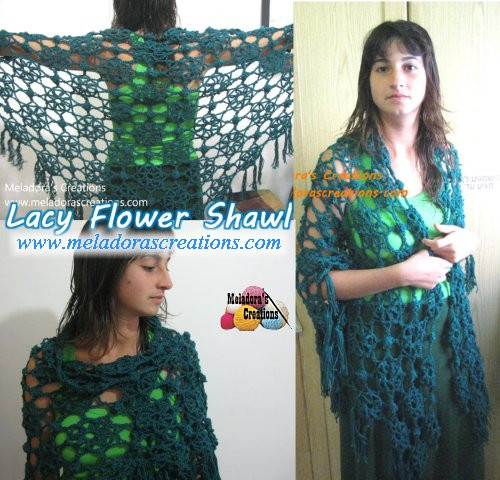
The Crochet Lacy Motif Flower Shawl is a delightful and versatile piece that exudes elegance and charm. The intricate floral motifs combined with delicate lacework create a beautiful and feminine accessory that is perfect for adding a touch of whimsy to any outfit.
This shawl is not only visually stunning but also practical, offering warmth and comfort while still looking stylish. Whether you wear it draped over your shoulders at a special occasion or casually wrapped around your neck on a cozy evening, the Crochet Lacy Motif Flower Shawl is sure to be a standout piece in your wardrobe. So grab your crochet hook and some yarn, and let's create a stunning accessory that will make you feel fabulous every time you wear it!
What you will need for this Lacy Flower Shawl project is:
Materials Needed
YARN: At least 900 yards of yarn. I used Anti-Pilling yarn because I didn’t want it to fuzz up after a lot of use. But if you only have worsted weight yarn you can use it, but I would recommend for something like this that you get Anti-Pilling if possible. Also this is 4 ply yarn for the US / 10 ply for AU.
You will also need a tapestry needle.
HOOK: 4 mm hook, or US you can use G, G is 4.25 mm, so it may come out slightly larger.
Tips on Sizing
If this shawl is coming out too big, and you want to make it smaller, just do fewer rows total. This one is 11 from tip to last row. I’m a big gal so this is why I made it big, but if you’re skinny, perhaps you would prefer only 9 rows total.
Abbreviations
- ch = Chain
- sl st = Slip Stitch
- st = Stitch
- sk = Skip
- YO = Yarn Over
- SC = Single Crochet
- DC = Double Crochet
Repeat what’s in between * for the rest of the round.
Making the Large Motif
To Start:
ch 10 and sl st in beginning ch to form a ring.
Round 1
ch 10 and sl st into ring, repeat this 7 more times until you have 8 loops total. Then slip st up the side of the first loop. 4 or 5 times, however many it takes you to reach the top of the loop.
Round 2
sc into loop, ch 5, then sc into the tip of the next loop. Repeat for all 8 loops.
Round 3
ch 7, sl st into 4th ch from hook. Ch 3, sl st onto the following sc. Repeat for all loops around. This first motif will be done fully. The rest you will be connecting as you go. When making a connection, ch 3, connect it to the next motif where I am pointing to in this picture. Sl st in there and ch 3, sl st onto the next sc.
After you have your first two motifs connected, then make a third large motif and connect it at the bottom of the first motif as well. Remember to skip a point in between.
Connecting the Fourth Large Motif
To connect the fourth Large Motif you will start your fourth motif and stop after you’ve made your 5th point. Always make sure you have one loose peak after your connection, because we will be using them later to connect a smaller piece.
Ch 3 and sl st to connect at point. Ch 3 and sl st onto next sc.
Chain 7 and sl st in 4th ch from hook, ch 3, sl st to the next sc. ch 3 and sl to the next correct point. (You will always be connecting every other point! So be sure to skip a tip/point before making your next connection.)
Making the Center Motif
Ch 3 and sl st into beginning st to form a ring.
Ch 2 and dc 7 into ring. Ch 2 counts as a stitch (8 sts).
Ch 2 and sl st into one of the middle open connects, ch 2, then sk a st and sl st in next dc. Repeat 3 more times to connect all 4 middle points.
Now you can start making your next Large motif, the next one you will connect using only one point of the flower. To the right as we did before.
Then to connect the next motif, you will stop after you have 5 points made. Using your 6th point, make a connection to the motif on the right, then ch 7, sl st in 4th ch from hook, ch 3, sl st into next sc. Ch 3 and make your last connection to the other large motif by sl stitching on the correct point, then ch 3 and sl st into next sc. Ch 1 and cut your yarn.
Finalizing the Shawl
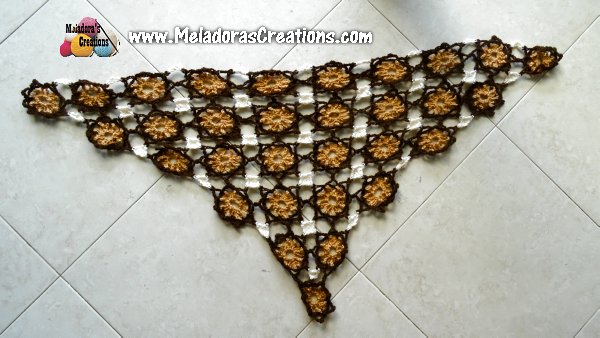
I repeated this in a square until I got 6 motifs by 5 motifs. Then I turned the square where the point faced away from me and started adding it diagonally. If you wish to not make your shawl as large, then do less row. For instance, try making 9 rows from tip to top and try it on, if you like this size, then finish it up as I will show you below. You can do the same for a child. Try making 6 rows for a 5-year-old and see if it fits well; if you need to add another row, then do it.
Now we have to fill in the top with half circles to even out the top a bit.
FOR LARGE SIZE SHAWL: Fill in as necessary.
FOR CHILD SIZE SHAWL: Make 10 across and 6 rows total.
Making the Half Circles
Ch 3, sl st in beginning st to form a ring. Ch 2, dc 5, sc 2 into ring, sl st into beginning ch 2.
* ch 2 and connect to one of the three points, ch 2 and sk a st and sl st onto circle. * Repeat for all 3 points. Ch 1 and cut your yarn.
There are two even smaller circles on the top two most points. This is how you make those:
Ch 3, sl st into beginning ch to form a ring. Ch 2, dc 3 into ring, sc 2 into ring, sl st into beginning ch 2.
Ch 2 and sl st connect to the first motif, ch 2, sk a st, sl st back on circle. Ch 2 and repeat for the last point. Ch 1, cut yarn.
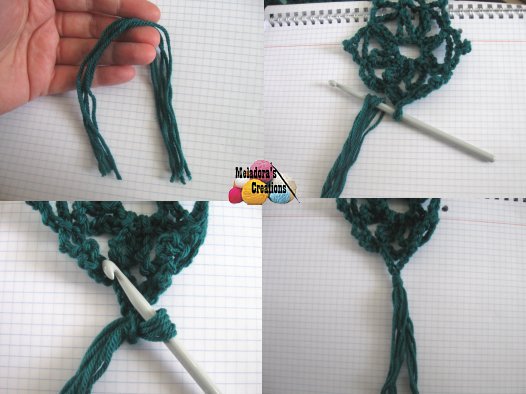
Making the Fringe
Find something that is the length of the fringe that you want and wrap it around 5 times. I used a thin book and wrapped it around the width of it. Then cut the loops at the bottom and remove. You will again be using the same holes you used to make your connections. Put a fringe in each one along the bottom of the shawl.