Crochet Rockskipper Bag

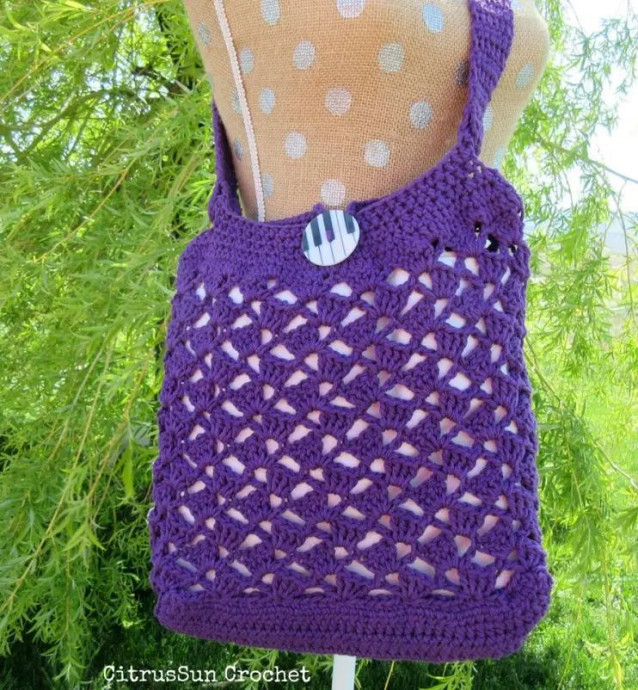
The Crochet Rockskipper Bag is the ideal accessory for adding a touch of charm and versatility to your daily outfit! With its trendy design and durable construction, this bag is perfect for carrying your essentials on the go while easily complementing any casual or dressy ensemble. Its intricate crochet pattern combined with its spacious interior make it a must-have for anyone looking to add a touch of handmade flair to their wardrobe. Grab your Crochet Rockskipper Bag today and add a splash of style to your look!
Materials
- 325 yards of #4 worsted weight yarn. I used Lily Sugar and Cream.
- G hook
- I hook
- (1) 1.5 inch button
- Yarn Needle
- Measuring Tape
- Scissors
Gauge
- G hook-16 hdc x 12 rows = 4 inches
- I hook- 3 shells by 6 rows = 5 x 4 inches
Swatch Instructions
Row Instructions
Row 1: Ch 24. Sk 5 *(4 Dc, Ch 2, Dc) in the next st. Sk 6 ch* Repeat from * to * across until 4 ch remain. Sk 3 ch. Dc in the last ch. Turn.
Row 2: Ch 2. *(4 Dc, Ch 2, Dc) in the next ch 2 space. Sk 5 Dc* Repeat from * to * across. Dc in the top of the turning ch. Turn.
Row 3-6: Repeat Row 2
Stitch Glossary
- Ch - chain
- Sk - skip
- St - stitch
- Sl st - slip stitch
- Sc - single crochet
- Hdc - half double crochet
- Fhdc - foundation half double crochet
- Hdc dec - half double crochet decrease
- Dc - double crochet
Notes
- Ch 3 counts as a Dc.
- Unless otherwise stated, the first st is made in the same st as the beginning ch.
- Bag is made from the base up.
- Base is worked in rows and then switches to rounds once you start the main part of the bag.
Finished Size
11.5 inches tall by 12 inches wide
Bag Base
Using G Hook:
- Row 1: Fhdc 42. Ch 1. Turn.
- Row 2-11: Hdc in each st across. Ch 1. Turn.
- Row 12: Hdc in each st across.
- Row 13: Change to I hook. Ch 1. Rotate the piece and sc around the entire piece, placing 2 sc in each corner. Join to the first stitch. (112)
Bag Construction
Round 1: (Ch 3, 3 Dc, Ch 2, Dc) in the first st. Sk 6 st. *(4 Dc, Ch 2, Dc) in the next st. Sk 6 st.* Repeat from * to * around. Join to the top of the ch 3. Turn. [16 shells]
Round 2: Sl st into the next ch 2 space. (Ch 3, 3 Dc, Ch 2, Dc) in the first ch 2 space. *(4 Dc, Ch 2, Dc) in next ch 2 space* Repeat from * to * around. Join to the top of the ch 3. Turn.
Round 3-12: Repeat Round 2.
Switch Back to G Hook
- Round 13: Ch 1. Hdc in each st around. Join to the beginning st. Ch 1. (112)
- Round 14: *Hdc in the next 2 st. Hdc dec over the next 2 st.* Repeat from * to * around. Join to the first st. Ch 1. (84)
- Round 15: *Hdc in the next 2 st. Hdc dec over the next 2 st.* Repeat from * to * around until 4 st remain. Hdc in the next 4 st. Join to the first st. Ch 1. (64)
- Round 16: Hdc in the next 4 st. Ch 6. Sk 6 st. Hdc in the next 26 st. Ch 6. Sk 6 st. Hdc in the next 22 st. Join to the first st. Ch 1. (52 hdc, 12 ch)
- Round 17: Hdc in the next 4 st. 6 hdc in the next ch 6 space. Hdc in the next 26 st. 6 hdc in the next ch 6 space. Hdc in the next 13 st. Ch 16. Hdc in the next 9 st. Join to the first st. (64 hdc, 16 ch) Fasten off.
Strap Instructions
Using G Hook:
- Row 1: Leaving a 10 inch tail to sew strap end around the strap hole, ch 7. Hdc in the 2nd ch from the hook and the next 5 ch. Ch 1. Turn. (6)
- Row 2-75: Hdc in each st across. Ch 1. Turn. (6).
- Row 76: Hdc in each st across. (6)
- Row 77: Sl st around the entire strap to prevent stretching and add durability to the strap. Fasten off leaving a 10 inch tail to sew strap end around the strap hole.
Finishing Touches
- Sew your button to the top center of the front of the bag.
- Take one end of your strap and insert it (going from the outside to the inside) through one of the strap holes located on the side of your bag. Fold the end of the strap upward and sew to the inner side of the strap using the leftover tail. Repeat this process for the opposite side.
- Weave in all ends.