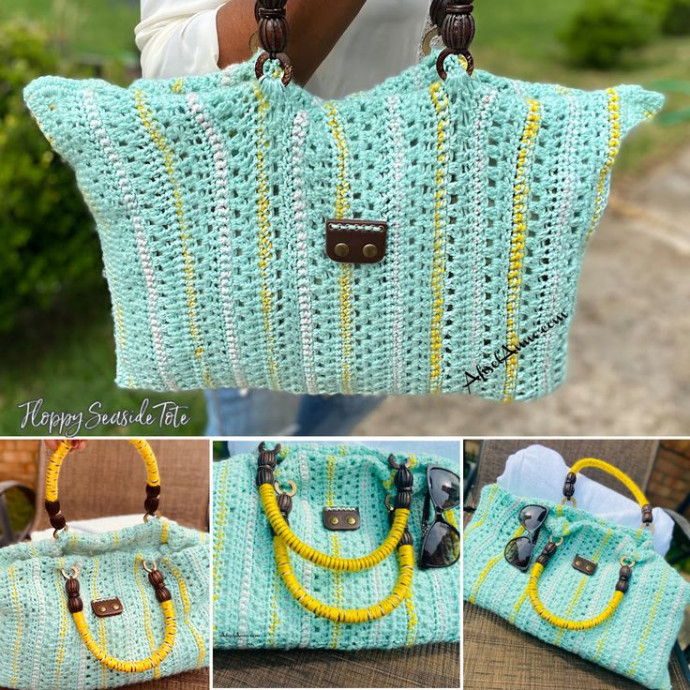
The Crochet Floppy Seaside Tote is an absolute must-have for your beach outings! This delightful tote is not just a bag; it’s a statement piece that combines style and functionality effortlessly. With its intricate crochet design and ample space to fit all your beach essentials, such as sunscreen, shades, and that thrilling novel you've been eager to read, this tote will have you turning heads from the boardwalk to the shoreline. So, grab your sunhat, slip into your flip-flops, and make a splash with this charming tote by your side – the beach day of your dreams awaits!
The Gauge may vary based on your crochet style.
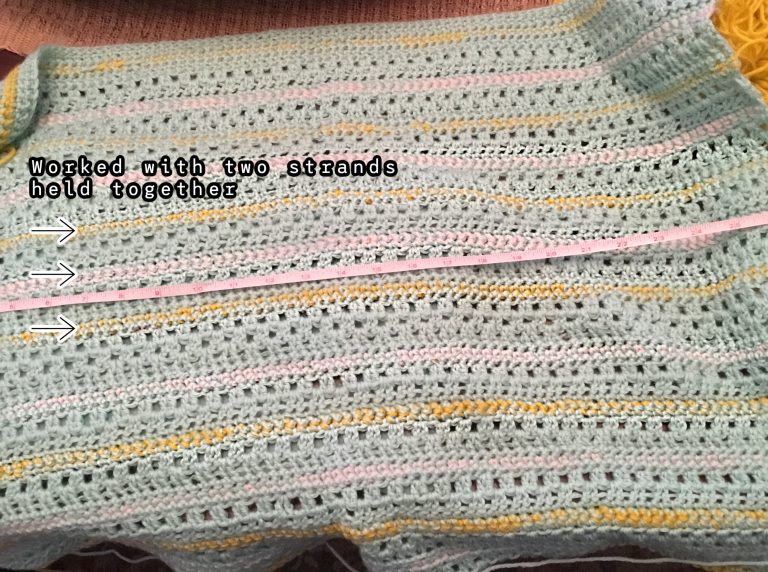
20 ½” wide x 15.5” height.
The stripes in this project are created by holding two strands of yarn together, at the same time. This is illustrated in the pattern with the abbreviation dbst (double strands held together).
You will add a yarn color, work down the row, and then drop that color to continue working the project with the main color. For this project, the main color was Color A- Mint.
Written Pattern for the Floppy Seaside Tote
Ch 96, plus 1 to start using Color A.
R1: sc across (96), ch 1, tw.
R2: sc across (96), ch 1, tw.
R3: Holding Color A, add Color B (dbst), sc across (96), ch 1, tw.
R4: Drop color B, continue using Original Color A, sc across, ch 1 tw (96).
R5: sc across (96), ch 3 (ch 3 will count as the first dc stitch in the next row), tw.
*R6: 1 dc (next to the chain 3), skip a stitch, 2 dc into the same stitch, sk stitch], [2dc, sk stitch, 2dc*]; repeat [*] across; finish with 2dc in the last stitch; ch 3, tw.
*R7: 2 dc into first space (this is the skip 1 space from the previous row), place 2 dc in next space, repeat across row, end with 1 dc stitch (96), ch 1, tw.
*R8: sc across (96), ch 1, tw.
*R9: Holding Color A, add Color C (dbst), sc across (96), ch 1, tw.
*R10: Drop color B, continue using Original Color A, sc across, ch 3 tw (96).
Note: *R6-R10 is the repeat pattern throughout the project.
R11: 1 dc (next to the chain 3), skip stitch, 2 dc into same stitch, sk stitch], [2dc, sk stitch, 2dc*]; repeat [*] across; finish with 2dc in last stitch; ch 3, tw.
R12: 2 dc into first space (this is the skip 1 space from the previous row), place 2 dc in next space, repeat across row, end with 1 dc stitch (96), ch 1, tw.
R13: sc across (96), ch 1, tw.
R14: Holding Color A, add Color B (dbst), sc across (96), ch 1, tw.
R15: Drop color B, continue using Original Color A, sc across, ch 3, tw (96).
Note:
Remember, the pattern repeats at rows 6-10. These 5 rows repeat throughout the project.
R16: 1 dc (next to the chain 3), skip a stitch, 2 dc into the same stitch, sk stitch], [2dc, sk stitch, 2dc] *; repeat [*] across; finish with 2dc in the last stitch; ch 3, tw.
R17: 2 dc into first space (this is the skip 1 space from the previous row), place 2 dc in next space, repeat across row, end with 1 dc stitch (96), ch 1, tw.
R18: sc across (96), ch 1, tw.
R19: Holding Color A, add Color C (dbst), sc across (96), ch 1, tw.
R20: Drop color C, continue using Original Color A, sc across, ch 3 tw (96).
R21: 1 dc (next to the chain 3), skip stitch, 2 dc into same stitch, sk stitch], [2dc, sk stitch, 2dc] *; repeat [*] across; finish with 2dc in last stitch; ch 3, tw.
R22: 2 dc into first space (this is the skip 1 space from previous row), place 2 dc in next space, repeat across row, end with 1 dc stitch (96), ch 1, tw.
R23: sc across (96), ch 1, tw.
R24: Holding Color A, add Color B (dbst), sc across (96), ch 1, tw.
R25: Drop color B, continue using Original Color A, sc across, ch 3 tw (96).
R26: 1 dc (next to the chain 3), skip stitch, 2 dc into same stitch, sk stitch], [2dc, sk stitch, 2dc] *; repeat [*] across; finish with 2dc in last stitch; ch 3, tw.
R27: 2 dc into first space (this is the skip 1 space from previous row), place 2 dc in next space, repeat across row, end with 1 dc stitch (96), ch 1, tw.
R28: sc across (96), ch 1, tw.
R29: Holding Color A, add Color C (dbst), sc across (96), ch 1, tw.
R30: Drop color C, continue using Original Color A, sc across, ch 3 tw (96).
R31: 1 dc (next to the chain 3), skip stitch, 2 dc into same stitch, sk stitch], [2dc, sk stitch, 2dc] *; repeat [*] across; finish with 2dc in last stitch; ch 3, tw.
R32: 2 dc into first space (this is the skip 1 space from previous row), place 2 dc in next space, repeat across row, end with 1 dc stitch (96), ch 1, tw.
R33: sc across (96), ch 1, tw.
R34: Holding Color A, add Color B (dbst), sc across (96), ch 1, tw.
R35: Drop color B, continue using Original Color A, sc across, ch 3 tw (96).
R36: 1 dc (next to the chain 3), skip stitch, 2 dc into same stitch, sk stitch], [2dc, sk stitch, 2dc] *; repeat [*] across; finish with 2dc in last stitch; ch 3, tw.
R37: 2 dc into first space (this is the skip 1 space from previous row), place 2 dc in next space, repeat across row, end with 1 dc stitch (96), ch 1, tw.
R38: sc across (96), ch 1, tw.
R39: Holding Color A, add Color C (dbst), sc across (96), ch 1, tw.
R40: Drop color C, continue using Original Color A, sc across, ch 3 tw (96).
R41 1 dc (next to the chain 3), skip stitch, 2 dc into same stitch, sk stitch], [2dc, sk stitch, 2dc] *; repeat [*] across; finish with 2dc in last stitch; ch 3, tw.
R42: 2 dc into first space (this is the skip 1 space from previous row), place 2 dc in next space, repeat across row, end with 1 dc stitch (96), ch 1, tw.
R43: sc across (96), ch 1, tw.
R44: Holding Color A, add Color B (dbst), sc across (96), ch 1, tw.
R45: Drop color B, continue using Original Color A, sc across, ch 3 tw (96).
R46: 1 dc (next to the chain 3), skip stitch, 2 dc into same stitch, sk stitch], [2dc, sk stitch, 2dc] *; repeat [*] across; finish with 2dc in last stitch; ch 3, tw.
R47: 2 dc into first space (this is the skip 1 space from previous row), place 2 dc in next space, repeat across row, end with 1 dc stitch (96), ch 1, tw.
R49: sc across (96), ch 1, tw.
R50: Holding Color A, add Color C (dbst), sc across (96), ch 1, tw.
R51 Drop color C, continue using Original Color A, sc across, ch 3 tw (96).
R52: 1 dc (next to the chain 3), skip stitch, 2 dc into same stitch, sk stitch], [2dc, sk stitch, 2dc*]; repeat [*] across; finish with 2dc in last stitch; ch 3, tw.
R53: 2 dc into first space (this is the skip 1 space from previous row), place 2 dc in next space, repeat across row, end with 1 dc stitch (96), ch 1, tw.
R54: sc across (96), ch 1, tw.
R55: Holding Color A, add Color B (dbst), sc across (96), ch 1, tw.
R56: Drop color B, continue using Original Color A, sc across, ch 3 tw (96).
R52: 1 dc (next to the chain 3), skip stitch, 2 dc into same stitch, sk stitch], [2dc, sk stitch, 2dc*]; repeat [*] across; finish with 2dc in last stitch; ch 3, tw.
R53: 2 dc into first space (this is the skip 1 space from previous row), place 2 dc in next space, repeat across row, end with 1 dc stitch (96), ch 1, tw.
R54: sc across (96), ch 1, tw.
R55: Holding Color A, add Color C (dbst), sc across (96), ch 1, tw.
R56: Drop color C, continue using Original Color A, sc across, ch 3 tw (96).
R57: 1 dc (next to the chain 3), skip stitch, 2 dc into same stitch, sk stitch], [2dc, sk stitch, 2dc*]; repeat [*] across; finish with 2dc in last stitch; ch 3, tw.
R58: 2 dc into first space (this is the skip 1 space from previous row), place 2 dc in next space, repeat across row, end with 1 dc stitch (96), ch 1, tw.
R59: Holding Color A, add Color B (dbst), sc across (96), ch 1, tw.
R60: Drop color B continue using Original Color A, sc across, ch 1 tw (96).
R61: sc across (96), ch 1 (ch 3 will count as the first dc stitch in the next row), tw.
R62: sc across (96).
Finish off, tie off ends. Weave in tails.
Block-To Create a straight edge along the top.
Turn crochet fabric vertically, to block the area that will be the opening.
R1: Attach yarn to corner, along the top, sc along top edge ch 1, tw. (Using Color A)
R2: sc each stitch across.
Finish off, Weave in end.
Construction:
Special Instructions:
The bag is created wide (horizontally).
Turn the bag vertically to sew along the sides. (This will allow the stripes to run vertically).
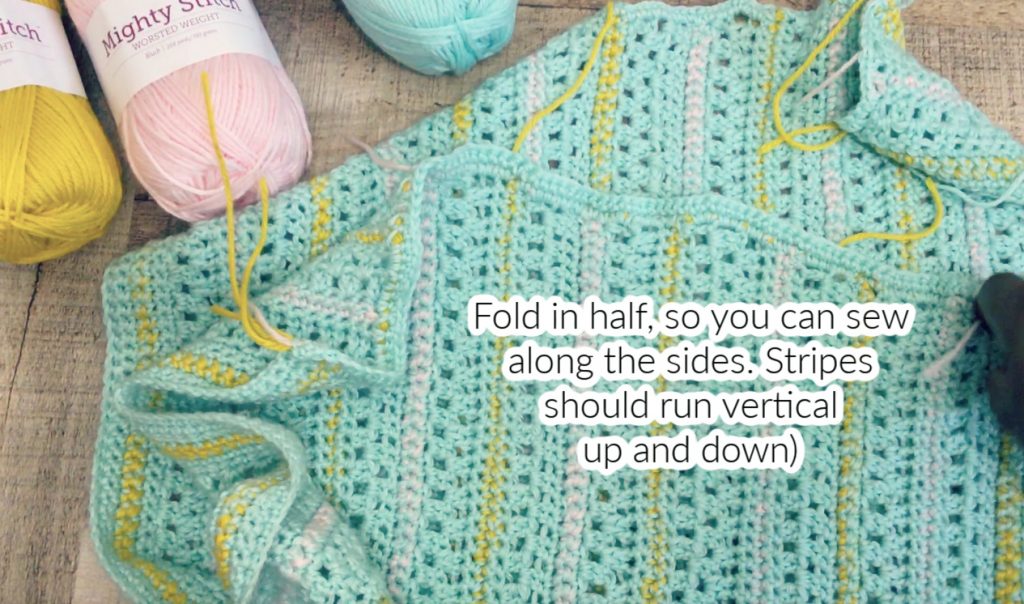
Fold the crochet fabric in half and align to make sure the top edge is even with the back edge, (the back and front should meet along the top).
Using the main color yarn (Yarn A). Attach yarn to corner, sew along the raw edge, along the left and right side. This will seal the bag, creating the tote.
Sew along the side, twice, to ensure the seam is secure.
Handles
I purchased a stylish set of handles for my Floppy Seaside Tote. These handles not only added a bit of flair, but they also created a nice store-bought appeal to the tote.
Attaching Handles
Measure approx. 7” in from the right side and then approx. 7” from the left side.
This should leave approx. 6” in the middle.
Using yarn and a sewing needle, attach the handle.
Note:
The spacing is an approximation. Your tote may be a little larger or smaller based on your gauge.
There is also a faux button added. This is an added embellishment that is not necessary for the construction of the Floppy Seaside Tote.