Crochet Sleepy Seaside Sweater

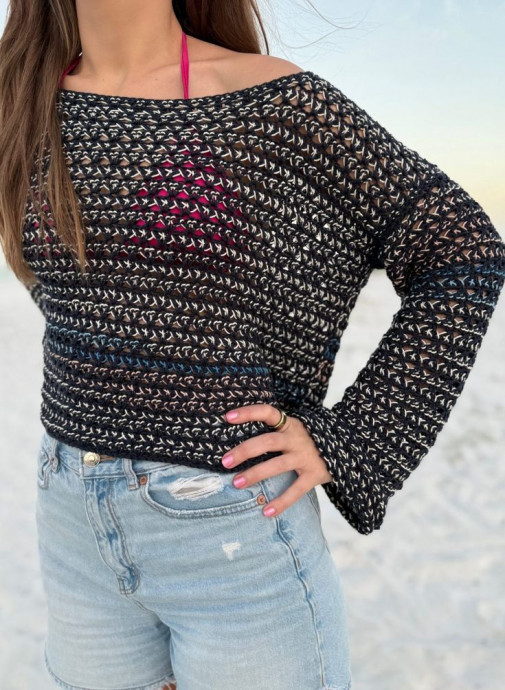
The Crochet Sleepy Seaside Sweater is the perfect cozy companion for those breezy beach evenings or lazy Sundays at home. With its intricate woolen patterns and soothing colors, it's like wearing a warm hug. This sweater effortlessly combines style and comfort, making it a delightful addition to any wardrobe. Whether you're strolling along the shore or curling up with a good book, this charming sweater will keep you feeling snug and stylish.
Materials
- Light (3) Weight Yarn, 24/7 Cotton DK in Nightshade: 3(3, 4, 4, 4, 5, 5, 5, 6) skeins or 730(800, 860, 950, 1030, 1110, 1200, 1290, 1380) yards
- Light (3) Weight Yarn, 24/7 Cotton DK in Azul: 1(1, 2, 2, 2, 2, 2, 3, 3) skeins or 190(210, 250, 270, 310, 350, 390, 440, 470) yards
- H/5.00mm Crochet Hook
- Needle
- Scissors
- Stitch Markers (3)
Gauge
16 Sts by 7.5 Rows = 4×4”
To make a gauge swatch, work 27 Fsc. Then, follow instructions for rows 2-10 of the back panel. Your swatch will be larger than the required gauge. Measure 4×4” within the swatch to check gauge.
Sizes
XS(S, M, L, XL, 2X, 3X, 4X, 5X)
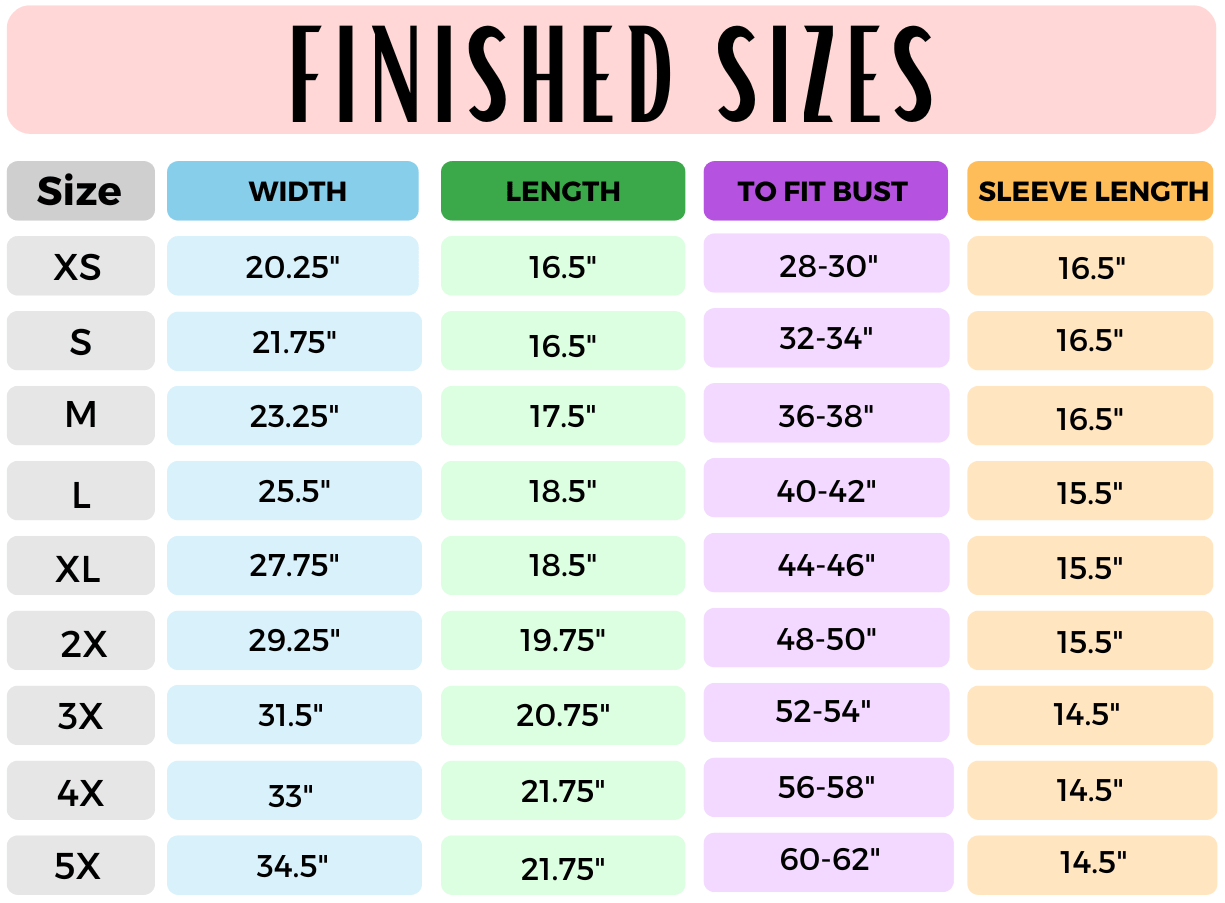
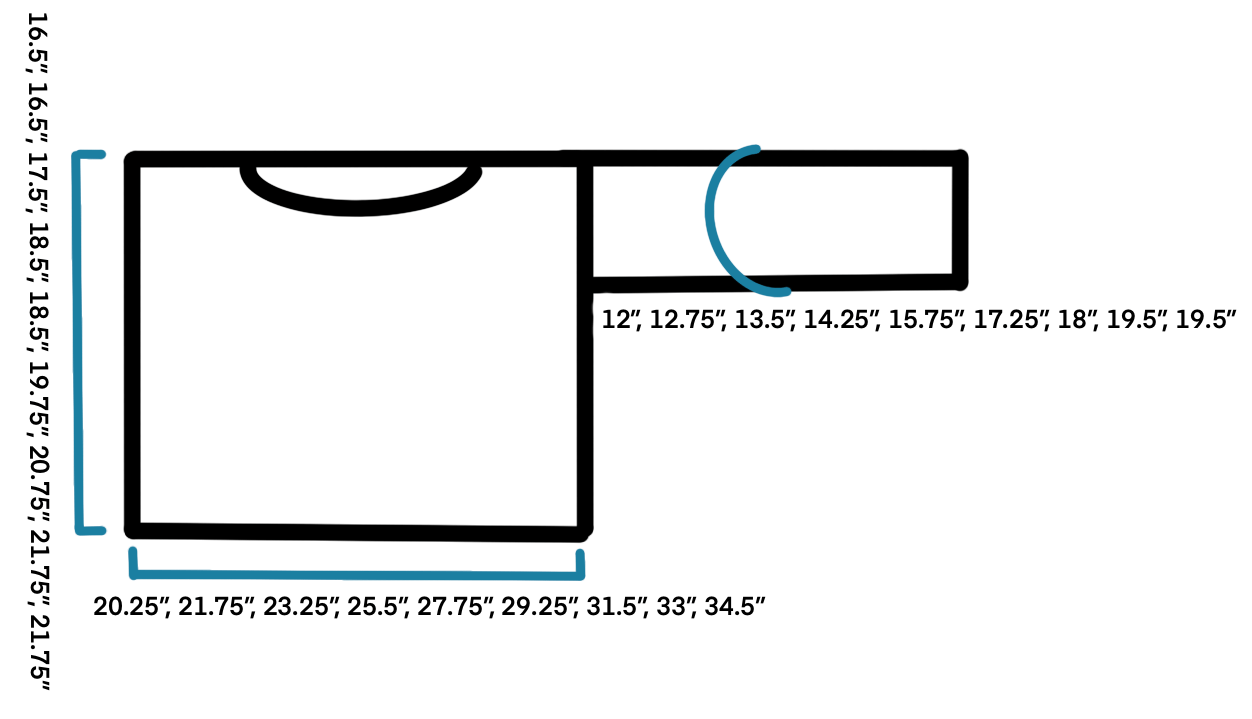
Finished Measurements
Notes
This top is made in separate panels and seamed together.
We are going to be using the method of “carrying yarn” to create this top. Your stitches are made using Yarn A. Yarn B is carried throughout, starting in Row 2.
The Ch 3 at the beginning of the row counts as 1 St.
The Ch-1 Sp counts as 1 St.
Add or remove as many rows before the neckline shaping to adjust the length of your sweater. Take into account this will alter the yardage requirements above. Add or remove the same amount of rows to your back panel. Sleeves can also be adjusted the same way.
The parenthesis at the beginning of the row are the row counts for all 9 sizes. The parenthesis at the end of the row are the stitch counts for all 9 sizes. The parenthesis within the row are the instructions for all 9 sizes.
Stitches and Abbreviations (US Terms)
- Fsc - Foundation Single Crochet
- Sc - Single Crochet
- Ch(s) - Chain
- Dc - Double Crochet
- St(s) - Stitch(es)
- Sk - Skip
- Sp - Space
- Sl St - Slip Stitch
- RS - Right Side
- WS - Wrong Side
Yarn A - 24/7 Cotton DK “Nightshade”
Yarn B - 24/7 Cotton DK “Azul”
How To Carry Yarn B Throughout The Pattern:
On the last St of Row 1, we will be bringing in Yarn B to begin carrying. Right before the final YO and pull through of the Sc, place Yarn B on your hook and finish your St still with Yarn A to attach.
You will always be working your Sts with Yarn A and carrying Yarn B.
For the Starting Ch 3’s, place Yarn B on your hook from front to back, then work a Ch like normal with Yarn A, doing so 3 times.
To carry the yarn through the Dc V-Sts with Yarn A, YO and insert hook into indicated St. Next, make sure Yarn B is placed across the top of your hook. Then, YO and pull up a loop, YO and pull through 2, now place Yarn B over hook from front to back, YO and pull through both loops to finish your Dc. For the Ch 1, place Yarn B on hook from front to back, YO and pull through. Repeat the same steps for the previous Dc to finish.
Pattern
Back Panel - With Yarn A
Row 1(RS): 81(87, 93, 102, 111, 117, 126, 132, 138) Fsc, turn. (81(87, 93, 102, 111, 117, 126, 132, 138) Sc) Alternatively, you can add 1 more than the number listed above, work 1 Sc into the second Ch from the hook and across for the same St count.
Don’t forget to bring in Yarn B at the end of Row 1.
Row 2: Ch 3 (counts as 1 Dc here and throughout), 1 Dc in same St, Sk 1, [1 Dc, Ch 1, 1 Dc] into next St, *Sk 2, [1 Dc, Ch 1, 1 Dc] in next*, repeat from * to * across row until 3 remain, Sk 2, 1 Dc in last, turn. (81(87, 93, 102, 111, 117, 126, 132, 138) Sts)
Row 3: Ch 3, 1 Dc in same St, *Sk 2 (skipping the Dc and the Ch-1 Sp), [1 Dc, Ch 1, 1 Dc] into next St*, repeat from * to * across row until 2 remain, Sk 1, 1 Dc in last (top of turning ch), turn. (81(87, 93, 102, 111, 117, 126, 132, 138) Sts)
Rows 4-32(32, 34, 36, 36, 38, 40, 42, 42): Repeat Row 3.
Fasten off.
Front Panel - With Yarn A
Row 1(RS): 81(87, 93, 102, 111, 117, 126, 132, 138) Fsc, turn. (81(87, 93, 102, 111, 117, 126, 132, 138) Sc) Alternatively, you can add 1 more than the number listed above, work 1 Sc into the second Ch from the hook and across for the same St count.
Don’t forget to bring in Yarn B at the end of Row 1.
Row 2: Ch 3 (counts as 1 Dc here and throughout), 1 Dc in same St, Sk 1, [1 Dc, Ch 1, 1 Dc] into next St, *Sk 2, [1 Dc, Ch 1, 1 Dc] in next*, repeat from * to * across row until 3 remain, Sk 2, 1 Dc in last, turn. (81(87, 93, 102, 111, 117, 126, 132, 138) Sts)
Row 3: Ch 3, 1 Dc in same St, *Sk 2 (skipping the Dc and the Ch-1 Sp), [1 Dc, Ch 1, 1 Dc] into next St*, repeat from * to * across row until 2 remain, Sk 1, 1 Dc in last (top of turning ch), turn. (81(87, 93, 102, 111, 117, 126, 132, 138) Sts)
Rows 4-28(28, 30, 32, 32, 34, 36, 38, 38): Repeat Row 3.
We will now be splitting the neckline.
Row 29(29, 31, 33, 33, 35, 37, 39, 39): Ch 3, 1 Dc in same St, *Sk 2 (skipping the Dc and the Ch-1 Sp), [1 Dc, Ch 1, 1 Dc] into next St*, repeat from * to * 6(7, 8, 9, 10, 11, 12, 13, 14) more times, Sk 1 St, 1 Dc in next St, turn. (24(27, 30, 33, 36, 39, 42, 45, 48) Sts)
Rows 30(30, 32, 34, 34, 36, 38, 40, 40)-32(32, 34, 36, 36, 38, 40, 42, 42): Repeat Row 3.
Fasten off, leave a long tail for seaming the last row to your back panel.
Opposite Shoulder (Right When Worn)
Create a slip knot with both Yarn A and B on your hook.
With your panel out in front of you and the finished shoulder on the right-hand side, count 24(27, 30, 33, 36, 39, 42, 45, 48) Sts in from the left towards the center of the panel and Sl St to join with Yarn A (Yarn B is still attached to the hook as well).
Rows 29(29, 31, 33, 33, 35, 37, 39, 39)-32(32, 34, 36, 36, 38, 40, 42, 42): Repeat Row 3.
Fasten off, leave a long tail for seaming the last row to your back panel.
Sleeves (Make 2)
With Yarn A (leave a long starting tail for seaming the first row made to your sweater)
Row 1(RS): 48(51, 54, 57, 63, 69, 72, 78, 78) Fsc, turn. (48(51, 54, 57, 63, 69, 72, 78, 78) Sc) Alternatively, you can add 1 more than the number listed above, work 1 Sc into the second Ch from the hook and across for the same St count.
Don’t forget to bring in Yarn B at the end of Row 1.
Row 2: Ch 3 (counts as 1 Dc here and throughout), 1 Dc in same St, Sk 1, [1 Dc, Ch 1, 1 Dc] into next St, *Sk 2, [1 Dc, Ch 1, 1 Dc] in next*, repeat from * to * across row until 3 remain, Sk 2, 1 Dc in last, turn. (48(51, 54, 57, 63, 69, 72, 78, 78) Sts)
Row 3: Ch 3, 1 Dc in same St, *Sk 2 (skipping the Dc and the Ch-1 Sp), [1 Dc, Ch 1, 1 Dc] into next St*, repeat from * to * across row until 2 remain, Sk 1, 1 Dc in last (top of turning ch), turn. (48(51, 54, 57, 63, 69, 72, 78, 78) Sts)
Rows 4-32(32, 32, 30, 30, 30, 28, 28, 28): Repeat Row 3.
Fasten off, leave a long tail for seaming the cuff to the underarm.
Note: This is an oversized drop-shoulder style pullover. The wider the front/back panels are, the shorter the sleeve needs to be because they join further down your bicep. That’s why the smaller sizes have more rows than the larger. You can easily adjust your sleeve length by adding or taking away as many rows as needed. Sleeves are written with length to cuff.
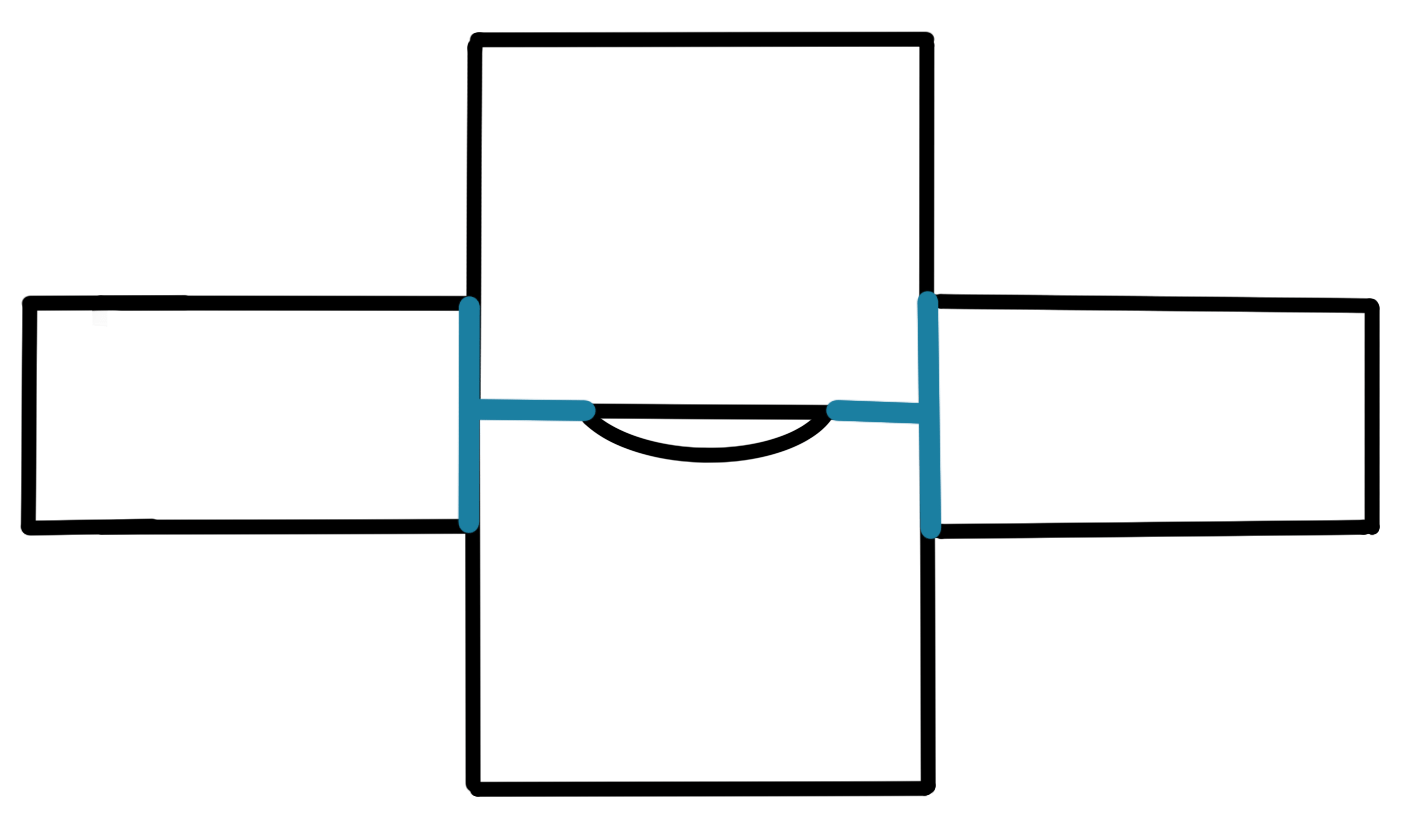
Assembly
Block your panels to the measurements listed above. I recommend a steam block.
Place your front and back panels together RS facing.
Using your preferred seaming method, attach the front panel to the back panel at the shoulders (I used a needle and did the mattress stitch across). Be sure your panels are aligned and that you aren’t bunching or skipping stitches.
Next, using the same joining process as above, we will be attaching the sleeves to the pullover. Make sure the center of the sleeve is aligned with the shoulder seam. Be sure to check that your sleeves are even on both the front and back panel as you go. It is helpful to use SM’s here to keep your sleeve in place as you join.
Finally, fold your pullover so that the back and front panels are on top of each other, RS facing. Seam from the cuffs to the underarm and down the side of the pullover.

Neckline Trim
With your top RS out, join yarn with a Sl St to the left of the shoulder seam on the left side. Ch 1, 1 Sc in each St across the back panel, Sc evenly down the side of the front panel shaping, working approximately 2 Sc per row, 1 Sc in each St across the front neckline, Sc evenly up the final side working approximately 2 Sc per row. Sl St to the first Sc made to join. Note: St count is not crucial here. If you want a smaller neckline and less of a "off the shoulder" look, simply add more rounds to the neckline trim until you reach your desired fit.
Fasten off and weave in any remaining ends.