Crochet Walker Tote Bag


The Crochet Walker Tote Bag is not just a practical accessory but a stylish and convenient way to carry your essentials while on the go.
With its sturdy straps and spacious design, it's perfect for keeping your belongings secure and accessible as you take a stroll or run errands. Whether you're carrying water bottles, books, or snacks, this tote bag is a charming and functional addition to your daily routine.
Get ready to crochet your way to both fashion and functionality with this delightful Walker Tote Bag!
Materials
- Worsted Weight 4 yarn - 285 yds - 350 yds
- Hook - H or 5mm
- Needle
- Scissors
- Hot Glue - optional for extra security if you prefer to glue straps and buttons as opposed to sewing them on
- Buttons 1 ¼ in; 6 or more if needed for your particular style walker *if using buttons to attach
- Velcro - *optional if you do not want to use buttons
Stitches
- Ch - chain
- Sc - single crochet
- Dc - double crochet
- Sk - skip a stitch
- Sp - space
- Hdc - half double crochet
- CSFS - Camel Stitch Front Side
- St/Sts - Stitch/Stiches
- #st - complete # number of sts in same space
- St # - complete stitch in next # number of spaces
Special Stitches
Lemon Peel Stitch
The lemon peel stitch is a beautiful stitch that is made by alternating the single crochet and double crochet stitches on each row like in the example below. With the alternating heights of each stitch in each row, it creates a subtle texture like you would find on the peel of a lemon!
Lemon Peel Instructions
- Begin: Ch multiples 2 + 1
- Row 1: *Sc, dc*, repeat to end.
- Row 2: Turn, *sc, dc*, repeat to end.
Note: The beginning stitch of the next row will always be opposite of the last stitch of the prior row.
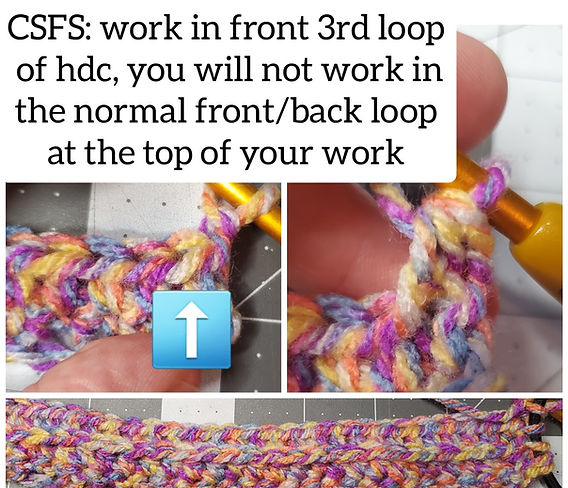
Camel Stitch Front Side
For this pattern, work a half double crochet stitch into the 3rd loop on the front side of your work. You will not be using the traditional front or back loop at the top of your work. See next photo for assistance.
Pattern Info
Size
- Approx. 15 inches wide
- Approx. 14 inches tall before being folded over top
- Pockets are approx. 6 inches deep
This pattern will make a pocket for a walker to hold lightweight items, such as tissues, reading glasses, or a small book. To make it stronger to hold heavier items, I would recommend sewing a piece of fabric to the back sides of each panel and the straps or try using two strands of yarn.
Because every walker is different, you may need to make your straps longer or try a different method for attaching the pocket to the walker such as using tie strings that you could tie and knot when attaching. If you need your pocket wider/slimmer you can simply increase or decrease the beginning chain on the Main Panel and Pocket Panel sections. To make it taller/shorter you can increase or decrease the rows as needed on both the Main Panel and Pocket Panel sections as well.
This pattern is written in a way that you can easily customize your pocket to fit the particular walker you are making it for. Every piece is made separately so that you can customize it to meet your needs. For example, you may need more or less straps. Therefore they are made completely separate so that you can make as many as you would like and attach them where needed.
The walker pocket that I made fits a walker that is 19 inches wide. I folded over the top four inches of my walker pocket in order to fasten it. This leaves roughly 9 to 10 inches in the front. The pockets are approximately 6 inches deep.
Swatch/Gauge Info
- Foundation Ch: Multiples of 2+1
- Swatch Size: Approx. 6in square
- Approx: 4 st per inch
Swatch Instructions
- Begin: Ch 23
- Row 1: Hdc in 2nd ch from hook, hdc next 21, ch 1. (22st)
- Row 2: Turn, hdc 22, ch 1. (22st)
- Row 3: Turn, CSFS 22, ch 1. (22st)
- Row 4: Turn, hdc 22, ch 1. (22st)
- Row 5 - 8: Turn, *sc, dc*, repeat *to* across, ch 2. (22st)
- Row 9: Turn, hdc 22, ch 1. (22st)
- Row 10 - 16: Repeat rows 2 - 8.
Pattern Instructions
Note: Beginning/Turning chs do not count as a stitch
Main Panel
- Begin: Ch 53
- Row 1: Hdc in 2nd ch from hook, hdc next 51, ch 1. (52st)
- Row 2: Turn, hdc 52, ch 1. (52st)
- Row 3: Turn, CSFS 52, ch 1. (52st)
- Row 4: Turn, hdc 52, ch 1. (52st)
- Row 5 - 8: Turn, *sc, dc*, repeat *to* across, ch 2. (52st)
- Row 9 & 10: Turn, hdc 52, ch 1. (52st)
- Row 11: Turn, CSFS 52, ch 1. (52st)
- Row 12: Turn, hdc 52, ch 1. (52st)
- Row 13 - 16: Turn, *sc, dc*, repeat *to* across, ch 2. (52st)
- Row 17 - 32: Repeat rows 9 - 16 twice. (52st)
- Row 33 - 36: Repeat rows 9 - 12. (52st)
Finish: Sc around all four sides to create the border, sl st to join, fasten off.
Pocket Panel
Note: If you would like to make an extra set of pockets you can make a second one and add as many rows as you like to get the height you would like. Sew this panel between the back piece and the original pocket panel.
- Begin: Ch 53
- Row 1: Hdc in 2nd ch from hook, hdc next 51, ch 1. (52st)
- Row 2: Turn, hdc 52, ch 1. (52st)
- Row 3: Turn, CSFS 52, ch 1. (52st)
- Row 4: Turn, hdc 52, ch 1. (52st)
- Row 5 - 8: Turn, *sc, dc*, repeat *to* across, ch 2. (52st)
- Row 9: Turn, hdc 52, ch 1. (52st)
- Row 10 - 16: Repeat rows 2 - 8. *if you would like your pockets deeper you can add additional rows as desired before finishing
Finish: Sc around all four sides to create the border, sl st to join, fasten off.
Note: If you do not want to use straps and buttons, you can make long chains, fold them in half, and attach the middle points to desired locations on the walker pocket. Then you can simply tie and knot the strings. Alternatively, you could make straps using Velcro for easier assembly.
10-inch Straps
Make 2 or more if needed/desired
- Begin: Ch 37
- Row 1: Hdc in 2nd ch from hook, hdc 35, ch 1. (36st)
- Row 2: Turn, sc 28, ch 4, sk 4, sc 4, ch 1. (36st including ch 4)
- Row 3: Turn, hdc 4, hdc 4 around ch 4, hdc 28, fasten off. (36st)
Note: If you would like your straps wider/thicker for more support you can add a sc or hdc row around the border, same applies for 3-inch straps below.
3-inch Straps
Make 3 or more if needed/desired
- Begin: Ch 11
- Row 1: Hdc in 2nd ch from hook, hdc 9, ch 1. (10st)
- Row 2: Turn, sc 3, ch 4, sk 4, sc 3, ch 1. (10st including ch 4)
- Row 3: Turn, hdc 3, hdc 4 around ch 4, hdc 3, fasten off. (10st)
Final Assembly
Begin:
Depending on how you made your walker pocket, you may need to use your own method for assembling.
If you made your walker pocket following the instructions exactly, then you can assemble yours in the same manner as I did:
First, I sewed two of the 3-inch straps to the top back ends of the main panel. Then I sewed the third 3-inch strap to the center.
Next, I folded my walker pocket over the top bar of my walker and measured where I would need to attach my buttons.

After measuring, I found that 6.5 inches was where I needed to sew the three buttons.
Note: You can either sew your pocket panel on first and then sew the bottom straps on working through both panels, or you can sew them onto the back of the main panel and then sew your pocket over top of the straps.
I sewed my pocket on first by lining up the edges and sewing the outer edges together. I measured to the center of the pocket and did a single running stitch with yarn and needle down the middle.
Next, I attached my 10-inch straps to the back of the two combined panels approx. 2.5 inches from the bottom.
Lastly, I attached my walker pocket to the walker and buttoned the top three straps. I wrapped the 10-inch straps around the leg of the walker to the back of the pockets to find the best position for my buttons and found 2.5 inches from the bottom and 2 inches from the outer edge gave me the best tension. I made sure I did not sew the button through both panels by putting one hand inside the pocket so that I was only sewing through the back panel.
To finish, I attached my walker pocket to the walker and made adjustments as necessary. You can test it by putting items in it and then moving the buttons if needed to help the tension.
If additional support is wanted/needed, you can make a few more straps and add them where needed. For a final extra special touch, feel free to add an applique or letters for it to have a personalized touch!
And just like that, you are finished!