Fluffy Woolly Lamb Crochet Pattern

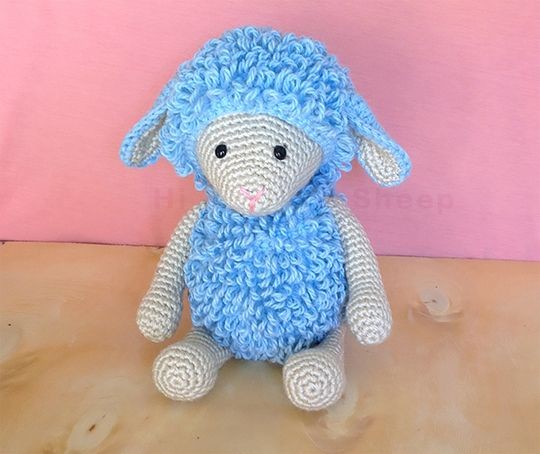
Get ready to meet the adorable Fluffy Woolly Lamb! This charming crochet creation is the perfect addition to your collection of handmade toys. With its soft and shaggy texture, this little lamb is sure to capture your heart. Its fluffy wool-like appearance is achieved through the art of crochet, where loops of yarn are intricately woven together to create a unique and cuddly toy.
The Fluffy Woolly Lamb is not only a delightful playmate but also a wonderful decorative piece that adds a touch of whimsy to any room. Whether you're a crochet enthusiast or simply looking for a special gift, this crochet shaggy sheep is a must-have! The shaggy texture is achieved by using a specific crochet technique that creates loops and strands, giving the sheep its unique appearance. Each stitch is carefully placed, resulting in a beautifully textured body and a fluffy head that you can't resist cuddling.
The eyes and nose are meticulously embroidered, adding a touch of personality to your woolly creation. Whether you're a beginner or an experienced crocheter, the crochet shaggy sheep is a delightful project that allows you to express your creativity and create a cherished keepsake.
I used Yarn, a 3 mm hook, and the finished sheep is about 17 cm / 6.7 inches tall (without measuring the legs, because it is sitting).
I hope you enjoy.
Abbreviations:
R: round
sc: single crochet
sl st: slip stitch
inc: increase
dec: decrease
ch: chain
lp st: loop stitch
hdc: half double crochet
dc: double crochet
mr: magic ring
**: repeat to the end of round
[...] total stitches at the end of round
Body
We are always working with loop stitch except for the magic ring.
R1: 6 sc in mr, close with sl st.
R2: *lp st inc* [12]
R3: *1 lp st, 1 lp st inc* [18]
R4: *2 lp st, 1 lp st inc* [24]
R5: *3 lp st, 1 lp st inc* [30]
R6: *4 lp st, 1 lp st inc* [36]
R7: *5 lp st, 1 lp st inc* [42]
R8: *6 lp st, 1 lp st inc* [48]
R9-16: 48 lp st
R17: *6 lp st, 1 lp st dec* [42]
R18: 42 lp st
R19: *5 lp st, 1 lp st dec* [36]
R20: 36 st
R21: *4 lp st, 1 lp st dec* [30]
R22: *3 lp st, 1 lp st dec* [24]
R23: *2 lp st, 1 lp st dec* [18]
Cut yarn leaving long end to sew to head later. Stuff.
Hands
Make 2.
R1: 6 sc in magic ring, close with sl st.
R2: *sc inc* [12]
R3: *1 sc, sc inc* [18]
R4-6: 18 sc
R7: *4 sc, sc dec* [15]
R8: 3 sc dec, 9 sc [12]
R9-20: 12 sc
Cut yarn leaving long end to sew to body. Stuff firmly at the bottom and slightly at the top.
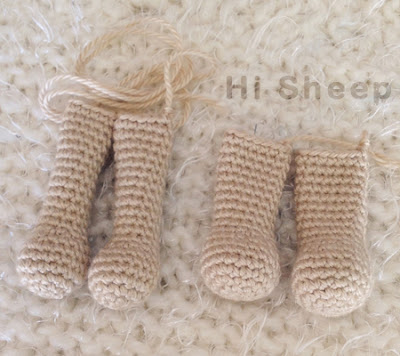
Legs
Make 2.
R1: 6 sc in magic ring, close with sl st.
R2: *sc inc* [12]
R3: *1 sc, sc inc* [18]
R4: *5 sc, sc inc* [21]
R5-7: 21 sc
R8: *5 sc, sc dec* [18]
R9: 3 sc dec, 12 sc [15]
R10-19: 15 sc
Cut yarn leaving long end to sew to body. Stuff firmly the bottom and slightly at the top.
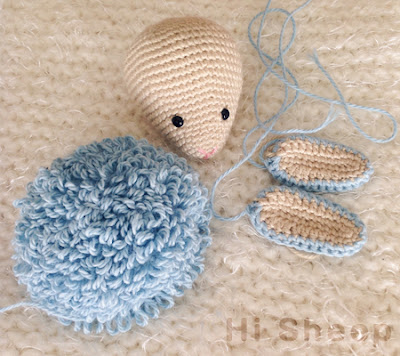
Head
Stuff as you go. I placed the eyes between R8 and R9.
R1: 6 sc in magic ring, close with sl st.
R2: *sc inc* [12]
R3: *1 sc, sc inc* [18]
R4: *2 sc, sc inc* [24]
R5-6: 24 sc
R7: *3 sc, sc inc* [30]
R8: *4 sc, sc inc* [36]
R9-10: 36 sc
R11: *5 sc, sc inc* [42]
R12: *6 sc, sc inc* [48]
R13: 48 sc
R14: *7 sc, sc inc* [54]
R15-20: 54 sc
R21: *7 sc, sc dec* [48]
R22: *6 sc, sc dec* [42]
R23: *5 sc, sc dec* [36]
R24: *4 sc, sc dec* [30]
R25: *3 sc, sc dec* [24]
R26: *2 sc, sc dec* [18]
R27: *1 sc, sc dec* [12]
R28: *sc dec* [6]
Close. With pink yarn, I embroidered a little V for the nose and a straight line for the mouth.
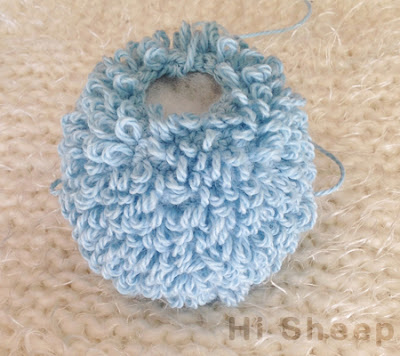
Hair
We are always working with loop stitch except for the magic ring.
R1: 6 sc in magic ring, close with sl st.
R2: *lp st inc* [12]
R3: *1 lp st, 1 lp st inc* [18]
R4: *2 lp st, 1 lp st inc* [24]
R5: *3 lp st, 1 lp st inc* [30]
R6: *4 lp st, 1 lp st inc* [36]
R7: *5 lp st, 1 lp st inc* [42]
R8: *6 lp st, 1 lp st inc* [48]
R9-13: 48 lp st
R14: *14 lp st, 1 lp st dec* [45]
R15-16: 45 lp st
Cut yarn leaving long end to sew to the head.
Ears
We are making four total: 2 with skin color and 2 with fur color.
Base: 12 ch
R1: 10 sc, 3 sc in the same ch, 10 sc, 1 sc inc [25]
R2: 4 dc, 4 hdc, 8 sc, 4 hdc, 4 dc, 1 hdc
Don't cut the yarn when making the fur one since we are going to be joining it with the skin piece.
To assemble ear: Place the skin piece facing the fur piece and aligning the stitches. Increase in the first stitch inserting the hook through the stitches of both pieces, keep joining around 25 sc (always making sure you are inserting the hook through both pieces), increase one more time, make 1 sc and you'll finish with 28 sts. Cut the yarn leaving long end to sew to the head.
Sew pieces accordingly and done!