Crochet Amigurumi Bunny Miffy Toy

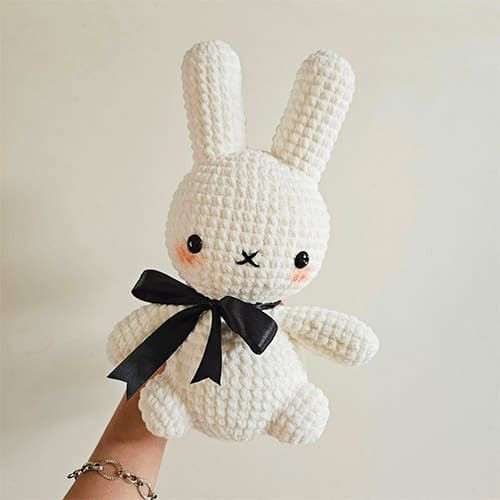
The Crochet Amigurumi Bunny Miffy Toy is an adorable and huggable creation that is sure to bring a smile to anyone's face. With its soft yarn and charming design, this bunny toy is perfect for cuddling or displaying as a cute decoration. Whether you're a seasoned crocheter or just starting out, creating this lovable Miffy toy will surely fill your heart with joy. Make one for yourself or a loved one and spread the happiness with this delightful handmade treasure!
Materials
To create this delightful bunny toy, you will need the following materials:
- Any size yarn in white (I used sweet snuggles, size 6)
- Crochet hook (I used 6.0mm)
- Yarn/darning needle
- Stitch markers
- Scissors
- Polyfill/stuffing
- Black felt or safety eyes (I used 20mm)
- Fabric glue/hot glue
The final size is around 9 inches tall when using size 5 yarn and a 6.0mm hook.
Abbreviations
- R - round
- MR - magic ring
- sc - single crochet
- sts - stitches
- slst - slip stitch
- inc - increase
- dec - decrease
- FO - fasten off
Head
Follow these instructions to create the head:
- R1. 6 sc in MR (6)
- R2. (inc)x6 (12)
- R3. (sc,inc)x6 (18)
- R4. (sc,inc,sc)x6 (24)
- R5. (3sc,inc)x6 (30)
- R6. (2sc,inc,2sc)x6 (36)
- R7. (5sc,inc)x6 (42)
- R8. (3sc,inc,3sc)x6 (48)
- R9-16. sc all around (8 rounds) (48)
- Place safety eyes in R14-15, 8 sts apart. Begin stuffing firmly.
- R17. (3sc,dec,3sc)x6 (42)
- R18. (5sc,dec)x6 (36)
- R19. (2sc,dec,2sc)x6 (30)
- R20. (3sc,dec)x6 (24)
- R21. (sc,dec,sc)x6 (18)
- R22. (sc,dec)x6 (12)
- Finish stuffing.
- R23. (dec)x6 (6)
- FO, close hole with tail.
Ears X2
Instructions for creating the ears:
- R1. 8 sc in a MR (8)
- R2. (inc)x8 (16)
- R3-13. sc all around (11 rounds) (16)
- Slst, FO, stuff firmly, leave long tail for sewing later.
Body
Create the body with these steps:
- R1. 6 sc in MR (6)
- R2. (inc)x6 (12)
- R3. (sc,inc)x6 (18)
- R4. (sc,inc,sc)x6 (24)
- R5. (3sc,inc)x6 (30)
- R6. (2sc,inc,2sc)x6 (36)
- R7. (5sc,inc)x6 (42)
- R8-12. sc all around (5 rounds) (42)
- R13. (5sc,dec)x6 (36)
- Begin stuffing as you go.
- R14. sc all around (1 round) (36)
- R15. (2sc,dec,2sc)x6 (30)
- R16. (3sc,dec)x6 (24)
- R17. sc all around (1 round) (24)
- R18. (sc,dec,sc)x6 (18)
- R19. sc all around (1 round) (18)
- Finish stuffing, slst. FO, leave long tail for sewing later.
Legs X2
Follow these instructions to create the legs:
- R1. 8 sc in MR (8)
- R2. (inc)x8 (16)
- R3-5. sc all around (3 rounds) (16)
- Slst, FO. Stuff, leave long tail for sewing later.
Arms X2
Instructions for the arms:
- R1. 5 sc in MR (5)
- R2. (inc)x5 (10)
- R3. (2sc,inc)x3, 1 sc (13)
- R4-7. sc all around (4 rounds)(13)
- R8. (2sc,dec)x3, 1 sc (10)
- R9-11. sc all around (3 rounds) (10)
- Stuff lightly, fold in half and do 4 sc to close.
- FO, leave long tail for sewing later.
Tail
Follow these steps to create the tail:
- R1. 5 sc in MR (5)
- R2. (inc)x5 (10)
- R3-4. sc all around (2 rounds) (10)
- R5. (dec)x5 (5)
- Stuff lightly, slst. FO. Leave a long tail for sewing later.
Assembly
Now it's time to assemble your bunny:
- Sew head to body on R21.
- Sew legs to bottom of body on R6-10, 7 sts apart.
- Sew arms to sides of the body, under the head on R18-19, 6 sts apart.
- Sew ears on top of head, on R2-8, 2 sts apart.
- Cut out an X shape for the mouth or embroider yarn on R14-15, in the middle of the eyes.
- Sew tail in the middle of the back of the body, on R7-8.