Crochet Amigurumi M&Ms Candies Keychain Tutorial

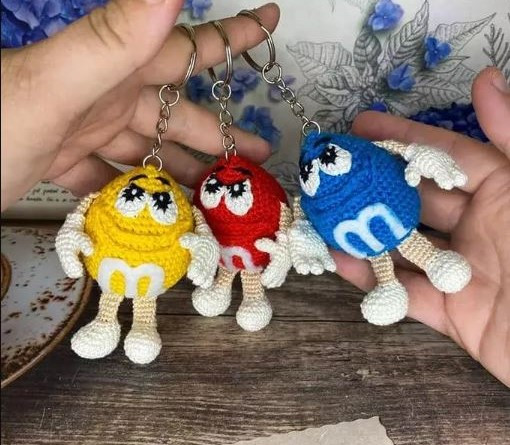
If you're looking for a cute and fun accessory to add to your keys, a Crochet Amigurumi M&Ms Candies Keychain is just what you need! This adorable keychain is not only practical but also adds a touch of sweetness to your everyday essentials. Handcrafted with love and attention to detail, it's sure to bring a smile to your face every time you reach for your keys. Whether you're a fan of quirky accessories or have a sweet tooth, this Crochet Amigurumi M&Ms Candies Keychain is a delightful way to jazz up your keyring and show off your unique style.
Materials and Tools
The following materials and tools are needed for this project:
- Yarn Gazzal Baby Cotton (base for body, arms, and legs)
- Yarn Iris (for eyes)
- Hook 1 mm and 1.75 mm
- Filler for toys
- Knitting markers
- Pins
- Felt white
- Keychain Accessories
- Needle for sewing parts
- Scissors
Legend
While crafting, you will encounter the following abbreviations:
- KA – amigurumi ring
- ps – half column
- VP – air loop
- ss – connecting post
- sc – single crochet
- dc – double crochet
- pr – increase
- dec – decrease
- (…) xn – repeat n times
Hands (2 Parts)
We knit 8 fingers, do not cut the thread from two. Use white Iris yarn.
- sc in KA
- 2-4: 6 sbn
- We connect the fingers:
- Connect 3 sbn with the 2nd finger, 6 sbn with the 3rd finger, on the second side 3 sbn for 2 fingers and 6 sbn for 1 finger.
- 18 sbn
- Attach 4 sbn, at the left handle, 3 sbn with a finger on both sides, 15 sbn (18)
- 18 sbn
- (4 sbn, dec) x 3 (15)
- 15 sbn, 11 (3 sc, dec) x 3 (12) Change the thread to beige, cut the white one, but leave it for tying the handle.
- Behind the back wall 12 sc
- 13-18: 12 sb Lightly stuff only the palm
- 6 sc on both sides of the handle, fasten, leave the thread for sewing. The right handle is knitted in the same way, only we knit the 7th row: 6 sc, 3 sc for both sides of 4 fingers and to the end of the row.
In the 12th row, knit 12 sc behind the front wall with white thread.
Eyes
The eyes are completely knitted. Use black thread Iris (or equivalent):
- 5 ch in the second from the hook 1 sbn, 1 sbn, in the last 3 sbn and on the second side 2 sbn. Change the thread to white 2, 1 sbn, 1 ps, inc from ssn, 1 ps, 1 sbn. Fasten the thread and leave for sewing.
Egg Body
- 7 sbn in KA
- 7 inc
- 14 sbn
- 1 sbn, inc x 7
- 21 sbn
- 2 sbn, inc x 7
- 28 sbn
- 3 sbn, inc x 7
- 9-17: 35 sbn
- 3 sbn, dec x 7
- 28 sbn
- 2 sbn, dec x 7
- 21 sbn
- 1 sbn, dec x 7
- 7 dec
Fasten the thread and hide it in the body.
Legs (2 Parts)
Use white thread:
- 6 in KA
- 6 inc
- 1 sc, inc x 6
- 2 sc, inc x 6
- 5-6: 24 sbn
- 6 sbn, 6 dec, 6 sbn
- 3 sbn, 6 dec, 3 sbn
- Change the thread to beige, cut the white one and leave the end for tying.
- We knit 12 sbn
- 10-15 behind the back wall: 12 sc
- Fasten the thread to both walls 6 sc, cut it and leave it for sewing.
In the 9th row, knit 12 sc with white thread behind the front wall. I knitted the mouth using my keychain. I collected a chain from ch and sewed it to the body.
Assembling the Toy
When designing a toy, we focus on the main photo.
Sew on eyes, arms, and legs, embroider eyebrows. I cut out the letter from felt and glued it to the body.
Sew on a chain with a ring.