Crochet Jar Lid Covers – A Charming Addition to Your Home

Crochet jar lid covers are a wonderful way to add charm and personality to your kitchen or crafting space. Not only do they serve a practical purpose by keeping your jars sealed and contents fresh, but they also bring a touch of handmade warmth to your home. With endless possibilities for colors, patterns, and designs, you can customize your jar lid covers to match your decor or create unique gifts for friends and family. Whether you're a seasoned crocheter or just starting out, making these covers can be a fun and rewarding project that adds a special handmade touch to your everyday items. Get creative, pick up your crochet hook, and start transforming your jars into charming pieces of art!
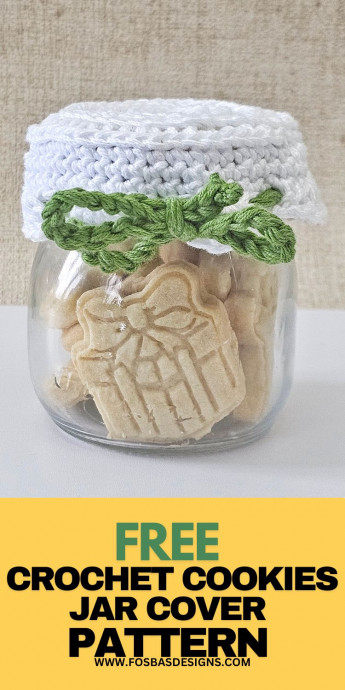
Crochet Cookies Jar Cover Finished Measurement
Base: Measures 4” across
Side: 2”
Materials Needed for Crochet Cookies Jar Cover
Yarn = 24/7 Cotton – Worsted weight, #4 lightweight (100% Cotton, 186 yd/170 m per 3.5 oz/100g skein)
Estimated Yardage
Main color: 20 yards
Contrasting color: 5 yards
Hook: 4 mm Crochet Hook
Gauge: Gauge isn’t essential for this project.
Pattern Notes
- Please kindly read through the pattern before starting.
- Any #4 weight of yarns can be substituted.
- Chains at the beginning of Rounds or Rows do not count as a stitch except when stated otherwise.
Difficulty Level
Easy
Terms Used
US Terminology
Stitches
- Chain(s) – ch(s)
- Magic ring – MR
- Single Crochet – sc
- Half Double Crochet – hdc
- Slip Stitch – sl st.
- Third Loop
- BLO – Back Loop Only
- Shell – 5 dc in indicated stitch.
- Shell Cluster – (3 dc, ch 3, 3 dc) in the same chain space indicated.
Crochet Jar Lid Covers Free Pattern
With Main Color
Round 1: In a magic ring, ch 2 (does not count as a stitch), 12 hdc in magic ring. 12 hdc.
Skip the beginning chains, and do not join.
Place a stitch marker at the end of the round and move it after every round.
In the 3rd loop from here on.
Round 2: 2 hdc in each st around. 24 hdc
Round 3: *hdc in next, 2 hdc in next, repeat from * around. 36 hdc
Round 4: *hdc in next 2 sts, 2 hdc in next, repeat from * around. 48 hdc
sl st to the next st to close the height difference.
Round 5: Ch 1, in BLO, sc in each st around. 48 sc
In both loops from throughout.
Rounds 6 – 7: Ch 1, sc in each st around, join with a sl st to the beginning chain. 48 sc
- There are two options for the lace edging. Use either option 1 or 2.
Option 1: Short Shell Edging with Eyelets
Round 8: Ch 1, sc in same st, skip next 2 sts, 5 dc in next st, *skip next 2 sts, sc in next st, skip next 2 sts, 5 dc in next st, rep from * around, skip last 2 sts, join with a sl st to the ch sp.
Fasten off.
Weave in all ends.
Option 2: Eyelets with Shell Cluster Opening
Round 8: Ch 4, *skip next st, dc in next st, ch 1, rep from * around, join with a sl st to the beginning chain. 24 ch sp/dc
Round 9: Ch 3, (2 dc, ch 3, 3 dc) in first chain sp, *sc in next ch sp, (3 dc, ch 3, 3 dc), rep from * until the last ch sp, sc in last ch sp, join with a sl st to the beginning chain. 12 sc, 12 shells
Fasten off.
Weave in all ends.
Section 2: Tie
With Contrasting Color
Chain 85, fasten off yarn.
Thread the tie through the spaces created from the skipped stitches.
Create a bow with the excess.