How to Crochet Gigi the Galah Bird Toy

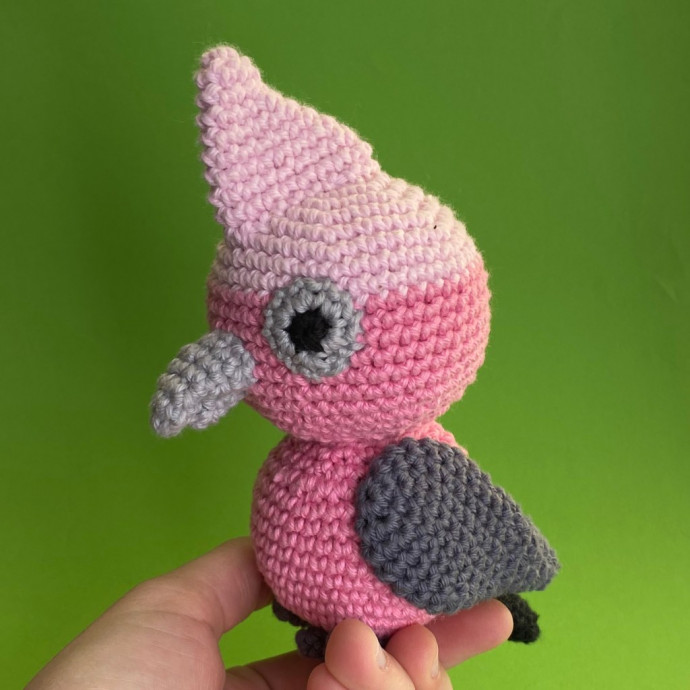
The Crochet Gigi the Galah Bird Toy is a charming and unique addition to any stuffed toy collection. With its vibrant colors and intricate details, this crochet creation brings a touch of whimsy and creativity to playtime. Crafted with care and skill, Gigi the Galah is sure to become a beloved companion for children and adults alike. Its soft texture and adorable design make it not just a toy, but a cherished keepsake that can be enjoyed for years to come. Whether displayed on a shelf or cuddled close, this handmade bird toy is bound to bring joy and smiles to all who encounter it.
Materials
- DK or 8ply yarn in dark pink, light pink, dark grey, light grey and black (I like to use the Ricorumi DK)
- 3.75 (F) crochet hook
- Stitch marker, tapestry needle and scissors
- Polyfill
Abbreviations Used (U.S. Terms)
- sc: single crochet
- st: stitch
- *…*: repeat
- inc: 2 single crochet in the same stitch
- dec: single crochet 2 stitches together through front loop only (invisible decrease)
Finished size: approx. 15 cm/ 6 inches
All pieces are worked through both loops of the stitches and in the round without joining unless stated otherwise in the pattern. It is recommended to use a stitch marker to mark the beginning of each round. To make it easier, stuff the head and the body as you go.
Instructions for Parts
Eyes – Starting in Black (Make 2)
Work in rounds
Round 1: sc 6 in magic ring
Change to light grey
Round 2: inc in each st around
Fasten off leaving a long tail for sewing.
Beak Bottom – In Light Grey (Make 1)
Work in rounds
Round 1: sc 4 in a magic ring
Round 2: sc in each st around
Round 3: *sc 1, inc* around
Round 4: sc in each st around
Fasten off leaving a long tail for sewing.
Beak Top – In Light Grey (Make 1)
Work in rounds
Round 1: sc 6 in a magic ring
Rounds 2-3: sc in each st around
Round 4: *sc 2, inc* around
Round 5: *sc 3, inc* around
Round 6: sc in each st around
Fasten off leaving a long tail for sewing.
Head – Starting in Light Pink (Make 1)
Work in rounds
Round 1: sc 6 in a magic ring
Round 2: inc in each st around
Round 3: *sc 1, inc* around
Round 4: *sc 2, inc* around
Round 5: *sc 3, inc* around
Round 6: *sc 4, inc* around
Round 7: *sc 5, inc* around
Rounds 8-9: sc in each st around
Change to dark pink
Rounds 10-16: sc in each st around
Round 17: *sc 5, dec* around
Round 18: *sc 4, dec* around
Round 19: *sc 3, dec* around
Round 20: *sc 2, dec* around
** If using safety eyes, insert them in the middle of the eye pieces and attach them to the head now, following the assembly instructions.
Fasten off leaving a long tail for sewing and stuff the head.
Body – In Dark Pink (Make 1)
Work in rounds
Round 1: sc 6 in a magic ring
Round 2: inc in each st around
Round 3: *sc 1, inc* around
Round 4: *sc 2, inc* around
Round 5: *sc 3, inc* around
Round 6: *sc 4, inc* around
Rounds 7-13: sc in each st around
Round 14: *sc 4, dec* around
Round 15: *sc 3, dec* around
Round 16: *sc 2, dec* around
Fasten off leaving a long tail for sewing and stuff the body.
Feet – In Dark Grey (Make 2)
Work in rounds
Round 1: sc 4 in a magic ring
Rounds 2-3: sc in each st around
Fasten off first toe and weave in ends. Start with the second toe, you will then attach the first toe back and continue with the back of the foot.
Round 1: sc 4 in a magic ring
Rounds 2-3: sc in each st around
Round 4: continuing from the toe that is on your hook, sc 4 onto the first toe to attach it, then sc 4 around the second toe
Round 5: *dec* around
Round 6: sc in each st around
Fasten off leaving a long tail for sewing to the body.
Wings – In Dark Grey (Make 2)
Work in rounds
Round 1: sc 6 in a magic ring
Round 2: inc in each st around
Round 3: *sc 1, inc* around
Rounds 4-7: sc in each st around
Round 8: *sc 7, dec* around
Round 9: *sc 6, dec* around
Round 10: *sc 5, dec* around
Round 11: sc in each st around
Round 12: *sc 4, dec* around
Round 13: sc in each st around
Round 14: *sc 3, dec* around
Round 15: sc in each st around
Round 16: *sc 2, dec* around
Round 17: sc in each st around
Round 18: *dec* around
Fasten off leaving a long tail for sewing to the body.
Crest – In Light Pink (Make 1)
Work in rounds
Round 1: sc 6 in magic ring
Round 2: sc in each st around
Round 3: inc, sc 4, inc
Round 4: inc, sc 6, inc
Round 5: inc, sc 8, inc
Round 6: inc, sc 10, inc
Round 7: inc, sc 12, inc
Round 8: inc, sc 14, inc
Round 9: sc in each st around
Fasten off leaving a long tail for sewing to the head, do not stuff.
Tail – In Black (Make 1)
Work in rounds
Round 1: sc 4 in magic ring
Round 2: *sc 1, inc* around
Round 3: sc in each st around
Round 4: *sc 2, inc* around
Round 5: sc in each st around
Round 6: *sc 3, inc* around
Round 7: sc in each st around
Round 8: *sc 4, inc* around
Round 9: sc in each st around
Fasten off leaving a long tail for sewing to the body.
Assembly Instructions
- Attach the eyes to the head, between rounds 9-13, with approx. 7 stitches in between the eyes.
- Attach the bottom beak between rounds 13-14 and the top beak just above. Secure the tip of the top beak to the tip of the bottom beak.
- Attach the crest, centered between the eyes, between rounds 3 (towards the back) and 6 (towards the front, 3 rounds above the color change).
- Attach the head to the body, adding stuffing if needed as you sew. Sew the wings on either side of the body between rounds 8-15.
- Sew the tail between rounds 6-7 of the body and the feet between rounds 2-5, more towards the front of the body.
You are done!