How to Crochet a Cute Tiger Toy

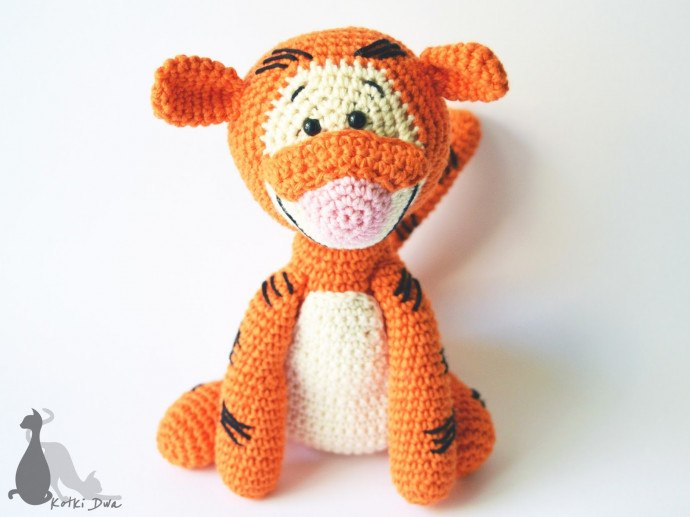
Crocheting a tiger toy can be such a fun and rewarding project! Not only is it a great way to unleash your creativity, but it also makes for a unique and special gift for a loved one. The process of crocheting allows you to carefully craft each detail of the toy, from the stripes on its body to the adorable little ears. Plus, as you work on this project, you'll find yourself immersed in a calming and meditative state, making it a perfect way to unwind after a long day. So grab your crochet hook and some soft yarn, and get ready to bring this cute tiger to life!
Materials Needed
What do you need:
- Yarn in four colors: orange, beige, pink, and black (in my project, it’s Alize Bella)
- Crochet hook 3 mm
- Black safety eyes 6 mm
- Polyester fiberfill
Amigurumi size: about 19 cm
Abbreviations:
- sc – single crochet
- inc – increase (two sc in one stitch)
- dec – decrease (one sc in two stitches)
Body Parts Instructions
Head (Start with Beige Yarn)
1: 6 sc in magic ring (6)
2: (inc) repeat 6 times (12)
3: (1 sc, inc) repeat 6 times (18)
4: (2 sc, inc) repeat 6 times (24)
5: (3 sc, inc) repeat 6 times (30)
6: (4 sc, inc) repeat 6 times (36), change color to orange
7: (5 sc, inc) repeat 6 times (42)
8: (6 sc, inc) repeat 6 times (48)
9: (7 sc, inc) repeat 6 times (54), install safety eyes between 2 and 3 round (3 stitches break), it looks weird, but will be better when you fasten the nose
10-15: 54 sc (6 rounds)
16: (7 sc, dec) repeat 6 times (48)
17: (6 sc, dec) repeat 6 times (42)
18: (5 sc, dec) repeat 6 times (36)
19: (4 sc, dec) repeat 6 times (30)
20: (3 sc, dec) repeat 6 times (24), stuff the head
21: (2 sc, dec) repeat 6 times (18)
22: (1 sc, dec) repeat 6 times (12), add more stuffing
23: (dec) repeat 6 times (6), cut off the yarn
Nose (Start with Pink Yarn)
1: 6 sc in magic ring (6)
2: (inc) repeat 6 times (12)
3: (1 sc, inc) repeat 6 times (18)
4: 18 sc, change color to beige
5: (2 sc, inc) repeat 6 times (24)
6: (3 sc, inc) repeat 6 times (30)
7: (4 sc, inc) repeat 6 times (36)
8: (5 sc, inc) repeat 6 times (42)
9: 42 sc, cut off the yarn, leave a long tail for sewing (stuff while sewing)
Ears (Orange)
1: 6 sc in magic ring (6)
2: (inc) repeat 6 times (12)
3-7: 12 sc (5 rounds)
8: fold and sew with sc (6), cut off the yarn, leave a tail
Stripe on the Nose (Orange)
1: 18 chains and 18 sc in every chain, reverse
2: 1 slip stitch, 16 sc, reverse
3: 1 slip stitch, 14 sc, cut off the yarn, leave a tail for sewing
Making the head is quite difficult; good sewing is really important here. At first, fasten ears symmetrically. Then place the nose right below the eyes, sew around the nose, and add some stuffing until finished. At last, fasten the stripe on the top side of the nose (also right below the eyes). Add the smile and eyebrows using black yarn. Now the head will look more like a tiger’s head ;)
Body (Orange)
1: 6 sc in magic ring (6)
2: (inc) repeat 6 times (12)
3: (1 sc, inc) repeat 6 times (18)
4: (2 sc, inc) repeat 6 times (24)
5: (3 sc, inc) repeat 6 times (30)
6: (4 sc, inc) repeat 6 times (36)
7: (5 sc, inc) repeat 6 times (42)
8: (6 sc, inc) repeat 6 times (48)
9-12: 48 sc (4 rounds)
13: (6 sc, dec) repeat 6 times (42)
14-17: 42 sc (4 rounds)
18: (5 sc, dec) repeat 6 times (36)
19-22: 36 sc (4 rounds)
23: (4 sc, dec) repeat 6 times (30)
24-27: 30 sc (4 rounds)
28: (3 sc, dec) repeat 6 times (24)
29-32: 24 sc (4 rounds)
33: (2 sc, dec) repeat 6 times (18), stuff the body
34-35: 18 sc (2 rounds), cut off the yarn, leave a long tail for sewing the head
Belly (Beige) – Reverse After Each Round!
1: 18 chains and 18 sc in every chain, reverse
2: 1 ch, 17 sc (18)
3: 1 ch, 1 inc, 14 sc, 1 inc, 1 sc (20)
4: 1 ch, 19 sc (20)
5: 1 ch, 1 dec, 14 sc, 1 dec, 1 sc (18)
6: 1 ch, 17 sc (18)
7: 1 ch, 1 dec, 12 sc, 1 dec, 1 sc (16)
8: 1 ch, 15 sc (16)
9: 1 ch, 1 dec, 10 sc, 1 dec, 1 sc (14)
10: 1 ch, 13 sc (14)
11: 1 ch, 1 dec, 8 sc, 1 dec, 1 sc (12)
12-14: 1 ch, 11 sc (12) – 3 rounds
15: 1 ch, 1 dec, 6 sc, 1 dec, 1 sc (10)
16-18: 1 ch, 9 sc (10) – 3 rounds
19: 1 ch, 1 dec, 4 sc, 1 dec, 1 sc (8)
20: 1 ch, 7 sc (8), cut off the yarn, leave a really long tail (to sew around the belly)
Legs (Orange)
1: 6 sc in magic ring (6)
2: (inc) repeat 6 times (12)
3: (1 sc, inc) repeat 6 times (18)
4-8: 18 sc (5 rounds)
9: (1 sc, dec) repeat 6 times (12)
10-14: 12 sc (5 rounds), stuff the leg
15: fold and sew with sc (6), cut off the yarn, leave a tail
Arms (Orange)
1: 6 sc in magic ring (6)
2: (inc) repeat 6 times (12)
3: (3 sc, inc) repeat 3 times (15)
4-13: 15 sc (10 rounds)
14: (3 sc, dec) repeat 3 times (12)
15-24: 12 sc (10 rounds), stuff the arm
25: fold and sew with sc (6), cut off the yarn, leave a tail
Tail (Orange)
1: 6 sc in magic ring (6)
2: (inc) repeat 6 times (12)
3-16: 12 sc (14 rounds), stuff lightly
17: 10 sc, dec (11)
18-24: 11 sc (7 rounds)
25: 9 sc, dec (10)
26: 10 sc
27: fold and sew with sc (5), cut off the yarn, leave a tail
Now it’s time to sew all parts together. Fasten legs and arms to the body, the belly should be fastened between arms and legs. Don’t forget about a tail – it’s stuffed lightly, so you can form any shape you want. At last, fasten the head. Remember that the tiger needs stripes on his body; you can make them with black yarn or with some black material.