Crochet Violet the Kitty Toy: Your Ultimate Guide

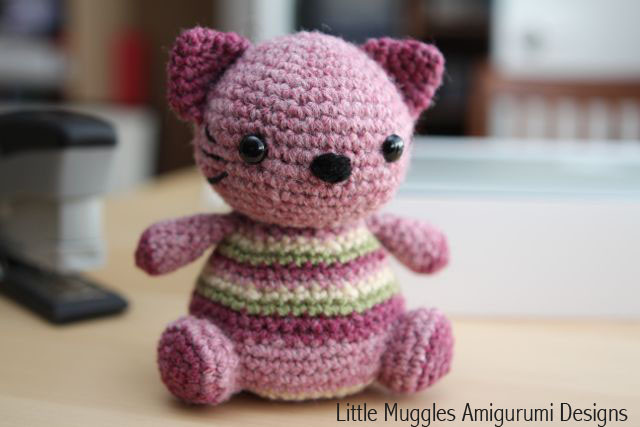
Crochet Violet the Kitty Toy is an adorable feline companion perfect for snuggles and playtime. With its soft yarn and sweet design, this handmade toy brings joy to children and cat lovers alike. The intricate crochet work and charming details make Violet the Kitty a delightful addition to any toy collection. Whether as a gift or a personal treasure, Violet is sure to bring smiles and warmth wherever it goes.
Materials
To create your own Crochet Violet the Kitty Toy, you will need the following materials:
- Size USG6/4.00mm crochet hook
- Worsted weight yarn
- Light pink (Lion Brand Wool-Ease in Dark Rose Heather)
- Dark pink (Lion Brand Wool-Ease in Rose Heather)
- Beige (Vanna’s Choice in Beige)
- Green (Vanna’s Choice in Dusty Green)
- Black
Other supplies:
- 9mm safety eyes
- Black embroidery thread
- Fiber fill
- Stitch marker
- Yarn needle
Head Instructions
Follow these steps to crochet the head:
Rnd 1: Make 6sc into magic ring
Rnd 2: inc in each st [12]
Rnd 3: (sc, inc) repeat around [18]
Rnd 4: sc around [18]
Rnd 5: (2sc, inc) repeat around [24]
Rnd 6: (3sc, inc) repeat around [30]
Rnd 7: (4sc, inc) repeat around [36]
Rnd 8: sc around [36]
Rnd 9: (5sc, inc) repeat around [42]
Rnd 10-12: sc around [42]
Rnd 13: (6sc, inc) repeat around [48]
Rnd 14: (6sc, dec) repeat around [42]
Rnd 15: (5sc, dec) repeat around [36]
Rnd 16: sc around [36]
Rnd 17: (4sc, dec) repeat around [30]
Rnd 18: (3sc, dec) repeat around [24]
Fasten off and leave a tail.
Ear Instructions
For the ears, follow this pattern:
Rnd 1: Make 4sc into magic ring
Rnd 2: inc in each st [8]
Rnd 3: sc around [8]
Rnd 4: (sc, inc) repeat around [12]
Rnd 5: (2sc, inc) repeat around [16]
Fasten off and leave a tail.
Body Instructions
Start crocheting the body with dark pink yarn:
Rnd 2: inc in each st [12]
Rnd 3 (beige): (sc, inc) repeat around [18]
Rnd 4 (light pink): (2sc, inc) repeat around [24]
Rnd 5 (dark pink): (3sc, inc) repeat around [30]
Rnd 6 (light pink): (4sc, inc) repeat around [36]
Rnd 7 (beige): (5sc, inc) repeat around [42]
Rnd 8 (light pink): (6sc, inc) repeat around [48]
Rnd 9-11 (light pink): sc around [48]
Rnd 12 (dark pink): sc around [48]
Rnd 13 (dark pink): (6sc, dec) repeat around [42]
Rnd 14 (green): sc around [42]
Rnd 15 (beige): (5sc, dec) repeat around [36]
Rnd 16 (light pink): sc around [36]
Rnd 17 (dark pink): sc around [36]
Rnd 18 (green): sc around [36]
Rnd 19 (beige): (4sc, dec) repeat around [30]
Rnd 20 (light pink): (3sc, dec) repeat around [24]
Rnd 21 (dark pink): sc around [24]
Fasten off and leave a tail.
Arm Instructions
Begin with dark pink yarn:
Rnd 1: Make 4sc into magic ring
Rnd 2: inc in each st [8]
Rnd 3: (sc, inc) repeat around [12]
Change to light pink yarn:
Rnd 4-6: sc around [12]
Rnd 7: (2sc, dec) repeat around [9]
Rnd 8: sc around [9]
Rnd 9: (2sc, dec) twice, sc [7]
Rnd 10: sc around [7]
Fasten off and leave a tail.
Foot Instructions
Start with dark pink yarn:
Rnd 1: Make 6sc into magic ring
Rnd 2: inc in each st [12]
Rnd 3: (sc, inc) repeat around [18]
Change to light pink yarn:
Rnd 4: sc around [18]
Rnd 5: (sc, dec) repeat around [12]
Rnd 6: (2sc, dec) repeat around [9]
Fasten off and leave a tail.
Tail Instructions
Start with dark pink yarn:
Rnd 1: Make 4sc into magic ring
Rnd 2: inc in each st [8]
Rnd 3-4: sc around [8]
Change to light pink yarn:
Rnd 5-7: sc around [8]
Change to dark pink yarn:
Rnd 8-10: sc around [8]
Change to light pink yarn:
Rnd 11-13: sc around [8]
Fasten off and leave a tail.
Assembly Instructions
For assembling your kitty toy, follow these steps:
Stuff the head with fiber fill and place the safety eyes between Rnds 10 and 11, with 8 stitches between them. Attach the ears, ensuring they are symmetrical with the eyes. Sew the nose with black yarn and then the whiskers with black embroidery thread. Ensure the yarn ends and thread ends are tied securely inside the head. Affix the backings to the safety eyes.
Fill the body with poly pellets (or beans) until about 3/4 inch from the top. Stuff the remaining space with fiber fill. Note: Someone suggested using pantyhose to create a small bag for the poly pellets before putting them into the body, which can prevent the pellets from leaking out if your stitches are too loose. Attach the body to the head, ensuring a seamless transition since there should be an equal number of stitches at each opening.
In my example, I did not stuff the arms or tail before attaching. The feet were stuffed with a little bit of fiber fill. Ensure the symmetry of the limbs before attaching, confirming the feet do not interfere with the balance of your doll when placed on a flat surface. The same goes for the tail.