How to Crochet a Pumpkin Spice Latte for Fall Decor

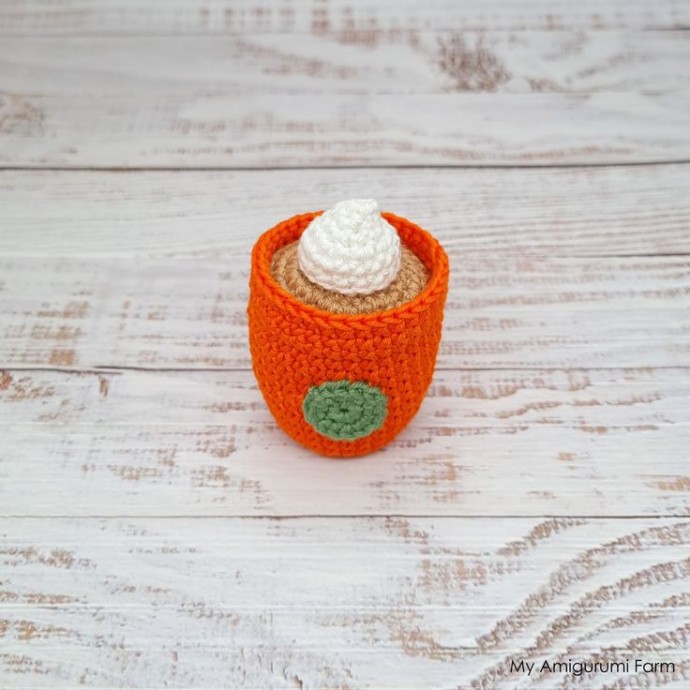
Ah, the beloved crochet pumpkin spice latte! This quirky and cozy creation combines the warmth of fall with the fun of crafting. Picture it - a crocheted pumpkin spice latte complete with a sprinkle of cinnamon-colored yarn on top, perfect for adorning your favorite mug or as a unique autumnal decoration. Whether you're sipping on the real deal or just craving a festive touch, this adorable crochet creation is sure to bring a smile to your face and a touch of seasonal charm to your home. So grab your crochet hook and get ready to whip up a little piece of autumn magic!
Size: 7 cm / 2.75 inch in height
Tools & Materials
- Crochet hook size 2.5 mm
- Polyester Craft Filling for toys
- Tapestry needle and craft pins
- Scissors
- Stitch marker or a piece of yarn to mark the end of a round
- Small piece of cardboard (for the cup's bottom)
Yarn
- Orange (Rico Essentials Cotton DK, Pumpkin (87), 100% Cotton, 50g)
- Brown (Stylecraft Natural DK Bamboo + Cotton, Nutmeg (7147), 60% Bamboo 40% Cotton, 100g)
- Green (Stylecraft Natural DK Bamboo + Cotton, Spring Green (7126), 60% Bamboo 40% Cotton, 100g)
- White (Stylecraft Natural DK Bamboo + Cotton, Chalk (7127), 60% Bamboo 40% Cotton, 100g)
Skills Required / Abbreviations / Info
- MG – magic ring (make specified number of single crochet stitches into the loop)
- Sc – single crochet
- Inc – 2sc increase (crochet 2 single crochet stitches into the same stitch)
- Dec – 2tog decrease (crochet 2 stitches together)
- BLO – back loops only
- FLO – front loops only
- CH – chain stitch
- F/O – finish off
- R – spiral round
- Row – row
- ( )* – repeat the sequence in brackets to the end of the round
- (12) – number of stitches expected at the end of the round
- Work in spiral rounds, do not turn/join unless stated otherwise
Cup (Color: Orange)
R 1 mg, 6sc (6)
R 2 (inc)* (12)
R 3 (inc)* (24)
R 4 (sc 3, inc)* (30)
R 5 BLO 30 (30)
R 6 sc 30 (30)
R 7 (sc 14, inc)* (32)
R 8 - 9 sc 32 (2 rnds) (32)
R 10 (sc 15, inc)* (34)
R 11 - 12 sc 34 (2 rnds) (34)
R 13 (sc 16, inc)* (36)
R 14 - 15 sc 36 (2 rnds) (36)
R 16 FLO 36 (36)
R 17 - 18 sc 36 (2 rnds) (36)
- Make 1sl st to the next stitch to even out the edge. F/O and cut off yarn.
- Take a small piece of cardboard (any thick piece of paper will work) and cut out a circle the size of the cup’s bottom. Next, place the circle on the bottom of the cup – it will help to keep it flat.
- Don’t stuff the cup yet, leave aside.
Coffee Top (Color: Brown)
R 1 mg, 6sc (6)
R 2 (inc)* (12)
R 3 (inc)* (24)
R 4 (sc 3, inc)* (30)
R 5 sc 2, (inc, sc 4)* - repeat the sequence in brackets 5 times, inc, sc 2 (36)
- F/O and leave a longer tail for sewing.
- Take the ‘Cup’, find BLOs made in row 16 and, using a needle, start attaching the ‘Coffee Top’ (BLO to BLO only).
- When about ¾ of the ‘Coffee Top’ is attached, leave a small hole and stuff the ‘Cup’ with polyester filling. Once the ‘Cup’ is properly stuffed, finish sewing and weave in the remaining thread.
Cream (Color: White)
R 1 mg, 6sc (6)
R 2 (sc 2, inc)* (8)
R 3 (sc 1, inc)* (12)
R 4 (sc 1, inc)* (18)
R 5 sc 18 (18)
R 6 (sc 7, dec)* (16)
- Make 1sl st to the next stitch to even out the ‘Cream’.
- F/O and leave a longer tail for sewing; stuff with polyester filling (use small tweezers, it will be easier to stuff the top).
- Using a needle, attach to the ‘Coffee Top’.
Tip: When attaching the ‘Cream’ to the ‘Coffee Top’, use the ‘Cream’ BLOs only – it’s like standard sewing; just instead of inserting the needle into the whole stitch, insert it into back loops only, make 1 stitch and move on to the next stitch.
Green Circle (Color: Green)
Note: Don't count CH as a stitch.
R 1 mg, 7sc – join with sl st, don’t turn (7)
R 2 CH 1, (inc)* – join with sl to the top of the chain (14)
F/O, leave a longer tail for sewing. Attach to the front of the ‘Cup’ between rounds 9 – 14, weave in remaining thread.
Tip: When attaching the ‘Green Circle’ to the ‘Cup’, use the ‘Circle’ BLOs only (in the same way as ‘Cream’ was attached to the ‘Coffee Top’).