Deprecated: Creation of dynamic property myadv::$cms_config is deprecated in /home/www/web/craftorator.com/public_html/system/core/controller.php on line 156
Deprecated: Creation of dynamic property myadv::$cms_user is deprecated in /home/www/web/craftorator.com/public_html/system/core/controller.php on line 156
Deprecated: Creation of dynamic property myadv::$cms_config is deprecated in /home/www/web/craftorator.com/public_html/system/core/controller.php on line 156
Deprecated: Creation of dynamic property subscribe::$cms_config is deprecated in /home/www/web/craftorator.com/public_html/system/core/controller.php on line 156
Deprecated: Creation of dynamic property tune::$cms_config is deprecated in /home/www/web/craftorator.com/public_html/system/core/controller.php on line 156
Deprecated: Creation of dynamic property myvotes::$cms_config is deprecated in /home/www/web/craftorator.com/public_html/system/core/controller.php on line 156
Deprecated: Creation of dynamic property mybookmarks::$cms_config is deprecated in /home/www/web/craftorator.com/public_html/system/core/controller.php on line 156
Crochet Carousel Pincushion: A Whimsical and Practical Crafting Accessory
Deprecated: Creation of dynamic property cmsCore::$cats_by_ids is deprecated in /home/www/web/craftorator.com/public_html/system/controllers/tune/frontend.php on line 1521

Deprecated: Creation of dynamic property printview::$cms_config is deprecated in /home/www/web/craftorator.com/public_html/system/core/controller.php on line 156
Deprecated: Creation of dynamic property tune::$cms_config is deprecated in /home/www/web/craftorator.com/public_html/system/core/controller.php on line 156
Deprecated: Creation of dynamic property tune::$cms_config is deprecated in /home/www/web/craftorator.com/public_html/system/core/controller.php on line 156
Deprecated: Creation of dynamic property myadv::$cms_config is deprecated in /home/www/web/craftorator.com/public_html/system/core/controller.php on line 156
Deprecated: base64_decode(): Passing null to parameter #1 ($string) of type string is deprecated in /home/www/web/craftorator.com/public_html/system/controllers/myadv/model.php on line 30
Deprecated: base64_decode(): Passing null to parameter #1 ($string) of type string is deprecated in /home/www/web/craftorator.com/public_html/system/controllers/myadv/model.php on line 30
Deprecated: Creation of dynamic property myadv::$cms_config is deprecated in /home/www/web/craftorator.com/public_html/system/core/controller.php on line 156
Deprecated: Creation of dynamic property myadv::$cms_user is deprecated in /home/www/web/craftorator.com/public_html/system/core/controller.php on line 156
Deprecated: Creation of dynamic property myadv::$cms_config is deprecated in /home/www/web/craftorator.com/public_html/system/core/controller.php on line 156
Deprecated: Creation of dynamic property myadv::$cms_config is deprecated in /home/www/web/craftorator.com/public_html/system/core/controller.php on line 156
Deprecated: Creation of dynamic property myadv::$cms_user is deprecated in /home/www/web/craftorator.com/public_html/system/core/controller.php on line 156
Deprecated: Creation of dynamic property tune::$cms_user is deprecated in /home/www/web/craftorator.com/public_html/system/core/controller.php on line 156
Deprecated: Creation of dynamic property tune::$image_index_to_html is deprecated in /home/www/web/craftorator.com/public_html/system/controllers/tune/frontend.php on line 3176
Deprecated: Creation of dynamic property myadv::$cms_config is deprecated in /home/www/web/craftorator.com/public_html/system/core/controller.php on line 156
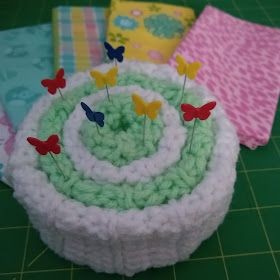
The Crochet Carousel Pincushion is a delightful and practical accessory for any crafter's sewing kit! Stitched with vibrant colors and intricate patterns, this charming pincushion adds a touch of whimsy to your workspace. Its carousel design not only provides a cute aesthetic but also ensures your pins are easily accessible while keeping your workspace organized. Whether you are a seasoned crocheter or a beginner looking for a fun project, creating this pincushion is a joyful and rewarding experience. Dive into the world of crochet and add a splash of personality to your crafting setup with the Crochet Carousel Pincushion!
Finished Size: Two inches tall with a four-inch diameter
Supplies
Acrylic yarn weight 4, approximately 80 yards
Size H hook
Scissors
Yarn needle
Abbreviations
ch = chain
sc = single crochet
hdc = half double crochet
blo = back loop only
st = stitch
sts = stitches
hk = hook
sl-st = slip stitch
Notes
- The turning chain does not count as a stitch.
- Gauge: 16 stitches x 12 rows = 4" x 4"
- This pincushion consists of four separate pieces; approximate yardage for each is as follows: Piece 1 - 13 yards, Piece 2 - 17 yards, Piece 3 - 22 yards, and Piece 4 - 28 yards.
Instructions
Piece #1
ch 17
Row 1: sc in the 2nd ch from the hk and in each ch across, turn
Rows 2-9: ch 2, hdc blo in each st across
Seam - see instructions below
Weave in ends
Piece #2
ch 17
Row 1: sc in the 2nd ch from the hk and in each ch across, turn
Rows 2-12: ch 2, hdc blo in each st across
Seam - see instructions below
Weave in ends
Piece #3
ch 17
Row 1: sc in the 2nd ch from the hk and in each ch across, turn
Rows 2-17: ch 2, hdc blo in each st across
Seam - see instructions below
Weave in ends
Piece #4
ch 17
Row 1: sc in the 2nd ch from the hk and in each ch across, turn
Rows 2-25: ch 2, hdc blo in each st across
Seam - see instructions below
Weave in ends
Seam Instructions
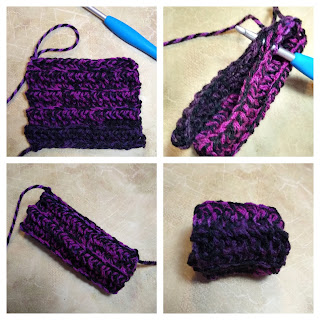
Use your preferred method to seam the final row to the foundation chain. I used sl-st. See photo. This creates a tube shape.
Assembly Instructions
Fold each piece in half lengthwise. This makes each of the tube-shapes half as long. See the photo. Now place piece one inside of piece two with the open edges down and the folded edge at the top. Next, gently insert pieces one and two into piece three. Finally, place pieces one through three inside of piece four. See photos for guidance. Make sure that all folded edges are up and open edges are down. You are done!
Design Notes
You can make the pincushion smaller by only completing 3 rings or larger by making 5 or more. If you would like to change the height of the pincushion, increase or decrease your starting chain.
Deprecated: Creation of dynamic property tune::$cms_config is deprecated in /home/www/web/craftorator.com/public_html/system/core/controller.php on line 156
Deprecated: Creation of dynamic property myadv::$cms_config is deprecated in /home/www/web/craftorator.com/public_html/system/core/controller.php on line 156
Deprecated: Creation of dynamic property myadv::$cms_config is deprecated in /home/www/web/craftorator.com/public_html/system/core/controller.php on line 156
Deprecated: Creation of dynamic property myadv::$cms_user is deprecated in /home/www/web/craftorator.com/public_html/system/core/controller.php on line 156
Deprecated: Creation of dynamic property Myseo::$cms_config is deprecated in /home/www/web/craftorator.com/public_html/system/core/controller.php on line 156
Deprecated: Creation of dynamic property tune::$cms_config is deprecated in /home/www/web/craftorator.com/public_html/system/core/controller.php on line 156
Deprecated: preg_match_all(): Passing null to parameter #2 ($subject) of type string is deprecated in /home/www/web/craftorator.com/public_html/system/controllers/tune/frontend.php on line 688
Deprecated: preg_match_all(): Passing null to parameter #2 ($subject) of type string is deprecated in /home/www/web/craftorator.com/public_html/system/controllers/tune/frontend.php on line 688
Deprecated: preg_match_all(): Passing null to parameter #2 ($subject) of type string is deprecated in /home/www/web/craftorator.com/public_html/system/controllers/tune/frontend.php on line 688
Deprecated: preg_match_all(): Passing null to parameter #2 ($subject) of type string is deprecated in /home/www/web/craftorator.com/public_html/system/controllers/tune/frontend.php on line 688
Deprecated: preg_match_all(): Passing null to parameter #2 ($subject) of type string is deprecated in /home/www/web/craftorator.com/public_html/system/controllers/tune/frontend.php on line 688
Deprecated: preg_match_all(): Passing null to parameter #2 ($subject) of type string is deprecated in /home/www/web/craftorator.com/public_html/system/controllers/tune/frontend.php on line 688
Deprecated: Creation of dynamic property Myseo::$cms_template is deprecated in /home/www/web/craftorator.com/public_html/system/core/controller.php on line 156
Deprecated: Creation of dynamic property cmsCore::$renderedContentItem is deprecated in /home/www/web/craftorator.com/public_html/templates/m1/controllers/content/item_view.tpl.php on line 6
Deprecated: Creation of dynamic property tune::$cms_config is deprecated in /home/www/web/craftorator.com/public_html/system/core/controller.php on line 156
Deprecated: Creation of dynamic property myadv::$cms_config is deprecated in /home/www/web/craftorator.com/public_html/system/core/controller.php on line 156
Deprecated: Creation of dynamic property myadv::$cms_config is deprecated in /home/www/web/craftorator.com/public_html/system/core/controller.php on line 156
Deprecated: Creation of dynamic property myadv::$cms_user is deprecated in /home/www/web/craftorator.com/public_html/system/core/controller.php on line 156
Deprecated: Creation of dynamic property tune::$cms_config is deprecated in /home/www/web/craftorator.com/public_html/system/core/controller.php on line 156
Deprecated: Creation of dynamic property tune::$cms_config is deprecated in /home/www/web/craftorator.com/public_html/system/core/controller.php on line 156
Deprecated: Creation of dynamic property myreauth::$cms_config is deprecated in /home/www/web/craftorator.com/public_html/system/core/controller.php on line 156
Deprecated: Creation of dynamic property tune::$cms_config is deprecated in /home/www/web/craftorator.com/public_html/system/core/controller.php on line 156
Deprecated: Creation of dynamic property tune::$cms_config is deprecated in /home/www/web/craftorator.com/public_html/system/core/controller.php on line 156