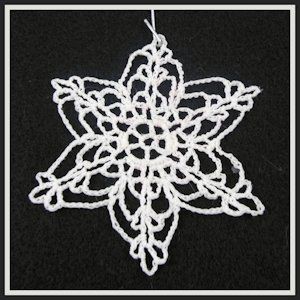
Crochet Lacy Snowflake Pattern

The Crochet Lacy Snowflake pattern is a delightful and elegant design that adds a touch of whimsy to any holiday décor or winter project. With its intricate details and openwork stitches, this snowflake is perfect for creating a festive ambiance in your home. Whether you're a seasoned crocheter looking for a new challenge or a beginner eager to try something intricate, this pattern offers a fun and rewarding project. By following the clear instructions and using a soft yarn in your favorite color, you can bring a little bit of snowflake magic into your crafting repertoire. Don't be intimidated by the delicate appearance – with a bit of patience and practice, you'll be creating beautiful Crochet Lacy Snowflakes to adorn your space in no time!
Materials Needed
Small amount size 20 crochet cotton in white
Coats & Clark Big Ball Mercerized Cotton
Size 11 steel crochet hook
Fine Tapestry needle
Fabric Stiffener
Small bowl (I used a custard cup)
Waxed paper
Rust proof pins
Foam board (one you can put pins into)
Yarn Thickness
20 thread
Gauge
12 sc = 1"
Finished Size
3¼" across from point to point
Skill Level
Easy
Instructions
Round 1
RND 1: Ch 6, join w/slst to first ch to form a ring. Ch 6. *Dc in ring. Ch 3. Rep from * 4 times more. Join w/slst to 3rd ch of ch 6.
Round 2
RND 2: Slst into the first ch 3 sp. 5 sc in the same sp. Ch 5. *5 sc in next ch 3 sp. Ch 5. Rep from * around. Join w/slst to first sc.
Round 3
RND 3: Slst in the first 3 sts. Ch 3. Work the following in the next ch 5 sp. (dc, ch 3, dc, ch 5, dc, ch 3, dc). Sk 2 sc. *Dc in next dc. Work the following in the next ch 5 sp. (dc, ch 3, dc, ch 5, dc, ch 3, dc). Sk 2 sc. Rep from * around. Join w/slst to the top of ch 3.
Round 4
RND 4: Ch 6, dc in the same st as slst. *Ch 5. Work the following in the next ch 5 sp. (dc, ch 3, dc, ch 5, dc, ch 3, dc). Ch 5. Sk the ch 3 sp and the next dc. Dc, ch 3, dc in the next dc. Rep from * 4 times more. Ch 5. Work the following in the next ch 5 sp. (dc, ch 3, dc, ch 5, dc, ch 3, dc). Ch 5. Sk the ch 3 sp and the next dc. Join w/slst to 3rd ch of ch 6.
Round 5
RND 5: Slst in the first 2 chs. Sc in ch 3 sp. *Ch 8. Sk the next ch 5 and ch 3 sps. Work the following in the ch 5 sp of the next point. (dc, ch 3, dc, ch 5, dc, ch 3, dc). Ch 8. Sk the next ch 3 and ch 5 sps. Sc in the next ch 3 sp. Rep from * 4 times more. Ch 8. Sk the next ch 5 and ch 3 sps. Work the following in the ch 5 sp of the next point. (dc, ch 3, dc, ch 5, dc, ch 3, dc). Ch 8. Join w/slst to first sc. Fasten off and weave ends into work.
To Stiffen Snowflake
Steps
1. Dip the snowflake into a very small amount of fabric stiffener and lay it out onto a wax paper covered foam board.
2. Use a paper towel and dab off the excess fabric stiffener.
3. Stretch & pin the snowflake down to the wax paper covered foam board, sticking the pins into the points of the snowflake.
4. Allow to dry overnight.
5. Attach a hanger to one of the points.