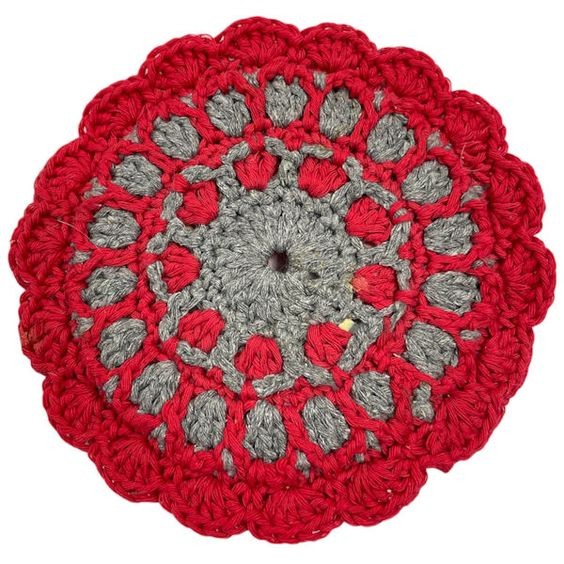
Crochet Scalloped Edged CD Trivet

Introduction
Oh, a Crochet Scalloped Edged CD Trivet can be such a lovely addition to your kitchen decor! This crafty creation not only protects your countertops from hot pots and pans but also adds a charming touch to your kitchen aesthetic. The scalloped edge gives it an elegant and dainty look, making it a delightful piece for both practical use and visual appeal. Imagine setting your steaming teapot on this handmade trivet, knowing that it's not only functional but also a unique piece made with care and creativity. Crocheting this trivet can be a fun and rewarding project, perfect for adding a personal touch to your kitchen or even as a heartfelt gift for a friend who appreciates handmade items.
Materials Needed
- 1 ball each red and grey worsted weight cotton yarn. I used Aunt Lydia's Denim yarn.
- 1 Junk CD
- Size H/8 5mm aluminum crochet hook
- Yarn Needle for weaving in ends
Specifications
- Yarn Thickness: 3mm
- Gauge: 5sc=1"
- Finished Size: 7" diam
- Skill Level: Intermediate
Instructions
Make 2 pieces: Start with grey on the first piece, then start with red on the second piece.
Round 1
RND 1: Ch5. Join with slst to first ch to form a ring. Ch3. Work 17 dc in the ring. Join with slst to the top of ch 3.
Round 2
RND 2: Ch1. Sc in each dc around. Join with slst to ch1.
Round 3
RND 3: Ch7. Sk next st. *Dc in next st. Ch4. Sk next st. Rep from * around. Join with slst to 3rd ch of ch7. Fasten off color 1.
Round 4
RND 4: Join color 2 to the same st as slst. Ch1. 3dc in the skipped st on rnd 2 behind the ch4 sp. *Sc in next dc. 3dc in the skipped st on rnd 2 behind the ch4 sp. Rep from * around. Join with slst to ch1.
Round 5
RND 5: Ch1. Sc in next dc. Sc in next dc through the ch4 sp. Sc in next dc. *Sc in next sc. Sc in next dc. Sc in next dc through the ch4 sp. Sc in next dc. Rep from * around. Join with slst to ch1.
Round 6
RND 6: Ch7. Sk next st. *Dc in next st. Ch4. Sk next st. Rep from * around. Join with slst to 3rd ch of ch7. Fasten off color 2.
Round 7
RND 7: Join color 1 in the same st as slst. Ch1. 3dc in the skipped st on rnd 2 behind the ch4 sp. *Sc in next dc. 3dc in the skipped st on rnd 2 behind the ch4 sp. Rep from * around. Join with slst to ch1. Do not fasten off the 2nd piece only. At this point, weave all ends into the back of the work.
Assembly
Put both pieces together back sides facing each other.
Final Rounds
RND 8: Line up the first piece in front of the second piece, wrong sides facing each other, pull the finishing loop from the 2nd piece through the slst on the piece in front. Ch1. Sc in next dc through both layers. Sc through ch4 lp and in next dc of both layers. Sc in next dc of both layers. Sc in next sc of both layers. *Sc in next dc through both layers. Sc through ch4 lp and in next dc of both layers. Sc in next dc of both layers. Sc in next sc of both layers. Rep from * around. Join with slst to the first sc.
RND 9: Ch3, 4dc in the same st. Sk next st. Sc in next st. Sk next st. *5dc in next st. Sk next st. Sc in next st. Sk next st. Rep from * around. Join with slst to the top of ch3. Fasten off. Weave end through back of work. Enjoy!