Crochet Bacon and Eggs Skillet Trivet

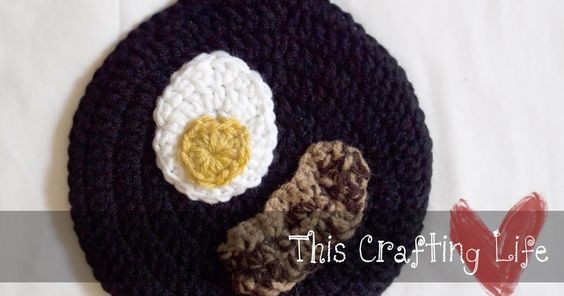
The Crochet Bacon and Eggs Skillet Trivet is not just a practical kitchen accessory; it's a charming conversation starter for any gathering. With its unique design resembling a sizzling skillet complete with crocheted bacon strips and sunny-side-up eggs, this trivet adds a touch of whimsy to your kitchen decor. Not only does it protect your countertops from heat damage, but it also brings a smile to anyone who sees it. Crafted with care and attention to detail, this hand-crocheted trivet is a must-have for those who appreciate both functionality and a touch of playful flair in their home. Let this delightful piece of kitchen art brighten up your cooking space and add a sprinkle of creativity to your meals!
Materials Needed
- About a half a skein of black yarn
- Minimal amounts of white, yellow, and two shades of brown yarn
- "H" Hook
- Embroidery needle (for weaving in ends)
Skillet Section (Make 2)
ch 6, join with sl st
R1: ch 3, 11 dc in ring, join to top of ch3 (12 st)
R2: ch 3, dc in same st, 2dc in each dc around, join with sl st to top of ch3 (24 st)
R3: ch 3, dc in same st, dc in next dc, *2 dc in next dc, dc in next dc* repeat to end, join with sl st to top of ch3 (36 st)
R4: ch 3, dc in same st, {dc in dc} twice, *2dc in next dc, {dc in dc} twice* repeat to end, join with sl st to top of ch3 (48 st)
R5: ch 3, dc in same st, {dc in dc} three times, *2dc in next dc, {dc in dc} three times* repeat to end, join with sl st to top of ch3 (60 st)
R6: ch 3, dc in same st, {dc in dc} four times, *2dc in next dc, {dc in dc} four times* repeat to end, join with sl st to top of ch3 (72 st)
{Here we'll switch to working back and forth in rows}
R7: ch 3, dc in next 5 st, ch3, turn (6 st)
R8: dc in next 5 st, ch 3, turn (6 st)
R9: dc in next 5 st, ch 3, turn (6 st)
R10: dc in next 5 st, ch 3, turn (6 st)
R11: dc in next 5 st, ch 3, turn (6 st)
R12: dc in next 5 st, ch 3, turn (6 st)
R13: dc in next 5 st, ch 6, turn (6 st)
R14: join in top of ch 3 from previous row, FO.
Egg
Base, Work in White
ch 4, join with sl st
R1: ch 3, 11 dc in ring, join with sl st to top of ch 3 (12 st)
R2: ch 3, 2 dc in each dc, join with sl st to top of ch 3 (24 st)
R3: sc, hdc, hdc, 2 dc in next st, 2 dc in next st, hdc, hdc, sc, sl st in next st, FO
Yolk, Work in Yellow
ch 4, join with sl st
R1: ch 3, 11 dc in ring, join with sl st to top of ch 3, FO (12 st)
Bacon
Mine is worked in two scrap shades of brown I had laying around :)
A= Dark Brown
B= Light Brown
With both A and B, chain 17
R1: dc in 3rd ch from hook and next 14 ch, ch1, turn (15 dc)
R2: sc in next 14 dc, drop color A, ch 1 (15 sc)
R3: with color B, sc in next 14 sc, FO (15 sc)
Thread the tail from the dropped color A in the second row and baste across the middle row, pull taut and then loosen a little to make it look rippled, like bacon.
Note: if you prefer more "meat in your meal" you can make a second piece of bacon to add to your skillet. :)
Finishing Up
Using the tails you left behind, sew yolk to egg.
Choose your placement of egg and bacon on one skillet piece and sew around the edges to attach to skillet.
Last, lay your decorated skillet over top of the undecorated half and join yarn on the edge of the ch6 at the top of the skillet handle. Sc 8 times on ch 6 space, and then sc all the way around working in loops from both skillet sides. When you've worked all the way around, sl st in top of the first chain and FO, weaving in any remaining ends.