Crafting a Cozy Crochet Pumpkin Bath Tissue Cover

Imagine a Delightful Touch in Your Bathroom
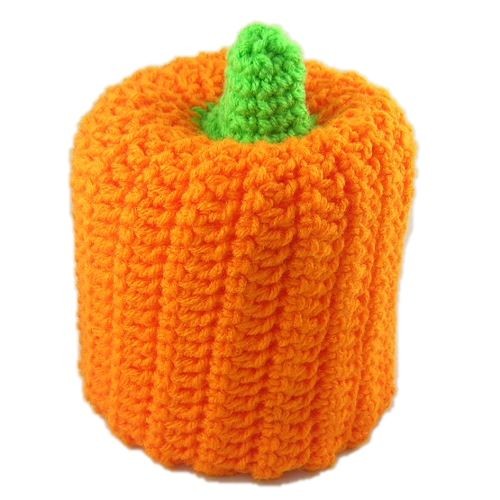
Imagine adding a delightful touch to your bathroom with a Crochet Pumpkin Bath Tissue Cover! This charming accessory not only adds a festive flair to your space but also serves as a cute storage solution for your toilet paper. Handcrafted with care, each cover is carefully crocheted to ensure durability and a snug fit for your standard-sized toilet paper roll. The cozy pumpkin design brings a touch of whimsy to your bathroom decor, making it perfect for fall or year-round use. Whether you're decorating for the season or simply adding a touch of fun to your bathroom, this Crochet Pumpkin Bath Tissue Cover is sure to bring a smile to your face every time you reach for a roll.
Materials Needed
- 1.5 oz Worsted weight acrylic yarn in Pumpkin (Red Heart Super Saver was used in the example)
- Scrap worsted weight acrylic yarn in Spring Green (Red Heart Super Saver was used in the example)
- Size H/8 or 5mm aluminum crochet hook
- Yarn needle for weaving in ends and gathering up the top of the stem
Additional Specifications
- Yarn Thickness: 4mm
- Gauge: 4dc=1"
- Finished Size: Fits a full-size roll of bath tissue
- Skill Level: Beginner to Intermediate
Decrease Technique
Decrease: Pull up a loop in each of the next 2 stitches, yo, pull through all 3 loops on hook.
Instructions
Beginning Rows
ROW 1: With pumpkin, ch24. Slst in each of the first 3 chs from hook. Sc in each of the next 20 chs. Ch3, turn.
ROW 2: Sk very first sc. Dc in each of the next 19 sc. Slst in each of the 3 slsts. Ch1, turn.
ROW 3: Working in back lp only all the way across this row, slst in each of the 3 slsts. Sc in each dc across. Ch3, turn.
ROW 4: Working through both lps on this row, sk very first sc. Dc in each of the next 19 sc. Slst in each of the 3 slsts. Ch1, turn.
ROW 5-38: Repeat ROWs 3 & 4 consecutively. You should end with a dc row. Do not fasten off. Fold work lengthwise lining up row 1 with row 38, so the sharp ridges are on the outside. Work a slst in each st across working through 1 lp on the first and last rows at the same time. Fasten off and weave ends into the back of work. Turn work right side out so the ridges are now on the inside.
Creating the Stem
RND 1: Join green in any st at the top of the pumpkin, the edge where the slip stitches are. Ch1. Sc in same st as joining. Work a total of 20 more sc around. Join with slst to first sc. (17 sts)
RND 2: Ch1, sc in the same st as slst. Sc in each of the next 2 sc. Decrease 1. Sc in each of the next 3 sc, decrease 1, 4 times. Sc in the next sc. Join with slst to first sc. (17 sts)
RND 3: Ch1, sc in the same st as slst. Sc in each sc around. Join with slst to first sc.
RND 4: Ch1, sc in the same st as slst. Sc in the next sc. Decrease 1, sc in each of the next 2 sts, 3 times. Decrease 1. Sc in the next sc. Join with slst to first sc. (13 sts)
RND 5-7: Ch1, sc in the same st as slst. Sc in each st around. Join with slst to first sc.
RND 8: Ch1, sc in the same st as slst. Decrease 1, sc in each of the next 2 sc, twice. Decrease 1. Sc in the next sc. Join with slst to first sc. Fasten off leaving an end about 8" long. Weave this end through the last round and gather up tight. Then weave the end into the work and trim off any excess.
Finishing Touches
Weave all other ends into the back of work. Place over bath tissue roll.