Crochet Angel Melba Ornament: A Whimsical Holiday Décor Piece

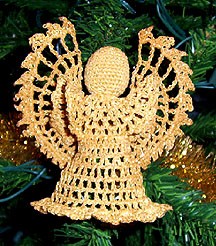
The Crochet Angel Melba Ornament is a delightful addition to any holiday décor. With its intricate crochet details and charming design, this ornament is sure to bring a touch of whimsy to your Christmas tree. Handcrafted with care and attention to detail, the Crochet Angel Melba Ornament exudes a warm and inviting vibe that will surely put a smile on your face every time you see it. Whether you hang it on your tree or gift it to a loved one, this darling ornament is a wonderful way to spread some cheer during the festive season. So, why not add a sprinkle of magic to your holiday decorations with the Crochet Angel Melba Ornament? It's a small piece that carries big joy!
Materials
To create the Crochet Angel Melba Ornament, you will need the following materials:
- Steel crochet hook size 1.75mm
- Size 10 (bedspread weight) cotton (I used Southmaid gold with the gold thread through it)
- Small amount of fibre fill
- Fabric stiffener of your choice
- Glue
Notes
Here are some important notes to keep in mind while working on your ornament:
- Always begin rounds of single crochet (sc) with a chain one (ch1), which does not count as the first stitch. Sc in the same stitch to begin.
- Always start rounds of double crochet (dc) with a ch3, and triple crochet (tr) with a ch4; these count as the first stitch.
- To decrease (dec), draw up a loop in the next two stitches, yarn over (yo), and draw through all three loops.
- V-stitch: Work a dc, ch1, dc in the same stitch/space. To work a V stitch at the beginning of the round: Ch4 (counts as dc, ch1), dc in the same stitch/space.
- Picot: Ch3, slip stitch in the 3rd chain from the hook.
Approximate Size
Height: 4 1/2 inches tall
Instructions to Begin
To begin at the top of the head, follow these steps:
- Ch3, join to form a ring.
- Rnd 1: Ch1, 8sc in ring, join. From here, do not join at the ends of rounds; mark the first stitch with contrasting thread.
- Rnd 2: 2sc in each stitch around. (16)
- Rnd 3: (sc in 1 stitch, 2sc in next) around. (24)
- Rnd 4: (sc in 2 stitches, 2sc in next) around. (32)
- Rnds 5-13: Sc around.
- Rnd 14: (sc in 2 stitches, dec) around. (24)
- Rnd 15: (sc in 1 stitch, dec) around. (16) Stuff the head firmly.
- Rnd 16: Dec around. (8) Join.
- Rnd 17: Ch2, 2hdc in the same stitch. 3hdc in each stitch around. (24)
- Rnd 18: (ch4, dc) [counts as beginning V-stitch] in the 1st stitch. *Skip 1 stitch, (dc, ch1, dc) [=V-stitch] in the next stitch. Repeat from * around.
- Rnd 19: Ch1. Sc in dc. (Ch3, sc in the next dc) around. Ch1, hdc in the first sc to join. (24 loops)
- Rnd 20: Ch1, sc around post of the joining hdc. (Ch3, sc in the next loop) around. Join as in rnd 19. Turn.
- Rnd 21: Ch4, dc in the same space. In each ch3 space around, work (V stitch, ch1). Join to ch3 of the beginning ch4. Turn.
- Rnd 22: Slip stitch across ch1 space into the first dc. 2dc in the next 8 dc. Skip the next 8 V-stitches, 2dc in each of 8dc, skip the next 8 V-stitches, join to the first dc. (32)
- Rnd 23: Dc in each dc around.
- Rnd 24: (V-stitch in 1 stitch, skip 1 stitch) around.
- Rnds 25-28: (dc, ch1) in each dc around. (32dc)
- Rnd 29: *5dc in 1 stitch, skip 1 stitch, sc in the next, skip 1 stitch. Repeat from * around.
- Rnd 30: *(sc, ch1, dc, ch1, sc) in sc. Ch1, skip 1 dc, sc in next. (Ch1, sc in the next stitch) twice. Ch1. Repeat from * around. Fasten off.
Sleeve Trim
With the head toward you, join thread in the first chain of the sleeve with sc. Sc in the next chain, sc in the first dc. Ch1, dc in ch1 space, ch1, sc in dc. Sc in 2 chains. Repeat from * around. Fasten off. Work second sleeve the same way.
Wings
For the wings, follow these steps:
- Row 1: Ch7. Dc in the 5th ch from the hook. (Ch1, dc in the next ch) twice. Turn. (4dc)
- Row 2: Ch4. (Dc in ch1, ch1, dc in the next dc, ch1) across. (7dc) Turn.
- Row 3: Dc in each dc and 2dc in each ch space across. Turn. (19)
- Row 4: Ch5. (Tr in the next stitch, ch1) across. Tr in the last.
- Row 5: Ch5. (Dc in the next tr, ch2) 8 times. (Hdc in the next stitch, ch1) 5 times. (Sc in the next stitch, ch1) 5 times, sc in the last tr. Turn.
- Row 6: Ch1, sc in the same stitch. (Ch1, sc in the next sc) 7 times. (Ch1, hdc in the next stitch) 3 times. (Ch2, dc in the next stitch) 3 times. (Ch3, tr in the next stitch) to the end. Ch1, turn.
- Row 7: *Sc in space. Ch1, dc, picot, dc, ch1, sc in the same space. Repeat from * 6 more times. In the next 2 spaces, work: (sc, ch1, hdc, picot, hdc, ch1, sc). In remaining ch1 spaces, work: (sc, picot, sc). Fasten off.
Repeat for the 2nd wing.
Finishing Touches
To finish your angel ornament, ensure all ends are woven in. Place waxed paper on your working surface. Make a small cone shape out of boxboard (or use a styrofoam shape). Cover this with plastic wrap. Wet the angel in stiffening solution and gently squeeze out the excess. Place it over the cone and shape it. Use small balls of plastic wrap in the sleeves to shape.
Wet the wings in the stiffening solution, gently squeeze out excess, and place them flat on waxed paper. If desired, pin in place.
Let dry completely. When dry, use strong glue to attach the wings to the back of the angel, or stitch them in place with matching thread. Your angel can sit on a flat surface, or you can run a thread through a couple of stitches at the center top of the head to hang it.