Crochet Cabled Candy Cowl: An Intricate and Colorful Accessory

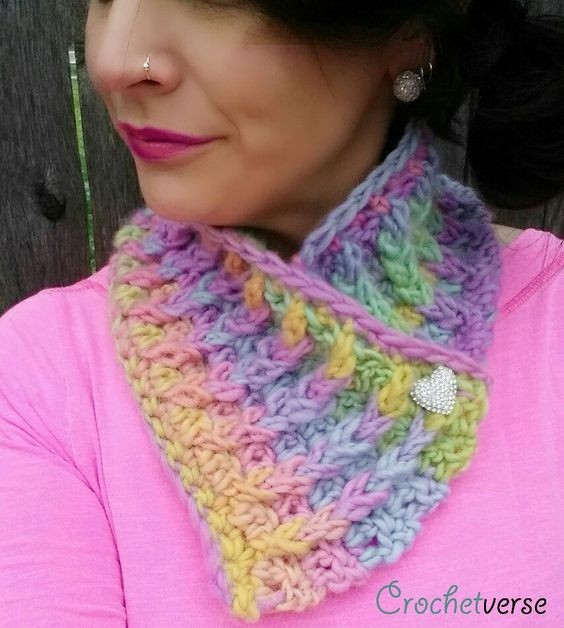
The Crochet Cabled Candy Cowl is a delightful accessory that combines intricate cabling with vibrant colors to create a unique and eye-catching piece. This cowl is perfect for adding a pop of color to any outfit while keeping you warm and cozy during the colder months. The crochet technique used in this design adds a handmade touch that is both stylish and charming. With its playful name and intricate design, the Crochet Cabled Candy Cowl is sure to be a standout piece in your wardrobe. The combination of cabling and colorful yarn creates a visually appealing texture that is both fun and sophisticated. Whether you're heading out for a casual day or dressing up for a special occasion, this cowl is a versatile accessory that will add a touch of whimsy to any ensemble.
Materials
– 150 yards chunky weight size 5 yarn
(Shown: 3 Balls Crystal Palace Chunky Mochi in Babyface)
– Size N (9.0mm) crochet hook
– Large eye tapestry needle for weaving ends
– Button, pin, or closure of your choosing
Finished Size
5.5” tall x 24” long
Sized For
One size fits most teen to adult
Instructions
Chain 45
**As opposed to working in the loop of the chain as standard, turn the chain over and see the BUMPS on the back of each chain. Insert your hook under the BUMP for this piece; it creates a neater edge.**
Row 1
Sc in 2nd hump from hook and each hump across. (44 sc)
Row 2
Ch 1, turn, sc in same st and next st, ch 6, *sc in next 2 sts, ch 6, repeat from *, across. After the final ch-6 that is hanging off the end, sl st back into the last sc made to close that loop.
Row 3
While working, keep all ch-6 loops to the BACK or BEHIND the current row, ch 1 (doesn’t count as a stitch), dc in the 1st sc and each sc across. (44 dc)
Row 4-13
Repeat Rows 2-3, five times more.
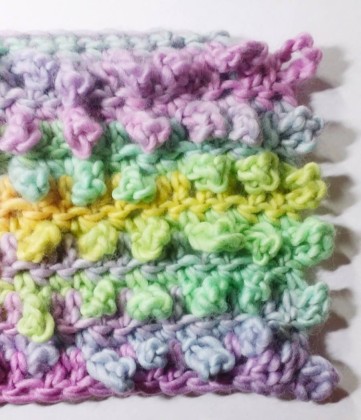
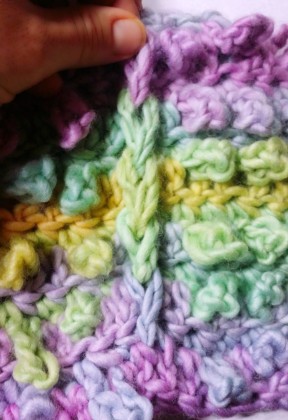
At this point, you will have a rectangle with 22 vertical rows of 6 loops each, like this:
Cabling and Securing the Loops
Now we will cable and secure the loops. Align the cowl so row 1 is on the bottom and row 13 is on the top, and the loops are all facing you. Begin at the bottom right corner loop (this is not the one shown in the photo, but start where I’ve stated). Grab the loop and give it a ½ COUNTER-clockwise turn, like so:
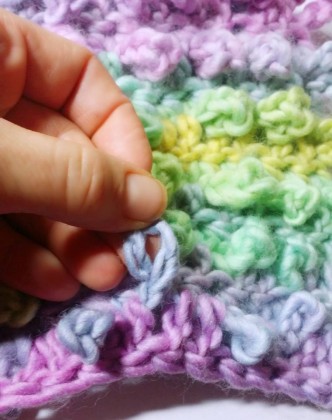
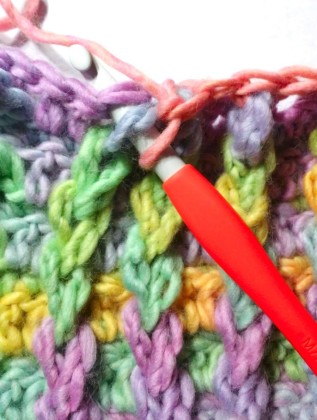
Next, pull the untwisted loop directly above it THROUGH the loop you just twisted, like this:
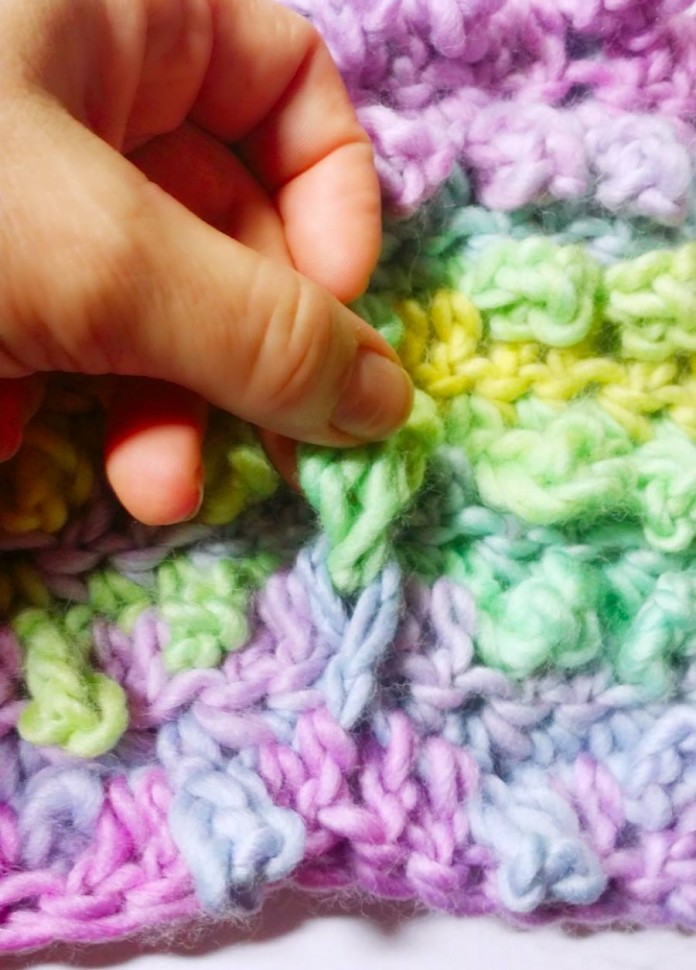
Now, twist that loop you just pulled through a ½ turn counterclockwise, then pull the next loop above it through that twisted loop as before. Continue to pull each loop above through the twisted loop below it, then twist that loop, all the way to the top, shown here:
Securing the Top Loops
Finally, we will secure these top loops by working a row of single crochet across the top, catching that final loop as we work.
Row 14
Ch 1, sc in the 1st st, now catch that final twisted loop and single crochet through that and into the next sc of row 13 as shown below (working yarn through the twisted loop from front to back and into the next sc on the row). Sc in the next sc on row 13 normally, twist the next vertical row of loops to the top and then sc in the next sc on row 13, catching that loop. Continue to alternate a sc on row 13, then sc on row 13, securing the next loop until you reach the other end.
Row 15
Ch 1, turn, sc in each sc across, tie off.
Finishing
Weave in all ends and attach whatever buttons or pins you’d like.