Crochet Josephine Cloche Hat Pattern

Introduction
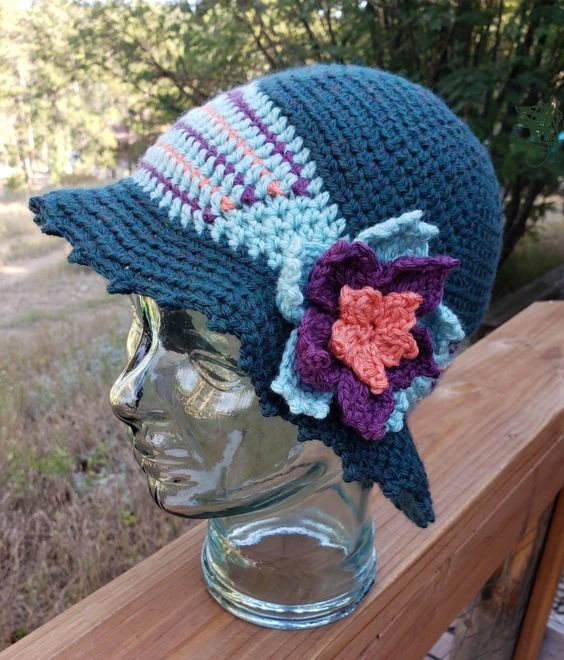
Discover the exquisite artistry of the Crochet Josephine Cloche, a stunning piece that combines vintage charm with modern elegance. This meticulously handcrafted hat is a true testament to the skill and creativity of the artisan who brought it to life. The intricate crochet work creates a delicate and intricate pattern, reminiscent of a bygone era. This unique cloche hat is versatile and can be styled in various ways to suit different occasions. Whether you're attending a garden party, a wedding, or simply want to add a touch of elegance to your everyday outfit, the Crochet Josephine Cloche is the perfect accessory. Its classic silhouette and intricate details make it a standout piece that will surely turn heads wherever you go. Embrace the beauty of the past with this exquisite crochet creation and let it become a cherished addition to your wardrobe.
Skill Level
Intermediate
Stitches Used
- Chain (ch)
- Single Crochet (sc)
- Half Double Crochet (hdc)
- Double Crochet (dc)
- Cluster (Cl)
- Extended Double Crochet (Exdc)
- Picot (picot)
Size
Finished size: 23 inches head circumference at beginning of brim.
Materials
- Yarn – We Crochet “Swish Worsted”, 100% Fine Superwash Merino Wool (50 g; 110yds), #4 weight category
- Color A – #25630 Rainforest Heather (Dark Teal)
- Color B – #26067 Wonderland Heather (Pale Aqua)
- Color C – #25147 Amethyst Heather (Deep Purple)
- Color D – #26068 Conch (Bright Peach)
- Hook – H (5mm) or size needed to obtain gauge.
- Notions – yarn/tapestry needle, 16 stitch markers in 2 colors: 8 in first color, 8 in second color
Gauge
Diameter of first 6 rounds of crown, also 9 rows and 16 sts of double crochet worked in the round, both = 4 inches (10 cm)
Special Stitches/Abbreviations
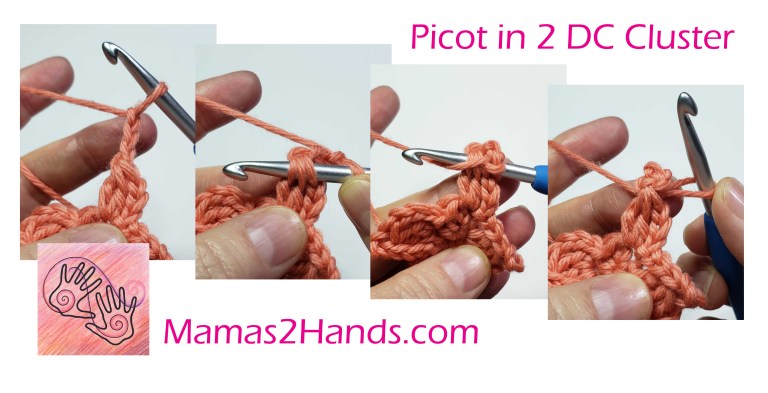
- Picot – ch 3, insert hook through front loop and top side loop of indicated stitch, yarn over (YO), slip stitch tightly.
- Cl (2 dc cluster) – (YO, insert hook in indicated place, YO, pull up a loop, YO, pull through 2 loops) 2 times, YO pull through remaining loops on hook.
- Exdc (Extended double crochet) – YO, insert hook in indicated place, YO, pull up a loop, YO, pull through 1 loop, [YO, pull through 2 loops] twice.
- PM (Place Marker)
Pattern Notes
This hat is worked crown down with standard increases in continuous rounds for the first 13 rounds, then worked is turned so that the front of the previous rounds’ stitches become the wrong side of fabric.
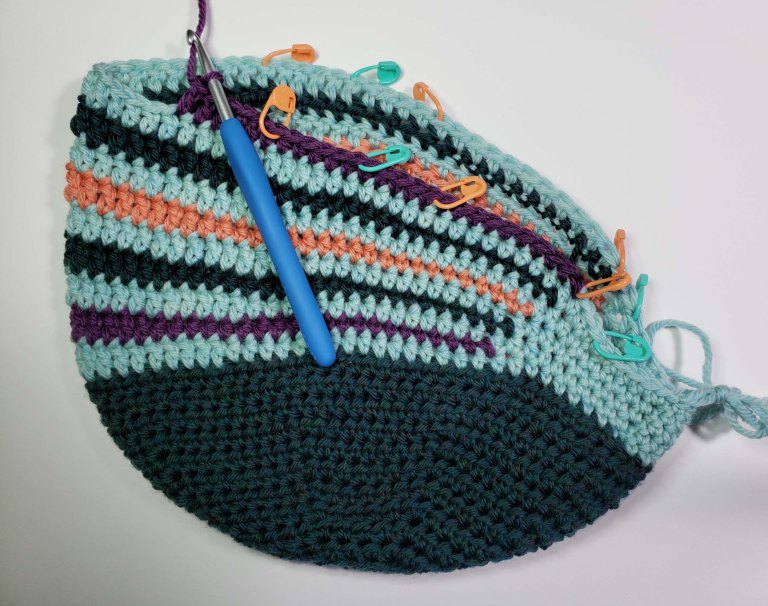
The band of the hat is worked in joined rounds with short rows worked to create asymmetrical shaping. All band rounds and short rows are worked in the same direction. I have included a photo of how I used stitch markers to help me keep track of where the stitch heights change. I used a different color marker for the regular band rounds from the markers for the short rows.
After the band is finished, work is turned again. Next, a flared “drunken” brim is worked in joined rounds, without turning. Then work is turned to crochet the edging. If a more structured brim is desired, the edging can be crocheted over millinery wire to stiffen.
Flowers are worked separately and can be sewn to the hat band or sewn to a pin backing to attach to the hat.
Instructions
Crown
Rnd 1: Start with Color A using an adjustable slip knot, ch 2, (1 sc, 7 hdc) in 2nd ch from hook. PM in last hdc with first color stitch marker. [1 sc, 7 hdc]
Rnd 2: 2 hdc in each stitch, PM in 2nd hdc made using second color stitch markers 7 times, move last stitch marker to last stitch made. [16 hdc]
Rnds 3-10: Hdc in each unmarked stitch, 2 hdc in each marked stitch moving stitch marker to 2nd stitch made. At end of Rnd 10 remove all markers except last stitch marker. [Count at end of Rnd 10 – 80 hdc]
Rnds 11 – 13: Hdc in each stitch to last stitch, move stitch marker up to last stitch of Rnd.
Step down at end of Rnd 13: Sc in next stitch, loosely slip stitch in next stitch, slip stitch in next stitch. Fasten off Color A, change to Color B.
Band
Rnd 1: Continue with Color B, ch 1, turn, sc in loose slip stitch from step down, sc next 6 stitches, hdc next 18 stitches, dc next 30 stitches, hdc next 18 stitches, sc next 7 stitches, join with slip stitch to first sc of Rnd. [14 sc, 36 hdc, 30 dc]
Short Row 1: With Color C. Attach new yarn with slip stitch at 10th stitch from beginning of previous Rnd, sc next 10 stitches, hdc next 10 stitches, dc next 20 stitches, hdc next 10 stitches, sc next 10 stitches, slip stitch next stitch, fasten off yarn. [20 sc, 20 hdc, 20 dc]
Rnd 2: Ch 1, sc next 7 stitches, hdc next 18 stitches, dc next 30 stitches, hdc next 18 stitches, sc next 7 stitches, join with slip stitch to first sc of Rnd. [14 sc, 36 hdc, 30 dc]
Short Row 2: With Color D. Repeat Short Row 1.
Rnd 3: Repeat Rnd 2.
Short Row 3: With Color C. Repeat Short Row 1.
Rnd 4: Repeat Rnd 2.
Short Row 4: With Color D. Repeat Short Row 1.
Rnd 5: Repeat Rnd 2.
Short Row 5: With Color C. Repeat Short Row 1.
Rnd 6: Repeat Rnd 2. Fasten off Color B, change to Color A.
Brim
Rnd 1: Continue with Color A, ch 2 (does not count as a stitch), turn, hdc in each stitch around, skip beginning ch-2, join with slip stitch to first hdc of Rnd. [80 hdc]
Rnd 2: Using 8 stitch markers, PM in 3rd stitch then in every 10th stitch around, ch 2, hdc in each unmarked stitch, 2 hdc in marked stitches moving stitch marker to the second stitch made, skip beginning ch-2, join with slip stitch to first hdc of Rnd. [88 hdc]
Rnd 3: Add a stitch marker in 5th stitch past current stitch markers, for a total of 16 markers, ch 2, hdc in each unmarked stitch, 2 hdc in each marked stitch, move stitch markers to the second stitch made, skip beginning ch-2, join with slip stitch to first hdc of Rnd. [104 hdc]
Rnd 4 & 5: Ch 2, hdc in each unmarked stitch, 2 hdc in each marked stitch, move stitch markers to the second stitch made, skip beginning ch-2, join with slip stitch to first hdc of Rnd. [end of Rnd 5 – 136 hdc]
Rnd 6 (Picot Edging): Ch 1, turn, sc next 2 stitches, picot in sc just made, (sc next 4 stitches, picot in last sc just made) 33 times, sc in next 2 stitches, join with slip stitch to first sc of Rnd. Fasten off. [136 sc, 34 picot]
Flowers
All flowers start with an adjustable slip knot; if substituting a magic circle, ch 1 at the start instead of ch 2.
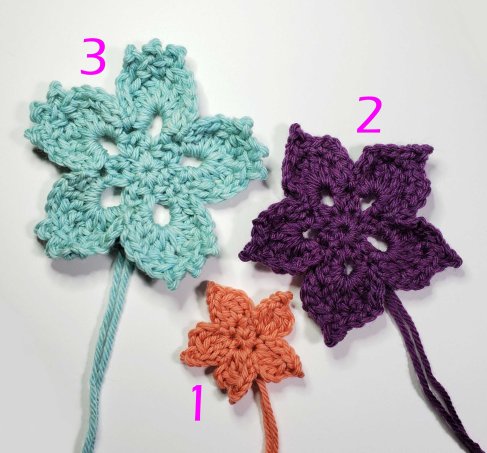
Flower 1
Rnd 1: Color D, ch 2, 5 sc in 2nd ch from hook, tighten center of circle, join with slip stitch to first sc of Rnd. [5 sc]
Rnd 2: Ch 3, Cl in same sc as join, picot in Cl, ch 3 [(sl st, ch 3, Cl) in next sc, picot in Cl, ch 3,] 4 times, sl st in first sc again. Fasten off.
Flower 2
Rnd 1: With Color C, ch 2, 10 sc in 2nd ch from hook, tighten center of circle, join with slip stitch to first sc of Rnd. [10 sc]
Rnd 2: Ch 1, sc in same sc as join, [ch 3, sc in next stitch, ch 1, sc in next stitch] 4 times, ch 3, sc in next stitch, ch 1, join with slip stitch to first sc of Rnd. [10 sc, 5 ch-1 sp, 5 ch-3 sp]
Rnd 3: Ch 1, [(sc, hdc, dc, 3 Exdc, dc, hdc, sc) in ch-3 sp, skip to next ch-3 sp,] 5 times, join with slip stitch to beginning ch-1 of Rnd.
Rnd 4: [Ch 2, skip 2 stitches, sc next stitch, ch 2, sc next stitch, (sc, picot in sc just made, sc) in next stitch, sc in next stitch, ch 2, sc next stitch, ch 2, skip 2 stitches, sl st before next sc] 5 times. Fasten off
Flower 3
Rnd 1: With Color B, ch 2, 10 sc in 2nd ch from hook, tighten center of circle, join with slip stitch to first sc of Rnd. [10 sc]
Rnd 2: Ch 1, [(sc, ch 5, sc) in next stitch, ch 1, skip next stitch] 5 times, join with slip stitch to first sc of Rnd. [10 sc, 5 ch-1 sp, 5 ch-5 sp]
Rnd 3: Ch 1, [(sc, hdc, 2 dc, Exdc, ch 1, Exdc, 2 dc, hdc, sc) in next ch-5 sp] 5 times, join with slip stitch to beginning ch-1 sp.
Rnd 4: [Ch 2, skip 2 stitches, sc next stitch, ch 2, skip 1 stitch, {(sc, picot in sc just made) in next stitch/ch sp} 3 times, ch 2, skip 1 stitch, sc next stitch, ch 2, skip 2 stitches, sl st before next sc,] 5 times. Fasten off
Finishing
Weave in tails for the hat.
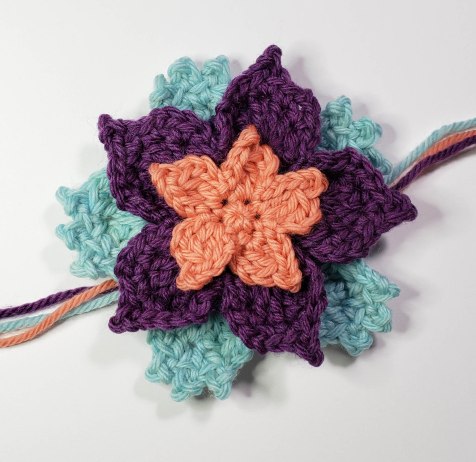
Stack flowers sandwiching Flower 2 between 1 and 3. Use tails to sew them together referencing the photo for staggering of petals.
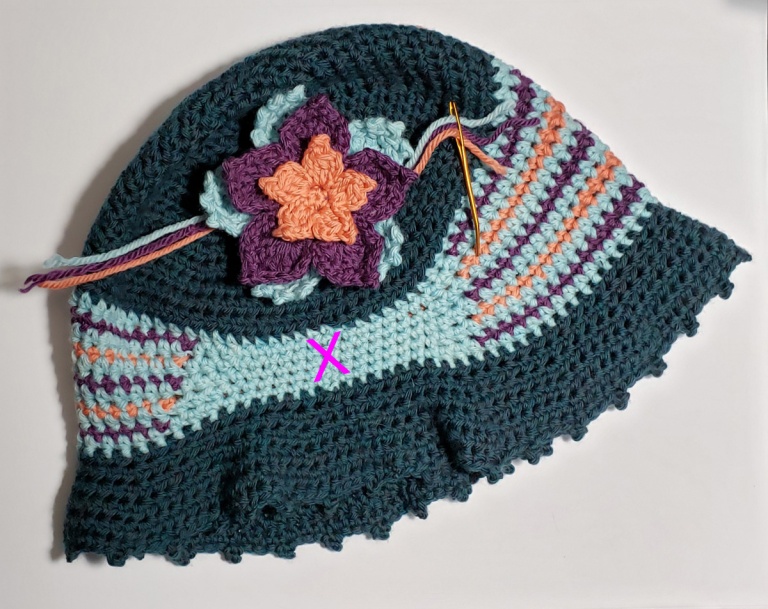
Finish by sewing flowers to the hat band where the pink X is shown in the photo, or sew to a pin backing to make it removable.