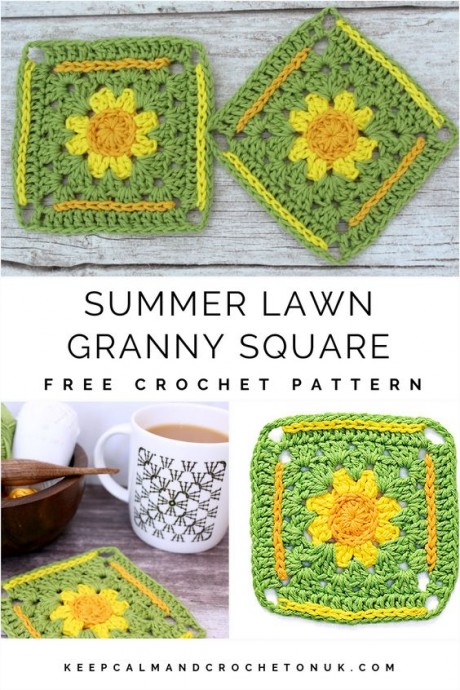
Crochet Summer Lawn Granny Square Pattern

Experience the vibrant and breezy essence of summer with the delightful Crochet Summer Lawn Granny Square. This unique crochet pattern combines the timeless charm of granny squares with the refreshing allure of a summer lawn. Each square is meticulously crafted using a combination of colorful yarns, creating a stunning visual display that captures the essence of the season. Whether you choose to create a blanket, a pillow, or even a stylish garment, this pattern is sure to impress with its unique combination of traditional crochet techniques and a modern twist. So grab your crochet hook and immerse yourself in the world of crochet with the Crochet Summer Lawn Granny Square.
Yarn Required
25g / 58m
Yarn Used in Photos
Rico Ricorumi DK
- YARN A – Tangerine (026)
- YARN B – Saffron (063)
- YARN C – Pistachio (047)
About the Yarn
Rico Ricorumi DK; 8ply / Double Knit; 25g / 58m; 100% Cotton
Finished Size
10cm width x 10cm high
Hook Size(s)
4mm (US size G).
Pattern will work in other hooks and yarns though finished size may be different.
You Will Also Need
- A yarn needle
- Scissors
Gauge
A single square motif measures 10cm² (3.9in²) using a 4mm hook.
Obtaining the correct gauge is not critical to this project but if your gauge does not match the gauge stated then your finished item will be a different size.
Stitch Guidance
- Slip Stitch (sl st): Insert hook in st indicated, yarn over and draw through all loops.
- Treble (tr): Yarn over, insert hook in indicated st and pull up a loop (three loops on hook), yarn over, pull through two loops, yarn over, pull through remaining two loops on hook.
Pattern Notes
- How to Surface Crochet: Start by attaching a slip knot to the back of the crochet area. Then, from the front of the work, insert your hook into the stitch nearby and start working chain stitches on the surface of your crocheted area; continue to work in this way according to the design.
- (…) any stitches in brackets work into one stitch or space.
- *…* any stitches between * icon repeat as required.
Pattern Instructions
The ch3 at the beginning of each round counts as a tr throughout.
With YARN A
Ch4, ss to first ch to join into a ring.
Round 1
Rnd 1 (RS): Ch-3, 11tr into the ring, ss to top of beginning ch-3 to join [12 sts]
Fasten off and weave in ends.
Round 2
Rnd 2: With YARN B join on RS with a ss to the top of any tr, ch3, 1tr in the same st as the beginning ch3, then work 2tr in each st around until end, ss to the top of the beginning ch3 to join. [24 sts]
Fasten off and weave in ends.
Round 3
Rnd 3: With YARN C join on RS with a ss in-between any tr of the previous rnd, ch3, 2tr in the same sp, *miss 3sts, 3tr in-between the next tr’s of the previous rnd, miss 3sts, (3tr, ch3, 3tr) in-between the next tr’s of the previous rnd* repeat from * twice more, miss 3sts, 3tr in-between the next tr’s of the previous rnd, miss 3sts, ss to the top of the beginning ch3 to join. [36 sts + 4 x ch3-sps]
Round 4
Rnd 4: Ch3, (3tr, ch3, 3tr) in the next sp, * 3tr in the next 2sps, (3tr, ch3, 3tr)* repeat from * twice more, 3tr in the next sp, 2tr in the last sp, ss to the top of the beginning ch3 to join. [48 sts + 4 x ch3-sps]
Round 5
Rnd 5: Ch3, 1tr in 3sts, (1tr, ch3, 1tr) in the next sp, * 1tr in 12sts, (1tr, ch3, 1tr)* repeat from * three times, 1tr in the next 8sts, ss to the top of the beginning ch3 to join. [56 sts + 4 x ch3-sps]
Fasten off and weave in ends.
Finishing Touches
- With YARN A surface crochet around the top of rnd 1.
- With YARN A surface crochet on top of two opposite sides of rnd 4.
- With YARN B surface crochet around the posts of rnd 5 on opposite sides to the YARN A.
And that’s it, you’ve finished your lovely new motif!