How to Crochet a Beautiful Granny Square and Adorable Butterfly

Crocheting a beautiful granny square can be a delightful and rewarding experience. The repetitive yet soothing nature of creating each stitch allows you to immerse yourself in a calming and creative activity. With a variety of colors and textures to choose from, you can let your imagination run wild and design a unique square that reflects your personal style. Whether you're a beginner or an experienced crocheter, granny squares are a timeless classic that never fail to impress with their charm and versatility. So grab your hook, pick your favorite yarn, and enjoy the meditative process of crafting a beautiful granny square that you can be proud of!
Materials
D, F, and G hook
Red Heart Blue, Caron Soft Light Blue, Purple, and Yellow yarn or whatever yarn you prefer
Abbreviations
- sl st = slip stitch
- sc = single crochet
- ch = chain
- dc = double crochet
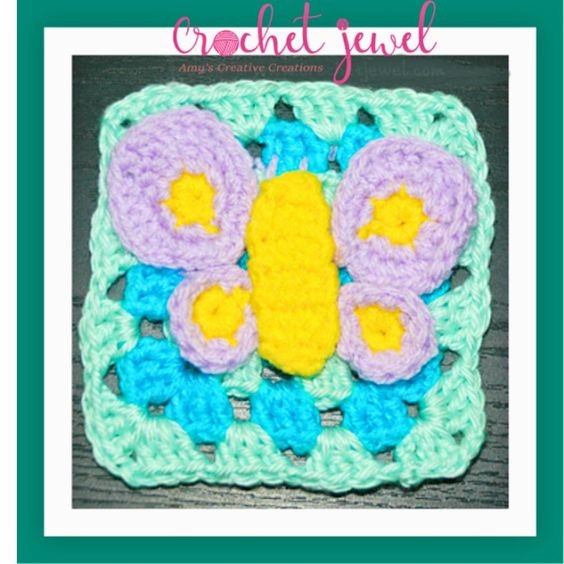
Instructions for the Granny Square
Starting the Granny Square with G Hook
Chain 6 and join with a sl st to the first ch to form a ring.
Round 1
Start with dark blue yarn, ch 3, 2 dc in ring, ch 2, (3 dc in ring, ch 2) 3 times, join with a sl st to the top of first ch‑3. Fasten off.
Round 2
Join in light blue yarn, with a sl st in the first ch space, ch 3, (2 dc, ch 2, 3 dc) in the same space to form a corner, (ch 1, 3 dc, ch 2, 3 dc all in the next ch‑2 space) 3 times for 3 more corners, ch 1, join with a sl st to the top of the first ch‑3. Fasten off.
Round 3
Join in dark blue yarn, ch 3, (2 dc, ch 2, 3 dc) in the same space, work (ch 1, 3 dc) in each ch‑1 space along the straight edge and (ch 1, 3 dc, ch 2, 3 dc) in each ch-2 space for the corner, ch 1, join with a sl st to the top of the first ch‑3. Fasten off.
Round 4
Join with light blue yarn, ch 3, (2 dc, ch 2, 3 dc) in the same space. For this and every following round, work (ch 1, 3 dc) in each ch‑1 space along the straight edge and (ch 1, 3 dc, ch 2, 3 dc) in each ch‑2 space for the corners, ch 1, join with a sl st to the top of the first ch‑3. Fasten off. Repeat this step until it is a square.
Instructions for the Butterfly
Body (Using Yellow Yarn, D Hook)
Ch 3,
- Row 1: Base row, 2 sc in 3rd ch from hook. Turn.
- Rows 2–3: Next two rows, 2sc increase at the beginning of the row and sc in each stitch across. Turn.
- Rows 4–11: sc in each stitch across, turn. Repeat this row 8 times.
- Row 12: Ch 1, skip first sc, 1 sc in each of next 2 sc. Fasten off.
Small Wings (Starting with Yellow Yarn, Make 2, G Hook)
Ch 4 and join with a sl st to the first ch to form a ring.
- Rnd 1: ch 1, 7 sc in ring, join with a sl to first ch. Fasten off.
- Rnd 2: Join with purple yarn with a sl st, ch 1, 2 sc in each of the next 2 sc, 2 dc in each of the next 3 sc, 2 sc in each of the next 2 sc, join with a sl st to the first ch. Fasten off.
Large Wings (Make 2)
Work as for small wings from the previous steps:
- Rnd 3: ch 1, 2 sc in each of the next 3 sts, 2 dc in each of the next 2 sts, 1 dc in each of the next 4 sts, 2 dc in each of the next 2 sts, 2 sc in each of the next 3 sts, join with a sl st to the first ch.
Fasten off.
Assembly
Sew body to the Granny Square, and sew on antennae above the body.