Create Your Own Beautiful Crochet Clutch Bag

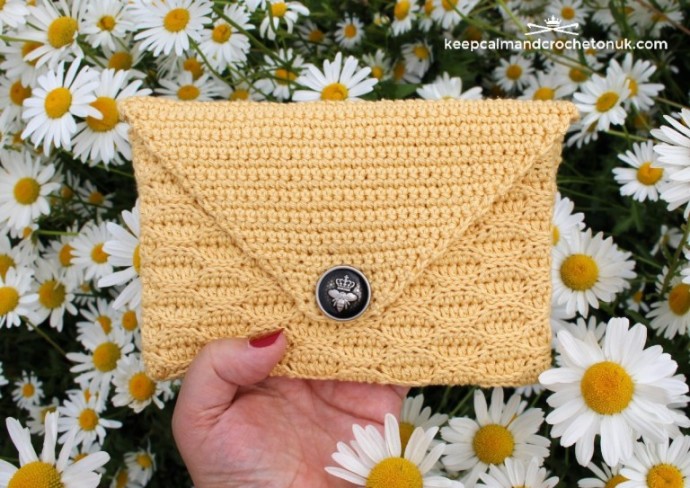
Unleash your creativity and embark on a delightful crochet journey as you craft your very own beautiful clutch bag. With just a few simple tools and some colorful yarn, you can transform a plain piece of fabric into a stunning accessory that will turn heads wherever you go. Once completed, your crocheted clutch bag will not only be a testament to your skills but also a fashionable statement piece that will complement any outfit. So, grab your crochet hook and let your imagination run wild as you embark on this exciting crochet adventure.
Materials
Yarn Required: 100g of Yellow
Yarn Used: Anchor Creativa Fino used in photos;
(Shade: #00306)
About the Yarn: 4ply / Fingering Weight; 125m per 50g ball, 100% Cotton
Hook Size: 3mm (US size D/3)
Pattern will work in other hooks and yarns though finished size will be different.
You Will Also Need:
- A yarn needle
- Stitch Markers
- 2cm (0.8”) Button
- Optional: Facing and material for lining your bag
Finished Size: 19cm (7.4 inches) wide x 12cm (4.7 inches) high
Gauge: 6sts = 2.5cm (1”)
Obtaining the correct gauge is not critical to this project but if your gauge does not match the gauge stated then your finished item will be a different size.
Stitch Guidance
Slip Stitch (sl st): Insert hook in st indicated, yarn over and draw through all loops.
Double Crochet (dc): Insert hook in st indicated and pull up a loop (two loops on hook), yarn over, pull through both loops on hook.
Double Crochet 2 Together (dc2tog): Invisible double crochet decrease method: Invisible decreasing is a method of removing stitches to shape your fabric without gaps. Insert hook in the FRONT LOOP ONLY of the first stitch indicated and pull up a loop [two loops on hook], insert hook in the FRONT LOOP ONLY of the next st, pull up a loop [three loops on hook], yarn over, pull through three loops on hook; decrease made.
Half Treble (htr): Yarn over, insert hook in next st and pull up a loop (three loops on hook), yarn over, pull through all three loops on hook.
Pattern Notes
Working in the Back Loop Only: If you hold your piece of crochet in front of you with the Vs of the stitch on top, the part of the V closest to you is the front loop. The part of the V farther away from you on the opposite side is the back loop. When a pattern asks you to crochet into the back loop, insert your hook into the relevant loop and crochet as instructed.
Note: The ch1 at the beginning of a row counts as a st.
Pattern
Main Body of Clutch:
Tip 1: If you struggle with twisting the row 1 try adding a row of dc as row 1, then work row 1 as row 2 and so on.
Tip 2: You might also find using stitch markers (or alternatives) to mark each row or where your last sl st, of each set of 5, helpful for this block.
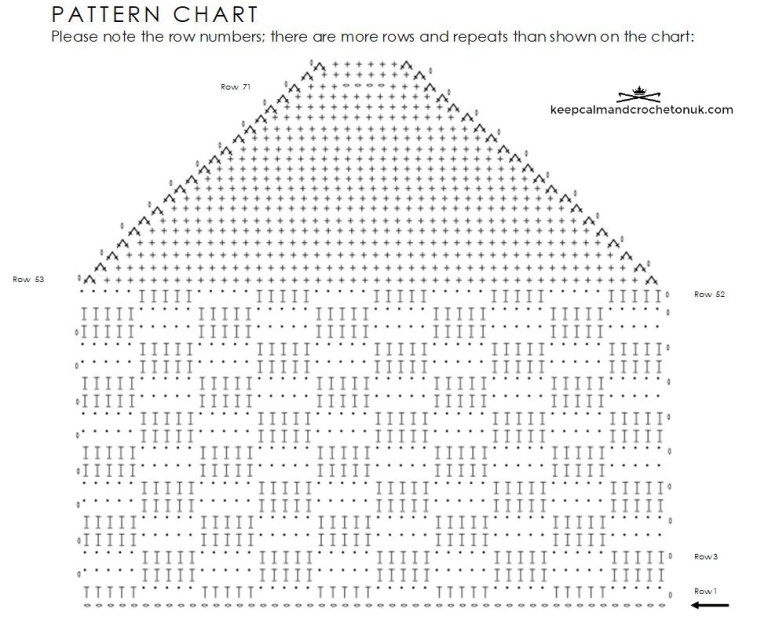
Row 1 (RS): Ch 51, sl st into the 2nd ch from the hook and sl st in the next 4sts * htr in the next 5 sts, sl st in the next 5 sts * repeat from * to * until the end of the row, turn (50 sts)
Note: From this point onwards work rows in the back loops only.
Row 2 (WS): Ch1 *5 sl st in 5 htr then 5htr in 5 sl st * repeat from * to * until the end of the row, turn.
Row 3 (RS): Ch1, *5 htr in 5 htr then 5 sl st in 5 sl st * repeat from * to * until the end of the row, turn.
Row 4 (WS): Ch1, *5 htr in 5 sl st then 5 sl st in 5 htr * repeat from * to * until the end of the row, turn.
Row 5: Ch1, 5 sl st in 5 htr then 5htr in 5 sl st * repeat from * to * until the end of the row, turn.
Row 6-52: Repeat rows 2-5 thirteen times.
From this point onwards you will begin shaping the clutch flap;
Row 53: Ch1; dc2tog, 1dc in 46sts, dc2tog, turn. 48sts
Row 54: Ch1; dc2tog, 1dc in 44sts, dc2tog, turn. 46sts
Row 55: Ch1; dc2tog, 1dc in 42sts, dc2tog, turn. 44sts
Rows 57 – 71: Continue decreasing on each end until you have 14sts left.
Row 72: Ch1; dc2tog, 1dc in 3sts, ch4, miss 4sts, 1dc in 3sts, dc2tog, turn. 12sts
Row 73: Ch1; dc2tog, 1dc in 3sts, 1dc in each of the ch4 sts, 1dc in 3sts, dc2tog, turn. 10sts
Row 74: Ch1; dc2tog, 1dc in 6sts, dc2tog, turn, fasten off and weave in ends. 8sts
Making Up
Fold the bag in half, leaving the gap at the top open with the flap, and seam both sides together on the wrong side.
Turn your bag right side round and add your button to the body of the bag opposite the open button hole.
Optional: Create a lining for your bag.