How to Make a Cute Crochet Pizza Slice Keychain

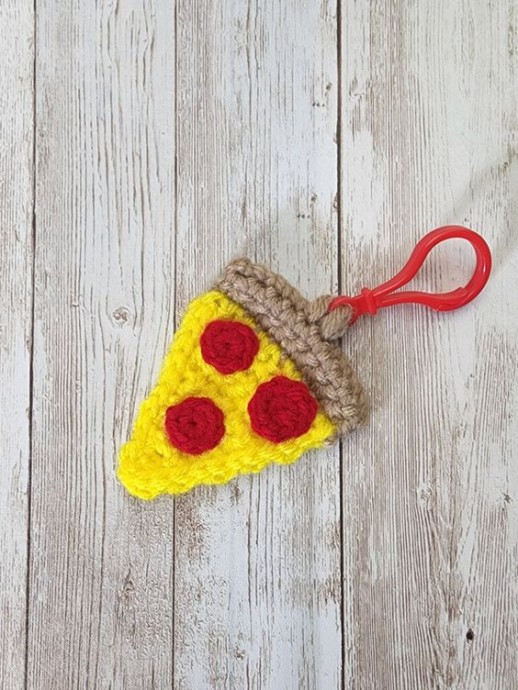
Create your very own miniature pizza slice keychain using the art of crochet! This fun and quirky accessory is perfect for adding a touch of personality to your keys or bag. With just a few basic crochet stitches and some colorful yarn, you can whip up a cute and unique keychain that is sure to turn heads. Customize your pizza slice with different toppings, from pepperoni to mushrooms, to make it truly your own. This project is great for beginners looking to practice their crochet skills while making something fun and practical. Whether you're a seasoned crocheter or just starting out, this project is a fun and easy way to create a one-of-a-kind accessory that will make you smile every time you reach for your keys. Give your keychain as a thoughtful gift to a friend or keep it for yourself as a reminder of your crafting skills. So grab your crochet hook and yarn, and get ready to make a deliciously cute pizza slice keychain that will be the envy of all your friends!
Materials
- 3.5mm & 4mm Hooks
- Yarn Needle
- 4/Worsted Weight Yarn in tan, yellow, and red (just a few yards of each!)
- Keyring, lobster clip, or desired clip type
- (Optional) Red Felt
- (Optional) Hot glue
Glossary
US Terminology
- SC – Single Crochet
- CH – Chain
- DEC- Decrease
- SLST – Slip Stitch
- F/O – Fasten Off
Directions
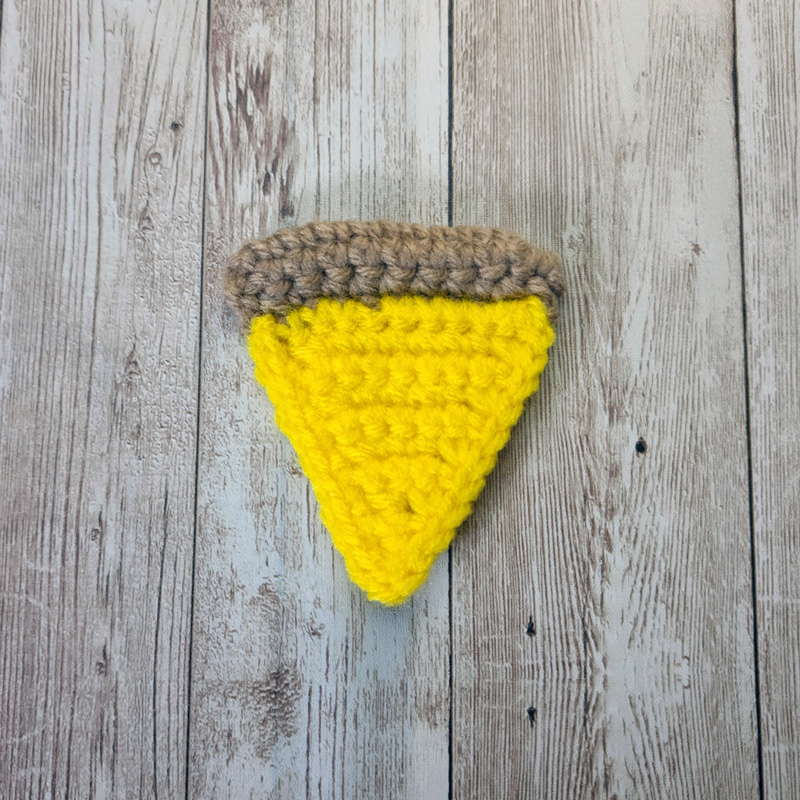
Tan/Brown Yarn
Start: Ch11, leave a tail a few inches long for sewing later
- 10sc, ch1, turn
- 10sc, ch1, turn
- 10sc, ch1, turn
- Fold the piece in half longways to form the crust. Use 10sc stitches all the way across to stitch the sides together.
- F/o. Use your yarn tails to sew the ends of the crust closed.

Yellow Yarn
- Attach your yellow yarn to the crust with a slst. Then 1sc in ea st across.
- 10sc, ch1, turn
- dec, 6sc, dec, ch1, turn
- 8sc, ch1, turn
- dec, 4sc, dec, ch1, turn
- 6sc, ch1, turn
- dec, 2sc, dec, ch1, turn
- 4sc, ch1, turn
- 2dec, ch1, turn
- 2sc, ch1, turn
- dec, ch1, do NOT turn
- Cut yarn, f/o, weave in tail.
- Attach to the top left corner of the cheese with a slst.
- Make 1slst in each row around both sides of the triangle. (See 2nd image)
Pepperoni – Make 3
Option 1: Hot glue dime-sized circles of red felt to the pizza
Option 2:
- 3.5mm hook, red yarn
- 8sc into a magic circle, slst to close
(If you’re unfamiliar with the magic circle, you can ch2 and work all 8sc into the 2nd ch from your hook) - f/o, weave in tails
- Hot glue or sew the pepperonis onto the pizza.
Keyring
Using a yarn needle and the same tan yarn you used for your crust, sew the keyring onto the pizza.
Make sure not to cinch up your stitches too tightly, or else your keyring won’t be able to swing or twist as it’s being used.
I like to make several open loops with my yarn passing through the keyring to make sure it’s sturdy enough while still being able to swing and twist appropriately.