Crochet Slice of Birthday Cake Granny Square

Celebrate your special day with a unique twist by creating a Crochet Slice of Birthday Cake Granny Square! This delightful pattern combines the art of crochet with the joy of birthdays, resulting in a charming and whimsical design. The square itself is shaped like a slice of cake, complete with intricate details that mimic the layers of frosting and sprinkles. The vibrant colors used in this pattern add a festive touch, making it the perfect addition to any birthday-themed project. Whether you're a seasoned crocheter or just starting out, this pattern is suitable for all skill levels. The step-by-step instructions guide you through each stitch, ensuring that you can create a beautiful and realistic slice of cake. Once completed, you can use these granny squares to make a variety of projects, such as blankets, pillows, or even a unique birthday-themed wall hanging. So, grab your crochet hook and yarn, and let your imagination run wild as you bring this delightful Crochet Slice of Birthday Cake Granny Square to life!
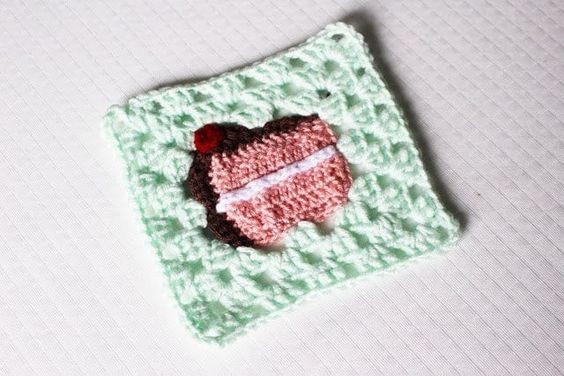
Materials
- Worsted weight yarn (I used Vanna’s Choice) in pink, chocolate, mint, a small amount of white and cranberry
- Size H 5mm crochet hook
- Tapestry needle
Cake Instructions
Begin with a slip knot in baby pink, Ch 13
Row 1: Dc in 2nd Ch from hook, Dc in each st across, Ch 2, turn
Rows 2-5: Dc in each st across, Ch 2, turn
Row 6: Dc in each st across, Ch 1
Working down the edge/side of the rectangle, Sc in each st across, finish off, weave ends
Frosting Instructions
Join chocolate yarn to the same spot you just finished off your baby pink, Ch 1
Row 1: Working along the long side of the rectangle, Sc in first 3 sts, Hdc in next 3 sts, Dc in next 2 sts, Trc in next 3 sts (your last Trc st should be in the corner)
Corner: Still working in the same corner st, Dc and Hdc
Row 2: Working down the other short side of the rectangle, Sc in each st, Ch 1, turn
Row 3: Sc in each st across until you reach the corner cluster of sts, sl st to join, finish off, weave ends
Working with white yarn, begin with a slip knot, Ch 12, finish off leaving a long tail for sewing
Sew this frosting along Row 3 of the cake, weave ends
Cherry Instructions
Begin with a magic ring in brick, Ch 1
Round 1: Work 6 Sc inside ring, sl st to join, finish off leaving a long tail for sewing onto corner of frosting
Granny Square Instructions
Round 1: With new color, sl st into top right corner of cake, all in the same st: CH 2, 2 DC, CH 3, 3 DC, CH 1, skip 3 sts, 3 DC in next st, CH 1, *3 DC, CH 3, 3 DC, CH 1, skip 3 sts, 3 DC in next st, CH 1*, repeat from * twice more forming a square, sl st to beginning CH 2
Rounds 2-3: Continue in this same manner – in corners 3 DC, CH 3, 3 DC, CH 1 and in all other CH spaces 3 DC, CH 1, finish off, weave ends