Crochet Happy Pears Coasters – A Whimsical DIY Project

Discover the joy of creating your very own set of Crochet Happy Pears Coasters! This delightful crochet project will not only add a touch of whimsy to your home decor but also bring a smile to your face every time you use them. With their vibrant colors and adorable pear shape, these coasters are sure to be a conversation starter at your next gathering. Get ready to embark on a crochet adventure as you dive into the world of Happy Pears Coasters! This unique and fun project will allow you to showcase your creativity and crochet skills while adding a playful element to your living space. Whether you're a seasoned crocheter or just starting out, these coasters are perfect for all skill levels. So grab your crochet hook, choose your favorite yarn colors, and let the magic of crochet bring these charming pears to life!
Materials Needed
Small amounts of any worsted weight yarn.
The pattern was made with Drop Paris yarn.
Yarn: Drop Paris – 100% cotton, 50g/1.8oz, 75m/82yds
Crochet hook from 3.5 mm.
Difficulty Level: Level 1 – Easy, for beginners
US Crochet Terms
- SlSt – slip stitch
- CH/s – chain/s
- SC – single crochet
- HDC - half double crochet
- DC - double crochet
- TR - triple crochet (treble)
- SK - skip
- T - turn
- ST/s - stitch(es)
REP - repeat
Pattern Notes
- A Ch 3 at the beginning of the row counts as dc throughout.
- Finish rounds with sl st.
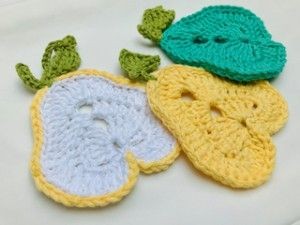
- This happy pear is worked in rounds. It's really a wonderful design - you can create smaller or larger pears that would make great coasters, doilies, or wall art.
- If you like to make the same pattern, adding pears in different colours is a great way to create small changes. This pear design can be worked in any green, yellow, and white colour.
- Arrange the pears in a way that makes you happy or hand sew them to your lovely project.
The Pattern Instructions
Make magic ring
R1: ch5, 5tr, ch3, 5tr, ch5, sl st in magic ring
R2: ch3, 5sc around ch5 space from R1, 1sc in next st, 1hdc in the same st, 1dc in next 4 st, in ch3 space (the mid-point): 3tr, ch3, 3tr, 1dc in next 4 st, 1hdc in next st, 1sc in the same st, 5sc around the last st, sl st in 1st ch to close the round
R3: ch3 (1dc), 1dc in next 3 st, 2dc in next 2 st, 1dc in next 3 st, 3dc in next st, 1dc in next 3 st, 2dc in next st, 3tr in next st, in ch3 space (the mid-point): 2tr, ch1, 2tr, 3tr in next st, 2dc in next st, 1dc in next 3 st, 3dc in next st, 1dc in next 3 st, 2dc in next 2 st, 1dc in next 4 st, ch3, sl st in the 1st ch to close the round
The Leaf - First Version
Start on top of the pear, in the mid-point
Make a slip knot, pull the chain through ch1 space in the top of the pear, ch9, in the 5th ch from the hook: 3tr, ch1, 3tr, ch5, ch2, turn, sl st in next 6 chains till the beginning of the row
The Leaf - Second Version
ch8, in the 5th ch from the hook: 2tr, picot (ch3, sl st in 3rd ch), 1tr, ch5, sl st in next 3 st. Then start new chain: ch6, turn, sl st in next 5 ch, sl st in the top of the pear to join.
Measurements
4 inch / 10 cm long
3.5 inch / 9 cm wide
Leaf: 2 inch / 5 cm long
Fasten off, hide all loose tails in the back of your work and you are all done my friends.
You just created an amazing happy pear!