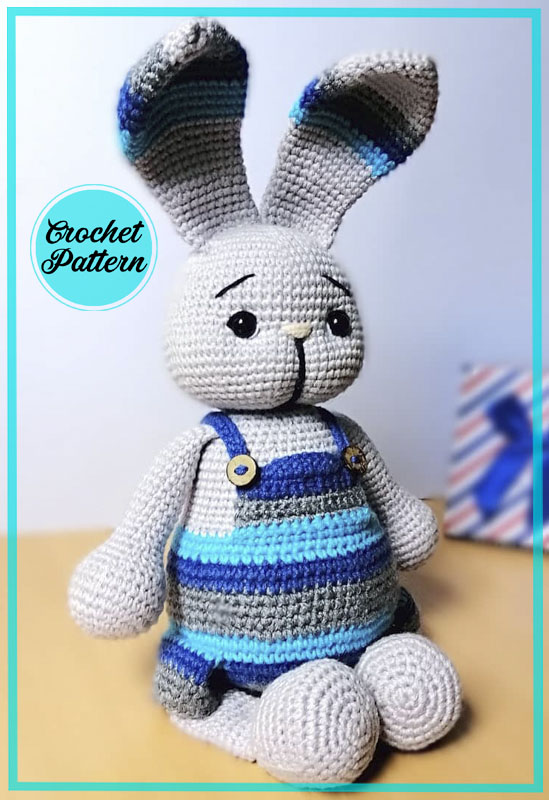
Crochet Bunny in Overalls Amigurumi

Discover the enchanting world of the Crochet Bunny in Overalls Amigurumi! This adorable creation combines the art of crochet with the charm of a bunny wearing overalls. With its soft and cuddly texture, this amigurumi bunny is perfect for both children and adults alike. Whether you're a seasoned crocheter or just starting out, this project is perfect for all skill levels. The pattern provides clear instructions and helpful tips, ensuring that your crochet bunny turns out just right. So grab your crochet hook and yarn, and let your creativity soar as you embark on the delightful journey of making the Crochet Bunny in Overalls Amigurumi.
Necessary Materials
- Yarn Alize Cotton Gold or YarnArt Jeans of the main and additional colors.
- Hook number 1.75 or 2 (whichever is convenient for you to crochet).
- Eyes on secure fastening 8mm or beads.
- Yarn for tightening and embroidering faces.
- Holofiber or synthetic fluff.
- Rattles (optional).
- Two buttons 8-9mm.
- Needle.
Abbreviations
- AR – Amigurumi Magic Ring
- LL: Lifting Loop
- MR – Amigurumi Magic Ring
- App – Application
- sc : Single Crochet
- inc : Increase
- dec : Decrease
- tr : Triple Crochet/ Treble Crochet
- st: Stitch
- dc : Double Crochet
- hdc: Half Double Crochet
- sl-st : Slip Stitch
- ch : Chain
- ..in : make increase into the same stitch as many as the number which is given in front of “inc” abbreviation (e.g., 3inc, 4inc).
- FLO: Crochet into front loops only
- BLO: Crochet into back loops only
- BL: Bobble Stitch – do 5dc all in the same stitch and then yarn over and pull through all the loops on your hook (the original loop + 1 loop for each partially completed dc).
Head Instructions
- 1p. 6sc in MR
- 2p. 6 increase (12sc)
- 3p. (1sc, 1inc)×6 (18sc)
- 4p. (2sc, 1inc)×6 (24sc)
- 5p. (3sc, 1inc)×6 (30sc)
- 6p. (4sc, 1inc)×6 (36sc)
- 7p. (5sc, 1inc)×6 (42sc)
- 8p. (6sc, 1inc)×6 (48sc)
- 9p. (7sc, 1inc)×6 (54sc)
- 10p. (8sc, 1inc)×6 (60sc)
- 11-15p. crochet 60sc
- 16p. We put a marker 7sc (3sc, 1inc)×4 times; 14sc (3sc, 1inc)×4 times, 7sc (68sc)
- 17p. 7sc (4sc, 1inc)×4 times; 14sc (4sc, 1inc)×4 times, 7sc (76sc)
- 18-20p. crochet 76sc
- At this stage, we insert safe eyes, for this, in the 16th row, we count from the marker, 6sc to the left and 6sc to the right, insert, weld, fix. And you can start stuffing your head little by little.
- 21p. 7sc (4sc, 1dec)×4 times; 14sc (4sc, 1dec)×4 times, 7sc (68sc)
- 22p. 7sc (3sc, 1dec)×4 times; 14sc (3sc, 1dec)×4 times, 7sc (60sc)
- 23p. (8sc, 1dec)×6 times (54sc)
- 24p. (7sc, 1dec)×6 times (48sc)
- 25p. (6sc, 1dec)×6 times (42sc)
- 26p. (5sc, 1dec)×6 times (36sc)
- 27p. (4sc, 1dec)×6 times (30sc)
- 28p. (3sc, 1dec)×6 times (24sc)
- 28p. (2sc, 1dec)×6 times (18sc)
- Do not forget to fill your head with holofiber.
- 29p. (1sc, 1dec)×6 times (12sc)
- 30p. 6 decrease, close tightens the hole, fix and cut the yarn.
Upper Legs (Hands) Instructions
- 1p. 6sc in MR
- 2p. 6 increase (12sc)
- 3p. (1sc, 1inc)×6 (18sc)
- 4p. (2sc, 1inc)×6 (24sc)
- 5p. (3sc, 1inc)×6 (30sc)
- 6-8p. (30sc)
- We insert the rattles.
- 9p. (3sc, 1dec)×6 times (24sc)
- 10p. 24sc (Stuff the foot while crocheting.)
- 11p. (2sc, 1dec)×6 times (18sc)
- 12p. (4sc, 1dec)×3 times (15sc)
- 13-27p. (15sc)
- !!! We do not fill the foot tightly !!!
- 28p. Fold crocheting in half, crochet together 7sc. Fasten the yarn.
- We crochet the second foot in the same way.
Lower Foot (Leg) Instructions
- 1p. 6sc in MR
- 2p. 6 increase (12sc)
- 3p. (1sc, 1inc)×6 (18sc)
- 4p. (2sc, 1inc)×6 (24sc)
- 5p. (3sc, 1inc)×6 (30sc)
- 6p. (4sc, 1inc)×6 (36sc)
- 7-8p. (36sc)
- We insert the rattle.
- 9p. (4sc, 1dec)×6 times (30sc)
- 10p. crochet 30sc
- 11p. (3sc, 1dec)×6 times (24sc)
- 12p. crochet 24sc
- 13p. (2sc, 1dec)×6 times (18sc)
- 14p. 18sc
- We do not stuff the lower legs.
- 15p. Fold the crocheting in half, crochet 9sc. Fasten the yarn.
- We crochet the second foot in the same way.
Shorts Instructions
We collect a chain of 26 air loops, connect them into a ring and crochet 6 rows in an additional color, finish the row of connecting stitches and fix the yarn. We crochet the second workpiece in the same way.
Attaching Legs to Shorts
We yarn the finished knife into the workpiece of the shorts, smooth the workpiece in half, so that the leg is in the center and crochet everything together, fasten the yarn 13sc. We do the second part in the same way.
Body Instructions
- We start crocheting with an additional (color of the shorts).
- 1p. 8sc in MR
- 2p. 8 increase (16sc)
- 3p. (1sc, 1inc)×8 (24sc)
- 4p. (2sc, 1inc)×8 (32sc)
- 5p. (3sc, 1inc)×8 (40sc)
- 6p. (4sc, 1inc)×8 (48sc)
- 7p. (5sc, 1inc)×8 (56sc)
- 8p. (6sc, 1inc)×8 (64sc)
- 9p. (7sc, 1inc)×8 (72sc)
- 10p. (72 sc)
- 11p. We crochet the legs.
- 12-14p. (72sc)
- 15p. (7sc, 1dec)×8 times (64sc)
- 16-18p. (64sc)
- 19p. (6sc, 1dec)×8 times (56sc)
- 20-21p. (56sc)
- 22p. Change the color to the main one and crochet by the back loop (56sc)
- 23p. (5sc, 1dec)×8 times (48sc)
- 24-31p. (48sc)
- 32p. (4sc, 1dec)×8 times (40sc)
- 33p. We crochet the legs, focusing on the lower legs, we crochet 7sc with a foot., 14sc, 7sc with a foot, 14sc (40sc)
- 34p. (3sc, 1dec)×8 times (32sc)
- 35p. (2sc, 1dec)×8 times (24sc)
- 36p. (1sc, 1dec)×8 times (16sc)
- 37p. (8dec) pull off the hole, secure and cut the yarn.
Ears Instructions
We take the hook number 2, if we crochet it and do not change anything.
- 1p. 4sc in MR
- 2p. 4 inc (8sc)
- 3p. (1sc, 1inc)×4 (12sc)
- 4p. (2sc, 1inc)×4 (16sc)
- 5p. (3sc, 1inc)×4 (20sc)
- 6p. (4sc, 1inc)×4 (24sc)
- 7p. (5sc, 1inc)×4 (28sc)
- 8p. (6sc, 1inc)×4 (32sc)
- 9-13p. (32sc)
- 14p. (6sc, 1dec)×4 times (28sc)
- 15p. (28sc)
- 16p. (5sc, 1dec)×4 times (24sc)
- 17-20p. (24sc)
- 21p. (4sc, 1dec)×4 times (20sc)
- 22-24p. (20sc)
- 25p. Fold in half and crochet 10sc, finish crocheting, fasten yarn.
- We embroider faces to your liking.
- Sew the head tightly.
- We put the ears closer to each other and sew them neatly.
Adding Straps to Shorts
We divide the tummy visually in half and from the center to the left we push 7 loops, for the front loops of the 22nd row we crochet with a yarn of an additional color 15sc, 1ch we turn crocheting and continue to crochet 15sc, 1ch we turn crocheting and crochet 15sc. So we crochet 6 rows. In the 7th row: 2sc, 7ssn., 2sc we finish crocheting, fasten and hide the yarn. Divide the back also visually in half, retreat from the center to the left 3 loops, crochet an additional color 7sc 1ch turn crocheting crochet 7sc 1ch and from the second loop crochet 6sc 1ch turn crocheting and crochet 6sc 1ch from the second loop crochet 5sc 1ch turn crocheting and crochet 5sc.
We do not finish crocheting, but we collect 25ch and in the chain from the 4th pelti we crochet sc to the end of the dialed chain – this will be the shoulder strap, we connect the chain with the back detail, we crochet 2sc and we collect 25ch, we repeat everything that we did with the first straps. Sew the finished straps with buttons to the front of the shorts. The straps can be made lighter by tying a chain from ch and sewing it in a V-shape from the back to the shorts for the front loops of row 22, and sew in front as you like to the front loops of row 22.