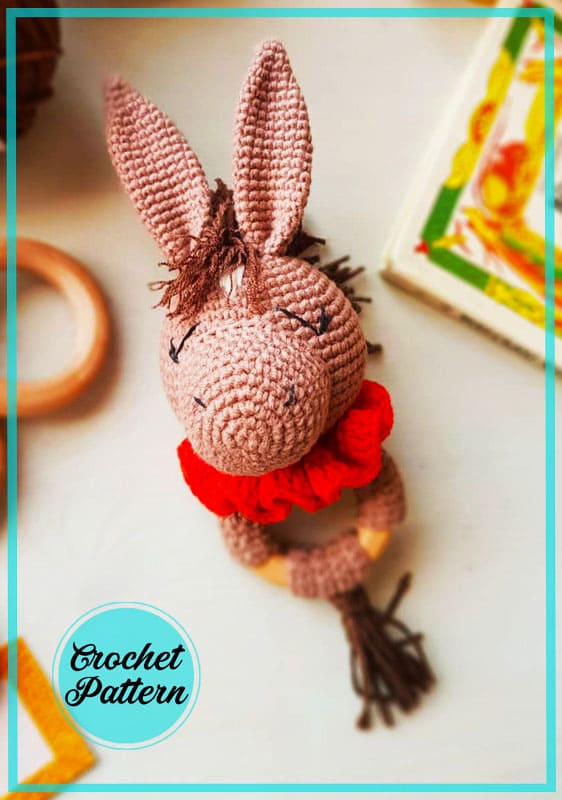
Crochet Rattle Horse Amigurumi Instructions

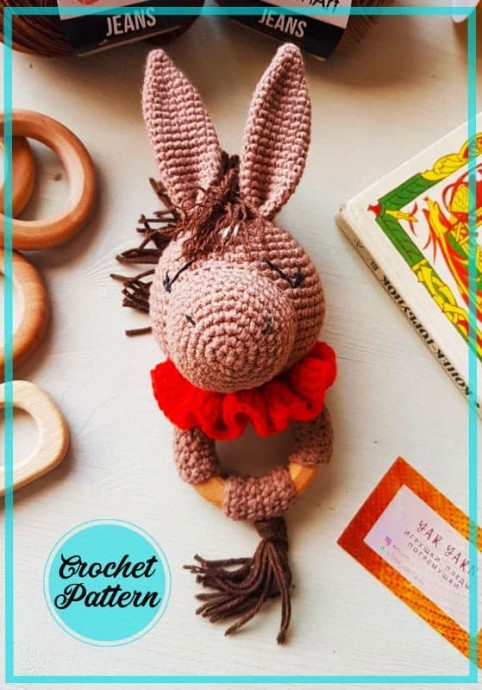
Discover the enchanting world of the Crochet Rattle Horse Amigurumi! This adorable handmade toy is a perfect companion for little ones, providing hours of entertainment and sensory stimulation. Crafted with love and attention to detail, this crochet rattle horse is designed to captivate the imagination and bring joy to children of all ages. Immerse yourself in the magic of the Crochet Rattle Horse Amigurumi, a delightful creation that combines the art of crochet with the charm of a rattle toy.
Handcrafted with precision and care, this whimsical horse is sure to become a cherished keepsake. Its soft and cuddly texture, coupled with the gentle rattle sound, will engage and soothe babies, while also stimulating their senses and fine motor skills. Whether it's a gift for a baby shower or a special treat for your little one, the Crochet Rattle Horse Amigurumi is a timeless treasure that will bring smiles and laughter to all who encounter it.
Materials Needed
- Yarn (semi-cotton, cotton) coffee, dark brown, milky and red (I have YarnArt Jeans)
- Threads (Iris) black
- Hook 2.0 mm
- Wooden ring (outer diameter 65 mm)
- Knitted needle with blunt tip
- Holofiber
Abbreviations
AR – Amigurumi Magic ring
LL: Lifting loop Click for mean!
MR – Amigurumi Magic ring
App – application
sc : Single Crochet
inc : Increase
dec : Decrease
tr : Triple Crochet/ Treble Crochet
st: Stitch
dc : Double Crochet
hdc: Half Double Crochet
sl-st : Slip Stitch
ch : Chain
..in : make increase into same stitch as many as the number which is given in front of “inc” abbreviation (exp; 3inc, 4inc..).
FLO : Crochet into front loops only
BLO : Crochet into back loops only
BL : Bobble Stitch – do 5dc all in the same stitch and then yarn over and pull through all the loops on your hook (the original loop + 1 loop for each partially completed dc)
Head Instructions
With a coffee-colored thread:
- 6sc in MR (6)
- 6inc (12)
- (1sc, inc)*6 (18)
- (2sc, inc)*6 (24)
- (3sc, inc)*6 (30)
- 30 sc
- (4sc, inc)*6 (36)
- 36 sc
- (5sc, inc)*6 (42)
- 42 sc
- (6sc, inc)*6 (48)
- –19) 48 sc
- (6sc, dec)*6 (42)
- (5sc, dec)*6 (36)
- (4sc, dec)*6 (30)
- Fill with holofiber and insert a ring
- (3sc, dec)*6 (24)
- (2sc, dec)*6 (18)
- (1sc, dec)*6 (12)
- Without closing the loop to the end, leave a hole and the end of the thread 20-30 cm long for sewing. Add holofiber
Muzzle Instructions
With a coffee-colored thread:
- 6sc in MR (6)
- 6inc (12)
- (1sc, inc)*6 (18)
- (2sc, inc)*6 (24)
- 24sc (24)
- (3sc, inc)*6(30)
- –9) 30sc (30)
- (4sc, inc)*6 (36)
- Fasten and cut the thread, leaving a 20 cm end for sewing.
Ears Instructions
For 2 pieces, with a coffee-colored thread:
- 6sc in MR (6)
- 6sc (6)
- (1sc, inc)*3 (9)
- 9sc (9)
- (2sc, inc)*4 (12)
- 12sc (12)
- (6sc, inc)*2 (14)
- 14sc (14)
- (7sc, inc)*2 (16)
- –22) 16sc
Fasten and cut the thread, leaving a sewing end 15 cm long. Do not fill with holofiber!
Ring Clamps Instructions
Ring clamp N1
– Cast on 10 ch with a coffee-colored thread (The number of loops depends on the thickness of the ring and the yarn, therefore, having knitted 3-4 rows, you need to try on the clamp on the ring. It should sit very tightly!)
– Turn the work and starting from the 2nd loop, knit 9 sc
– 1LL and knit back 9sc
Continue to knit to the length you need. I have 32 rows. Fasten and cut the thread, leaving the end for sewing.
Ring clamp N2
– Dial 10 ch with a coffee-colored thread (The number of loops depends on the thickness of the ring and the yarn, therefore, having knitted 3-4 rows, you need to try on the clamp on the ring. It should sit very tightly!)
– Turn the work and starting from the 2nd loop, knit 9 sc
– LL and knit back 9sc
Continue to knit 8 rows. Fasten and cut the thread, leaving the end for sewing.
Collar Instructions
- With a red thread, dial 15 ch plus 2LL (17)
- Turn the work and starting with 3 loops, knit 2 sc in each loop (30)
- Turn the work and, starting from the first loop, knit 3dc in each loop (90)
- Turn the work and starting from the first loop, knit 90dc (90).
- Leave the end of the thread for sewing
Assembly Instructions
Sew the muzzle, filling it with holofiber, to the head between rows 8 and 2 from the middle. Fold the ears at the base and even in half, sew to the head on the sides between rows 2 and 5 from the middle. Using black thread, embroider the eyes and nostrils. Embroider a spot on the forehead with a milky thread.
Mane Instructions
Cut off dark brown threads 8 cm long in the amount of 30 pieces. Using a crochet hook, fasten 2 threads along the course of the mane from the crown of the head to the back of the head. At the top of the head, you can cut the length a little and fluff it up. Then sew the clamps to the ringlet and turn the seam inside the ringlet. Sew the head to clamp N1. Using pins, mark the middle of the clamp and secure the head so that it is in the center. Further, passing several times in a circle, firmly sew the head to the clamp so that it does not dangle.