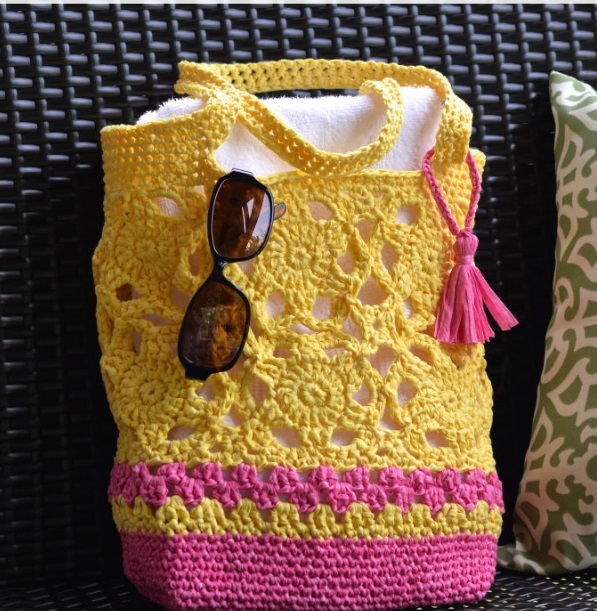
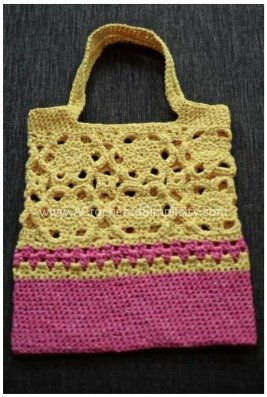
How to Crochet a Beautiful Flower Motif Bag


As many of you like this bag: https://www.craftorator.com/lessons/9-gorgeous-crocheted-bag-pattern.html#comment_2624 but unfortunately, I couldn't find a written description of it. However, I discovered some similar bag patterns with written instructions.
Here is one of them:
Materials
Yarn: Lion Brand Rewind Yarn (See Yarn Note Below) in the colors Make Lemonade (2 balls) & Think Pink (1 ball). Available for purchase on the Lion Brand Website or Amazon.
Crochet Hook: K/10.5/6.50mm; G/6/4.00mm, or size needed to obtain gauge (My favorite crochet hooks are the Clover Amour Hooks; I’ve never had an ache in my hand since switching).
Scissors
Yarn Needle
Scrap Piece of Yarn to use as a stitch marker.
Stitch Abbreviations
- ch: chain
- sl st: slip stitch
- st(s): stitch(es)
- sp(s): space(s)
- sc: single crochet
- hdc: half double crochet
- dc: double crochet
- Alt-dc: alternate double crochet (click here for tutorial)
- Rep: repeat
- Rnd: round
- yo: yarn over
One Size: 8.5″ W x 4.5″ D x 12.5″ H (not including handles)
Gauge
Flower Motif: 4.25″ diameter
In sc: 10 sts + 12 rows = 3″
Notes
Yarn Notes & Substitutions: Lion Brand Rewind tape yarn was used for the sample in the pattern. Although it is classified as a 5/bulky yarn because it is a tape yarn, it works up more similarly to a lighter worsted/4. So keep that in mind if you’re looking for substitutions. Testers had great luck using worsted weight/4 cotton yarns such as Lion Brand Yarns 24/7 cotton and acrylic yarns such as Lion Brand Vanna’s Choice.
Lion Brand Rewind Yarn – 70% Polyester / 30% Viscose (3.5 oz / 100g / 242 yds / 221 m)
(MC) Make Lemonade (2 balls) / (CC) Think Pink (1 ball)
Yardage Needed: (MC – 320 yards) / (CC – 170 yards)
Instructions
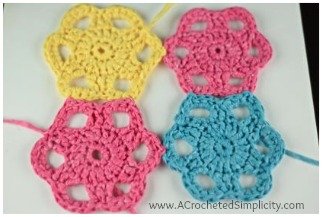
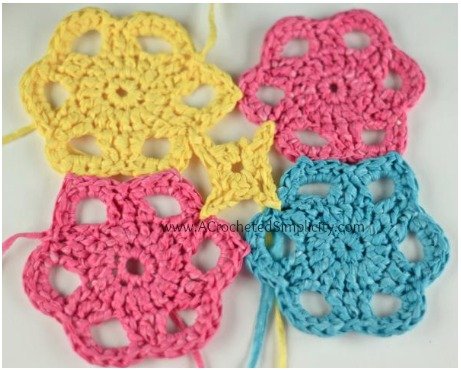
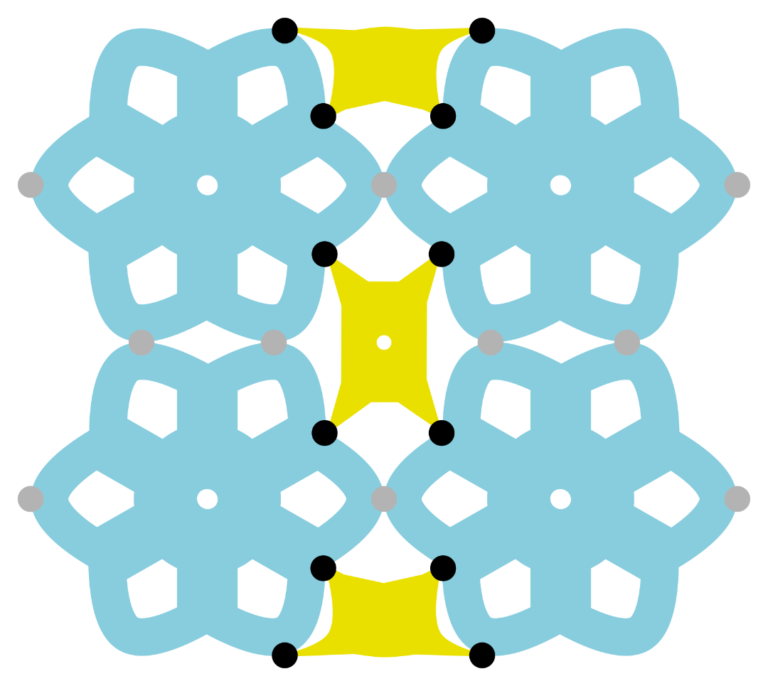
Flower Motif (Make 12)
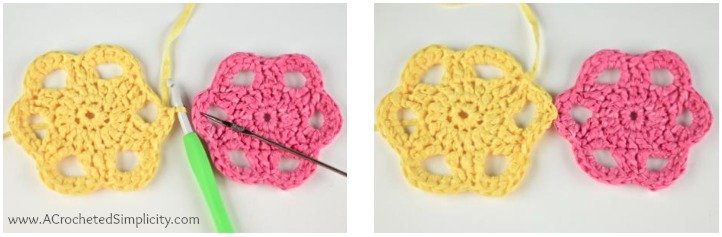
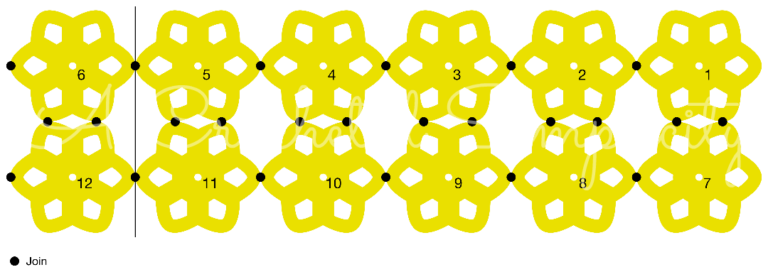
Order of Motifs: First, make motif 1. Second, make & join-as-you-go motifs #2 – 5. Third, make & join-as-you-go motif #7. Fourth, make & join-as-you-go motifs #8 – 11. Fifth, make & join-as-you-go motif #6. Last, make & join-as-you-go motif #12. See instructions and schematic below.
Note: Rounds 1 – 3 are the same for all 12 motifs. Note the different round 4 for the different numbered motifs.
Rnd 1: Using a 6.5mm crochet hook, ch 2, work 9 sc in 2nd ch from your hook. Join w/ a sl st to the 1st sc. (9 sts)
Rnd 2: (Alt-dc, dc) in 1st st, 2 dc in each remaining st around. Join w/ a sl st to the alt-dc. (18 sts)
Rnd 3: Alt-dc in 1st st, dc in each of the next 2 sts, ch 4, (dc in each of the next 3 sts, ch 4) 5 times. Join w/ a sl st to the alt-dc. (18 dc + 6 ch-4 sps)
Motif # 1 – Rnd 4: (sl st in the next dc, skip the next dc, 6 hdc in next ch-4 sp, skip the next dc) 6 times. Join w/ a sl st in the same st as the 1st sl st. (36 hdc + 6 sl sts)
Fasten off. Weave in ends. Continue on to Motifs #2 – 5.
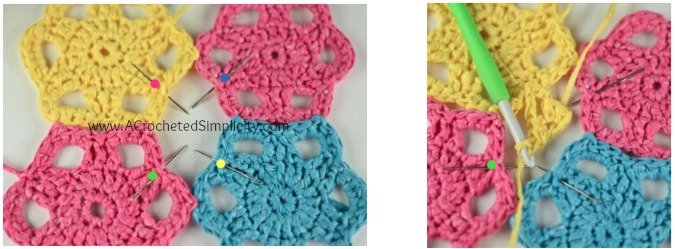
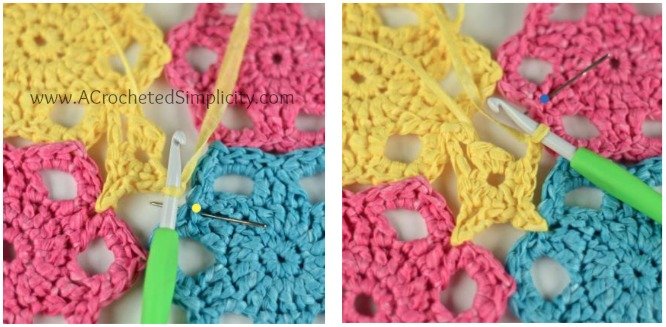
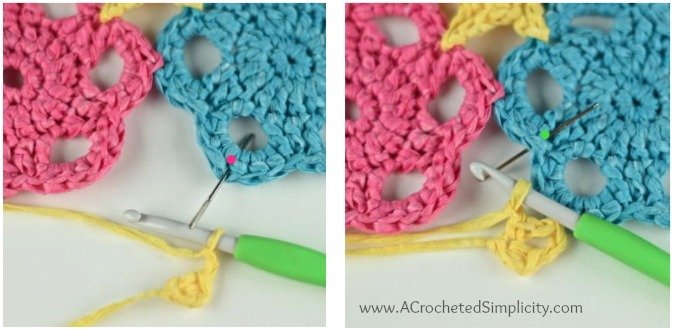
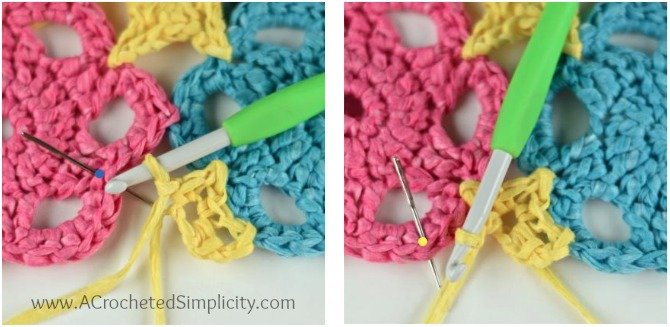
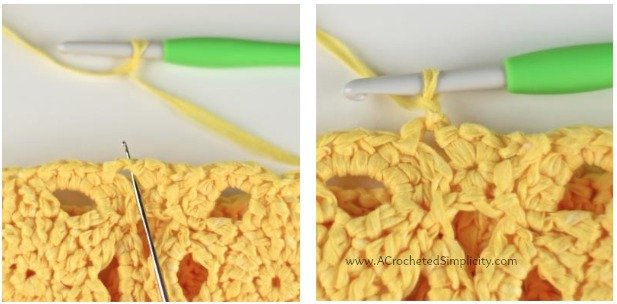
Motifs #2 – 5 Rnd 4: (sl st in the next dc, skip the next dc, 6 hdc in next ch-4 sp, skip the next dc) 5 times, sl st in the next dc, skip the next dc, 3 hdc in next ch-4 sp, sl st to other flower motif between 3rd & 4th dc of flower petal (see pics below), 3 hdc in same ch-4 sp, skip the next dc. Join w/ a sl st in the same st as the 1st sl st. (36 hdc + 6 sl sts)
Fasten off. Weave in ends. Complete motifs #2 – 5. You should have 5 motifs joined in a row. Continue on to motif #7.
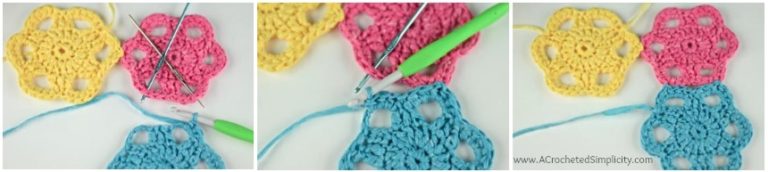
Motif #7 Rnd 4: (sl st in the next dc, skip the next dc, 6 hdc in next ch-4 sp, skip the next dc) 4 times, then (sl st in the next dc, skip the next dc, 3 hdc in next ch-4 sp, sl st to flower motif #1 between 3rd & 4th dc of flower petal (see pics below), 3 hdc in same ch-4 sp, skip the next dc) twice. Join w/ a sl st in the same st as the 1st sl st. (36 hdc + 6 sl sts)
Fasten off. Weave in ends. Continue on to motifs #8 – 11.
Motifs # 8 – 11 Rnd 4: (sl st in the next dc, skip the next dc, 6 hdc in next ch-4 sp, skip the next dc) 3 times, then (sl st in the next dc, skip the next dc, 3 hdc in next ch-4 sp, sl st to other flower motif between 3rd & 4th dc of flower petal (see pics below), 3 hdc in same ch-4 sp, skip the next dc) 3 times. Join w/ a sl st in the same st as the 1st sl st. (36 hdc + 6 sl sts)
Fasten off. Weave in ends. Complete motifs #8 – 11. You should have 10 motifs joined in two rows of 5. Continue on to motif #6.
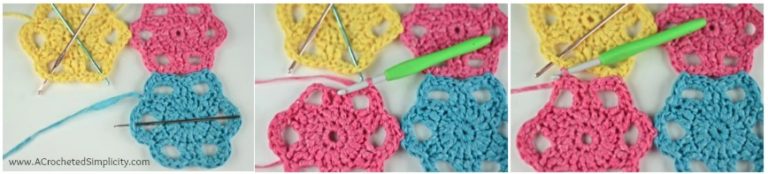
Motif #6 Rnd 4: (sl st in the next dc, skip the next dc, 6 hdc in next ch-4 sp, skip the next dc) twice, then sl st in the next dc, skip the next dc, 3 hdc in next ch-4 sp, sl st to flower motif #5 between 3rd & 4th dc of flower petal (see pics), 3 hdc in same ch-4 sp, skip the next dc, then (sl st in the next dc, skip the next dc, 6 hdc in next ch-4 sp, skip the next dc) twice, then sl st in the next dc, skip the next dc, 3 hdc in next ch-4 sp, sl st to flower motif #1 between 3rd & 4th dc of flower petal (form a tube), 3 hdc in same ch-4 sp, skip the next dc. Join w/ a sl st in the same st as the 1st sl st. (36 hdc + 6 sl sts)
Fasten off. Weave in ends. Continue on to Motif #12.
Motif #12 Rnd 4: (sl st in the next dc, skip the next dc, 6 hdc in next ch-4 sp, skip the next dc) twice, sl st in the next dc, skip the next dc, 3 hdc in next ch-4 sp, sl st to flower motif # 11 between 3rd & 4th dc of flower petal (see pics), 3 hdc in same ch-4 sp, skip the next dc, then (sl st in the next dc, skip the next dc, 3 hdc in next ch-4 sp, sl st to flower motif # 6 between 3rd & 4th dc of flower petal (see pics), 3 hdc in same ch-4 sp, skip the next dc) twice, then sl st in the next dc, skip the next dc, 3 hdc in next ch-4 sp, sl st to flower motif # 7 between 3rd & 4th dc of flower petal (complete forming a tube), 3 hdc in same ch-4 sp, skip the next dc. Join w/ a sl st in the same st as the 1st sl st. (36 hdc + 6 sl sts)
Fasten off. Weave in ends. Continue on to Small Center Motifs.
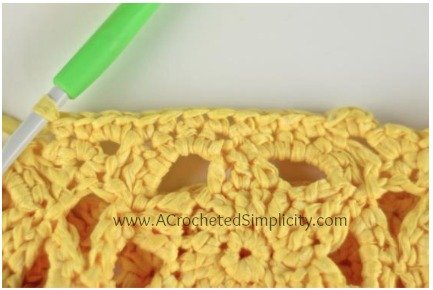
After completing all 12 motifs, you should have a tube of flower motifs that is 2 rows high of 6 motifs each.
Small Center Motif
Note: You will work 1 small center motif in each of the 6 center spaces around the bag.
Rnd 1: Ch 2, 2 hdc in 2nd ch from your hook, ch 2, sl st in the st marked w/ PINK DOT, ch 2, 3 hdc in center ch, ch 2, sl st in the st marked w/ GREEN DOT, ch 2, 3 hdc in center ch, ch 2, sl st in the st marked w/ YELLOW DOT, ch 2, 3 hdc in center ch, ch 2, sl st in the st marked w/ BLUE DOT, ch 2, hdc in center ch. Join w/ sl st to the 1st hdc. (12 hdc + 8 ch-2 sps)
Fasten off. Repeat for all 6 center spaces around the bag. Continue on to Small Half Star Motifs.
Small Half Star Motif
Note: You will work 1 small half star motif in each space between the flower motifs along the top and bottom edge of the bag.
Rnd 1: Ch 2, sc in 2nd ch from your hook, ch 2, sl st in the st marked w/ PINK DOT, ch 1, sc in center ch, ch 1, sl st in the st marked w/ GREEN DOT, ch 1, sc in center ch, ch 1, sl st in the st marked w/ BLUE DOT, ch 1, sc in center ch, ch 1, sl st in the st marked w/ YELLOW DOT, ch 2, sc in center ch. Join w/ a sl st to the 1st sc.
Fasten off. Repeat for all other spaces along the top and bottom edge of the bag. Continue on to Top Edge of Motif Assembly & Handles.
Top Edge of Motif Assembly & Handles
Rnd 1 (RS): Join MC yarn w/ a sl st in the 1st ch-2 sp you created in a small half star motif (that is around the top edge), ch 1, (2 sc in the ch-2 sp, sc in each of the next 8 sts across to the next ch-2 sp, 2 sc in ch-2 sp, sc in each of the next 2 sts) 6 times. Join w/ a sl st to the 1st sc. (84 sts)
Rnd 2: Ch 1, sc in each st around. Join.
Rnd 3: Ch 1, sc in each of the next 21 sts, ch 50 (to create the first handle), skip the next 21 sts, sc in each of the next 21 sts, ch 50 (to create the second handle), skip each of the remaining 21 sts. Join to the 1st sc. (42 sc + 100 chs)
Rnds 4 – 6: Ch 1, sc in each st and ch around. Join. (142 sts)
Fasten off. Weave in ends. Continue on to Bottom Edge of Motif Assembly.
Bottom Edge of Motif Assembly
Rnd 1 (RS): Join MC yarn w/ a sl st in the 1st ch-2 sp you created in a small half star motif (that is around the bottom edge), ch 1, (2 sc in the ch-2 sp, sc in each of the next 8 sts across to the next ch-2 sp, 2 sc in ch-2 sp, sc in each of the next 2 sts) 6 times. Join w/ a sl st to the 1st sc. (84 sts)
Do not fasten off. Switch to CC and continue on to Bottom Section of Bag.
Bottom Section of the Bag
Rnd 1 (RS) (CC): Work 1 alt-dc & 2 dc in first st, (skip the next 2 sts, work 3 dc in the next st) rep around to the last 2 sts, skip the last 2 sts. Join w/ a sl st to the alt-dc. (84 sts)
Rnd 2 (CC): Sl st in each of the next 2 dc to get to the next sp between the dc’s (do not count as sts), working into the space between the sets of 3 dc’s, work 1 alt-dc & 2 dc in the first sp, work 3 dc in each remaining sp around. Join w/ a sl st to the alt-dc. (84 sts)
Rnd 3: With CC, sl st in each of the next 2 dc to get to the next sp between the dc’s (do not count as sts), switch to MC, working into the space between the sets of 3 dc’s, work 1 alt-dc & 2 dc in the first sp, work 3 dc in each remaining sp around. Join w/ a sl st to the alt-dc. (84 sts)
Rnd 4 (MC): Ch 1, sc in each st around. Join. (84 sts)
Rnds 5 – 20 (CC): Ch 1, sc in each st around. Join. (84 sts)
Fasten off. Weave in ends. Continue on to Seaming the Bottom of the Bag.
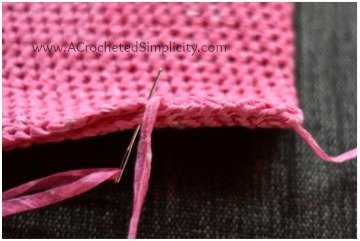
Seaming the Bottom of the Bag
Step 1: Turn the bag inside out, lay it flat in front of you, and line up the handles on the front and back (this will help you find the center of the bag).
Step 2: Using a yarn needle and a length of CC approximately 3 times the width of the bag, whipstitch the bottom of the bag closed, making sure to work into every stitch. Weave in ends.
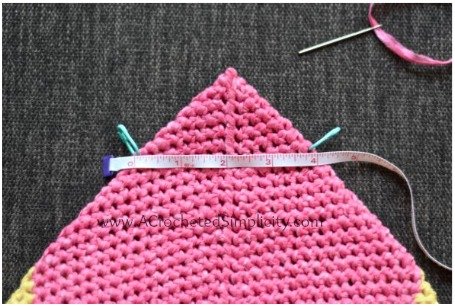
Step 3: Keep your bag inside out and position it so that one corner of the seam becomes the tip of the triangle. Note that the seam is centered vertically in the triangle.
Step 4: Use a measuring tape and find the points on the triangle where it measures 4″ across. Mark both the right and left side with a stitch marker.
Step 5: Use a yarn needle and a 12″ piece of yarn and sew from one stitch marker to the next, working through both layers of the bag.
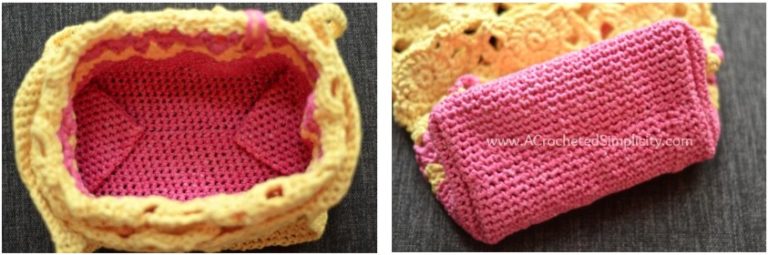
Step 6: Turn your bag right side out. The photo below left shows what the inside of your bag will look like. The photo below right shows what the bottom of your bag will look like. Add a tassel if you’d like and then your bag will be complete!
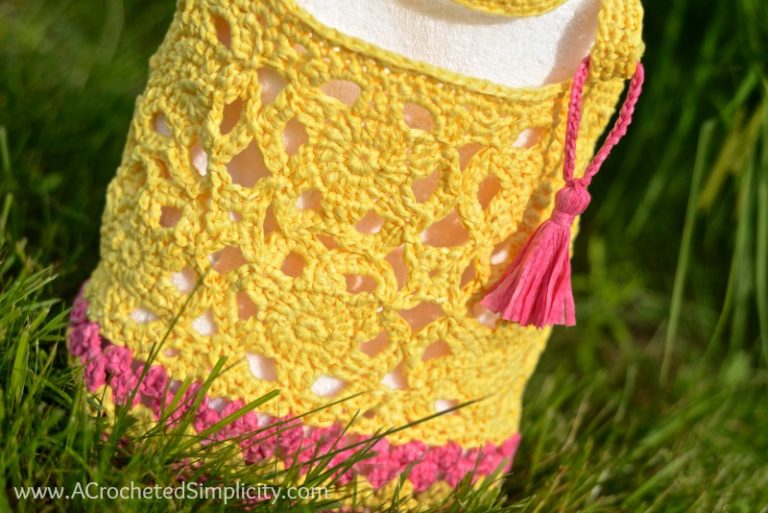
Tassel & Chain Loop
Chain Loop: Leaving a 6″ tail of yarn and using a 4.00mm crochet hook, ch 30. Fasten off leaving a 6″ tail of yarn.
Attach Chain Loop to Tassel: Tie one 6″ tail from the chain to the top of the tassel, tuck in end. Loop the chain around one of the handles, tie the other 6″ tail from the chain to the top of the tassel, tuck in end. Trim ends.