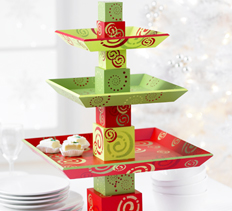
How to Create Beautifully Painted Wooden Trays


You'll Need:
3 Nested square wood trays: 14", 10", 8"
Wood blocks:
- one 4"
- two 3"
- two 2 1/2"
- two 2"
- one 1 3/4"
Acrylic paint: Apple Green, Light Foliage Green, Opaque Red, Mendocino Red
Exterior/interior satin varnish
Swirl stencils
Four 3/8" stencil brushes
Thick white craft glue
Paintbrushes
1" glaze/wash
#12 flat/shader Cotton swabs
Low-tack tape
Palette paper
Paper towels
Plastic sandwich bag
Sandpaper
Scissors
Water basin
Instructions
Use one brush for each paint color.
To keep paint from drying on bristles, place stencil brushes in a plastic sandwich bag when not in use.
Paint should be dry or almost dry by the time the stencil is lifted.
Stenciling is a dry brush technique requiring very little paint. Too much paint results in seepage or a raised edge around the design; two light coats of paint are always better than one heavy coat.
Allow paint to dry between coats.
Preparation
Sand trays to smooth any rough areas or edges. Wipe with a damp paper towel to remove dust. Use the 1" brush to apply two smooth, even coats as follows: large tray - Opaque Red; medium tray - Light Foliage Green; small tray - Apple Green (Photo A).
Stencil Red Tray and Blocks
For best results, cut swirl designs from the rest of the stencil. Position the stencil in the bottom of the red tray and secure it in place with low-tack tape. Pour a quarter-sized puddle of Mendocino Red on the palette. Dip the stencil brush into paint, tapping excess on the palette until only a hint of color remains on the brush. Use a pouncing motion to color in the largest swirl on the stencil (Photo B). Carefully lift one corner of the stencil and check color and coverage. If more paint is needed, reapply and recheck color and coverage.
Continue working in this manner until you have 5 large and 7 small swirls on the inside of the tray. Turn the tray over and add more swirls to the outside of the tray in the same way. Add swirls to red blocks in the same way.
When changing paint colors, wash off the stencil with a damp paper towel and dry thoroughly. Continue in the same way as above, adding more swirls in Light Foliage Green and Apple Green.
Stencil Light Foliage Green Tray and Blocks
Continue working in the same way as Step 2, using dotted swirl from the stencil and Mendocino Red, Opaque Red, and Apple Green paint.
Stencil Apple Green Tray and Blocks
Continue in the same way as Step 2, stenciling large and small swirls with Mendocino Red, Opaque Red, and Light Foliage Green paint.
Edge Trays
Use the #12 paintbrush to paint tray edges as follows: large tray - Light Foliage Green; medium tray - Apple Green; small tray - Opaque Red (Photo C).
Finish
Use a 1" paintbrush to apply 2 to 3 smooth, even coats of varnish to all surfaces. Use a doily or napkin when using trays. Do not place food directly on surfaces.
