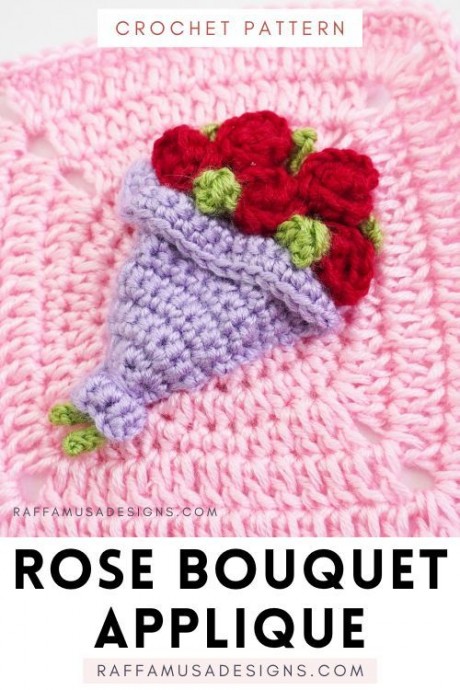
Crochet Bouquet of Roses Applique: A Creative Flower Crafting Project

Introduction
Create a stunning floral arrangement using the art of crocheting with this beautiful pattern for a bouquet of roses applique. This intricate design features delicate petals and leaves that come together to form a lovely bouquet that can be used to embellish various items such as clothing, accessories, or home decor.
The versatility of this crochet pattern allows you to customize the size and colors of the roses to suit your preferences, making it a perfect project for crafters of all skill levels. Whether you are looking to add a touch of elegance to a plain sweater, create a unique hair accessory, or decorate a special gift, this crochet bouquet of roses applique is sure to impress. The detailed instructions provided in the pattern will guide you through each step of the crocheting process, from creating the individual rose petals to assembling the bouquet. With a little time and patience, you can create a beautiful piece of handmade art that will be cherished for years to come. Let your creativity bloom with this charming crochet pattern for a bouquet of roses applique.Materials
- 3.5 mm (E/4 US, 9 UK) Crochet Hook
- DK (3, Light) Yarn
- Tapestry Needle
Yarn
For my bouquet of roses, I used Durable Comfy (291 yds / 266 m per 100 g) in the following colors:
- Green – Apple Green (2155)
- Lilac – Pastel Lilac (268)
- Red – Deep Red (317)
Feel free to use any yarn with the appropriate hook.
Size
3.15″ (8 cm) by 2.4″ (6 cm) at the largest point.
Gauge
This pattern is too small to accurately determine the gauge.
Abbreviations (US Terms)
- Ch – Chain
- Hdc – Half Double Crochet
- MC – Magic Circle
- RS – Right Side
- Sc – Single Crochet
- St – Stitch
Pattern Notes
- If the pattern says “dc 2”, you have to crochet 1 dc in each of the next 2 sts.
- (…) – Repeat instructions within parentheses for the indicated number of times.
- […] – Crochet the instructions within square brackets all in the same indicated st.
How to Crochet a Love Letter Amigurumi
Roses
(Make 5)
With your 3.5-mm hook and red, ch 6.
Row 1. [Sc 3] in second ch from hook, [sc 3] in next ch, [hdc 3] in each of next 2 ch, [sc 3, ch 1, sl st 1] in last ch. (15 sts)
Fasten off leaving a long tail for sewing.
Leaf
(Make 3)
With your 3.5-mm hook and green, ch 3.
Row 1. Sl st 1 in the second ch from hook, [hdc 1, ch 1, sl st 1] in last ch. (2 sl sts, 1 hdc)
Fasten off leaving a long tail for sewing.
Stem with Leaf
(Make 2)
With your 3.5-mm hook and green, ch 24.
Row 1. Sl st 1 in the second ch from hook, [hdc 2] in next ch, [sc 1, ch 1, sl st 1] in next ch, sl st in the remaining chs. (19 sl sts)
Fasten off leaving a long tail for sewing.
Paper Wrap
With your 3.5-mm hook and lilac, ch 7.
Row 1. Sc 6 starting from the second ch from hook. (6 sts)
Row 2. Ch 1 (does not count as a st here and throughout), turn. Sk 1, sc 5. (5 sts)
Row 3. Ch 1, turn. Sk 1, sc 4. (4 sts)
Row 4. Ch 1, turn. Sc inc 4. (8 sts)
Rows 5-6 (two rows). Ch 1, turn. Sc 8. (8 sts)
Row 7. Ch 1, turn. (Sc inc 1, sc 1) 4 times. (12 sts)
Row 8-9 (two rows). Ch 1, turn. Sc across. (12 sts)
Row 10. Ch 1, turn. (Sc inc 1, sc 2) 4 times. (16 sts)
Rows 11-12 (two rows). Ch 1, turn. Sc across. (16 sts)
Row 13. Ch 1, turn. (Sc inc 1, sc 3) 4 times. (20 sts)
Rows 14-15 (two rows). Ch 1, turn. Sc across. (20 sts)
Fasten off leaving a long tail for sewing.
Assembly
Assemble the roses. Let each rose roll on itself and secure it at the base of the sts by threading the yarn tail through the initial chs forming a sort of cross. Then, sew the roses on the granny square (photo 1).
Attach the leaves around the roses and the stems in front of the roses (photo 2).
Attach the wrapping paper modeling it so that it creates a 3D effect.
Fasten off and weave in your ends.
