

Adorable Crochet Carrot Keychain with Bunny — Free Amigurumi Pattern & Tutorial

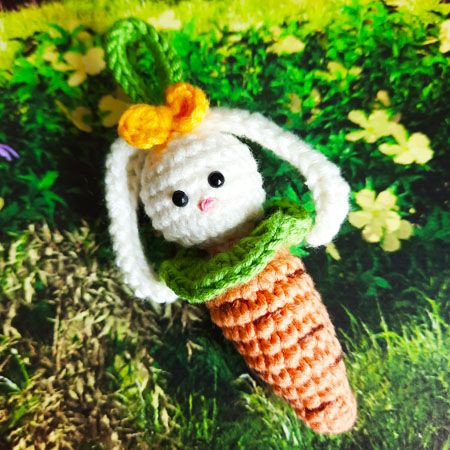
Create a cute crochet carrot keychain topped with a tiny bunny — a perfect little amigurumi accessory for your keys, backpack, or as a handmade gift. This step-by-step pattern uses Gazzal Baby Cotton yarn and includes a full list of supplies, abbreviations (US terms), and round-by-round instructions for the carrot base, bunny head and ears, loop, collar, and bow. Follow the finishing notes to assemble and add eyes, nose and embroidered details.
If you're looking to add some charm to your keys or bag, a Crochet Keychain Carrot with Bunny is just the thing you need! This adorable and whimsical accessory will surely make you smile every time you reach for your keys. The combination of a cute bunny perched on top of a vibrant crochet carrot is simply irresistible. It's a fun way to add a touch of playfulness to your everyday routine. Whether as a cute gift for a friend or a little treat for yourself, this keychain is sure to brighten up your day!
Supplies
– Yarn: Gazzal Baby Cotton (60% cotton/40% acrylic), 50 g-165 m/180 yds: cream №3410 (for bunny), green №3448 (for loop and collar), apricot №3465 (for carrot), yellow №3417 (for bow)
– Stuffing material – fiberfill
– Crochet hook appropriate for your yarn, I used 'Tulip' 1.5 mm (US 6)
– Glue-on eyes size 3 mm
– Clear hot glue
– Long eye needle for sewing pieces
– Needle for embroidery
– Pins
– Scissors
– Pink and brown embroidery thread
Abbreviations (US Terms)
- mr – magic ring
- ch – chain stitch
- sc – single crochet stitch
- sl.st – slip stitch
- sh st – shift stitch
- hdc – half double crochet
- dc – double crochet
- inc – increase - crochet two single crochet stitches in the same stitch
- dec – decrease stitches together using the invisible decrease method
- rnd – round
- FLO – work through front loops only
- BLO – work through back loops only
- […]* the number in the brackets indicates the number of times you should repeat the sequence in brackets
- (01) the number in brackets at the end of a round indicates the number of stitches in that round
Carrot
Start with the Gazzal Baby Cotton apricot yarn №3465
Rnd 1: 6 SC in magic ring (6)
Rnd 2: (1 SC, INC)* 3 times (9)
Rnd 3: 1 SC into each stitch around (9)
Rnd 4: (2 SC, INC)* 3 times (12)
Rnd 5: 1 SC into each stitch around (12)
Rnd 6: (3 SC, INC)* 3 times (15)
Rnd 7-8: (2 rnds) 1 SC into each stitch around (15)
Rnd 9: (4 SC, INC)* 3 times (18)
Rnd 10-11: (2 rnds) 1 SC into each stitch around (18)
Stuff.
Rnd 12: (1 SC, DEC)* 6 times (12)
Rnd 13: BLO: (DEC)* 6 times (6)
Change to the Gazzal Baby Cotton cream yarn №3410, cut the apricot yarn, fasten off and weave in the thread tail.
Rnd 14: 1 SC into each stitch around (6)
Rnd 15: (INC)* 6 times (12)
Rnd 16: (INC)* 12 times (24)
Rnd 17-20: (4 rnds) 1 SC into each stitch around (24)
Rnd 21: (2 SC, DEC)* 6 times (18)
Rnd 22: (1 SC, DEC)* 6 times (12)
Stuff.
In the next row, start crocheting the ears.
Rnd 23: DEC, 1 SC, (CH15, from the 2nd loop from the hook: 2 SC, 5 HDC, 5 DC, HDC, 1 SC), 1 SC, 2 DEC, 1 SC, (CH15, from the 2nd loop from the hook: 2 SC, 5 HDC, 5 DC, HDC, 1 SC), 1 SC, DEC (8)
Rnd 24: DEC, skip the ears, 2 DEC, skip the ears, DEC (4)
Change to the Gazzal Baby Cotton green yarn №3448, cut the cream yarn, fasten off and weave in the thread tail.
Start Crochet the Loop
Make CH20, SL ST into the center of the base, turn, 1 SL ST into each loop of the chain (20), SL ST into the center of the base.
Cut the yarn, fasten off and weave in the thread tail.
Start Crocheting Around the Collar
Insert the crochet hook in the way shown in the photo.
Attach the yarn of green color №3448, to the loops left in round 12
Rnd 1: FLO: CH2, INC of 3 DC into each stitch (36), SL ST into the 2nd ch loop
Cut the yarn, fasten off and weave in the thread tail.
Bow
Start with the Gazzal Baby Cotton yellow yarn №3417
Leave the long tail of the thread at the beginning of the work (~15-20 cm).
CH4, DC into the 4th loop from the hook, (TR, DC) into the same loop, CH3, SL ST into the same loop;
CH3, (DC, TR, DC) into the same loop, CH3, SL ST into the same loop.
Cut the yarn, fasten off, leaving a long thread tail.
Make each thread 2 turns in the center of the bow in different directions.
Tie both threads with a strong knot on the inside of the bow. Do not cut the threads, leaving a long thread tail for sewing.
Sew the bow to the loop.
Glue the eyes (3 mm) between rounds 18 and 19. The distance between the eyes – 2 stitches. Use transparent fabric glue or hot glue.
Embroider the nose between rounds 17 and 18 in pink color. Make 4 stitches around one stitch, then wind the thread 8 times around (see the photo). Weave in the thread tail, cut the end.
Embroider the stripes on the base of the carrot with a brown thread.
FINISH!
Assembly & Finishing Tips
- Use the clear hot glue and a pair of pins to position the bow and loop before securing them permanently.
- If you prefer removable hardware, you can sew or attach a small split ring or lobster clasp to the loop instead of permanently closing it.
- When placing the glue-on eyes, press gently and allow the adhesive to cure fully before handling. For a child-safe toy, consider using embroidered eyes instead of glued eyes.
- Adjust your hook size if you want a tighter or looser fabric; smaller hooks make denser stitches for a firmer amigurumi.
- Funny Pictures
-
 Fresh Animal Memes to Mix in Your Morning Coffee
-
 The Funniest Tweets of the Day
-
 Hilarious Tweets to Get Your Thoughts Clear
- Recipes
-
 Crispy Bean Tostadas with Smashed Avocado and Jicama-Cilantro Slaw
-
 Mango “Burrito” Bowls with Crispy Tofu and Peanut Sauce
-
 Baklava Granola
- Lifehacks
-
 Crochet Tutorial: Textured Bobble Stitch
-
 Crochet Tutorial: Brick Stitch
-
 Crochet Wheat Stitch Tutorial
- Crochet Ideas
-
 Crochet Pumpkin Bear
-
 Crochet Santa Placemat
-
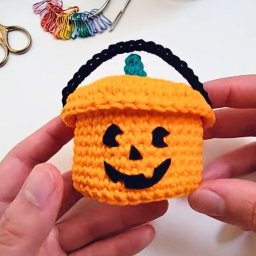 Crochet Mini Boo Bucket for Treats and Decor
- DIY
-
 Make a Crochet Spiral Star Doily — Free US-Term Pattern & Tips
-
 Easy DIY Easter Basket from Craft Sticks and a Cardboard Tube — Step-by-Step
-
 DIY Yarn-Wrapped Letter Bookmarks — Cute Personalized Bookmarks in Minutes
- Knitting Ideas
-
 DIY Knitted Waffle Kitchen Towel — Easy Pattern for a Textured, Absorbent Cotton Towel
-
 Make an Adorable Knitted Scrappy Bandana Bib — Easy Garter-Stitch Baby Pattern
-
 Quick & Cozy Knitted Wrist Pincushion — Easy Pattern and Step‑by‑Step Instructions