


DIY Crochet Mini Nesting Baskets — Free 3-Size Pattern (Small, Medium, Large)

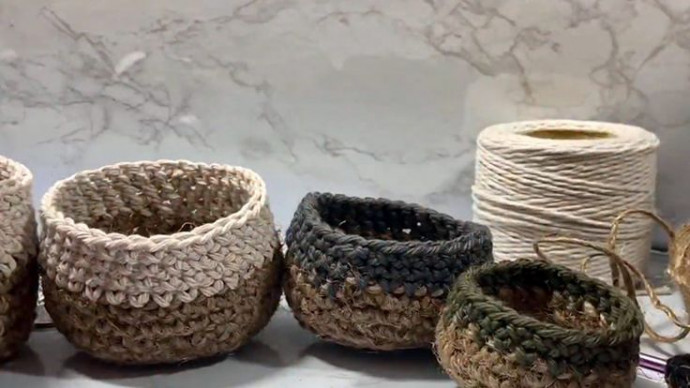
These Crochet Mini Nesting Baskets are a quick, useful project that adds handmade charm to any home. Use them to corral jewelry, keys, sewing supplies, or small craft items. This free pattern gives simple, repeatable rounds for three finished diameters (3", 4", 5") and uses basic US crochet stitches — a great stash-busting project for crocheters of beginner to intermediate skill.
Below you'll find materials, stitch abbreviations, full round-by-round instructions for Small, Medium and Large baskets, plus finishing tips and optional variations.
Materials Needed & Measurements
- Suggested Yarn: Cotton or acrylic worsted-weight yarn (Category 4)
- Yarn Measurements: Approx. 50–100 yards per basket, depending on size
- Hook Size: 4.5mm–5.5mm crochet hook
- Finished Pattern Size: Small (3”), Medium (4”), Large (5”) diameter
- Other Tools: Scissors, yarn needle, stitch marker (optional)
Skill Level
Beginner–Intermediate: pattern uses basic stitches (SC, INC, SL ST) and a back-loop round to shape the base.
Stitch Abbreviations (US Terms)
- MR – Magic Ring
- SC – Single Crochet
- INC – Increase (2 SC in the same stitch)
- SL ST – Slip Stitch
- BLO – Back Loop Only
- CH – Chain
- ST – Stitch
- RND – Round
Stitching Instructions for Making the Mini Nesting Baskets Pattern
Small Basket (3” Diameter)
- Base:
- RND 1: Make a Magic Ring (MR), work 6 SC into the ring, and pull the yarn tail to tighten the loop. (6 SC)
- RND 2: Work 2 SC into each ST around. (12 SC)
- RND 3: (SC in the next ST, INC in the next ST) repeat around. (18 SC)
- RND 4: (SC in the next 2 STS, INC in the next ST) repeat around. (24 SC)
- RND 5: SC in BLO around, working into the back loop only of each stitch to create a defined base edge. (24 SC)
- Sides:
- RND 6-12: SC in each stitch around, keeping the tension even for a smooth and sturdy shape. (24 SC per round)
- RND 13: SL ST in each ST around to form a finished edge. (24 SL ST) Fasten off and weave in ends securely.
Medium Basket (4” Diameter)
- Base:
- RND 1: Create a MR, make 6 SC inside the ring, and pull it tight. (6 SC)
- RND 2: INC in each ST around (2 SC in each ST). (12 SC)
- RND 3: (SC in the next ST, INC in the next ST) repeat around. (18 SC)
- RND 4: (SC in the next 2 STS, INC in the next ST) repeat around. (24 SC)
- RND 5: (SC in the next 3 STS, INC in the next ST) repeat around. (30 SC)
- RND 6: SC in BLO around, which creates a structural transition to the sides. (30 SC)
- Sides:
- RND 7-14: SC in each stitch around, maintaining even stitches for a uniform shape. (30 SC per round)
- RND 15: SL ST in each stitch around for a smooth, polished edge. (30 SL ST) Fasten off and weave in ends.
Large Basket (5” Diameter)
- Base:
- RND 1: Start with a MR, place 6 SC inside the ring, and pull it tight to close. (6 SC)
- RND 2: INC in each ST around. (12 SC)
- RND 3: (SC in the next ST, INC in the next ST) repeat around. (18 SC)
- RND 4: (SC in the next 2 STS, INC in the next ST) repeat around. (24 SC)
- RND 5: (SC in the next 3 STS, INC in the next ST) repeat around. (30 SC)
- RND 6: (SC in the next 4 STS, INC in the next ST) repeat around. (36 SC)
- RND 7: SC in BLO around, reinforcing the base structure. (36 SC)
- Sides:
- RND 8-16: SC in each stitch around, keeping a steady tension for even shaping. (36 SC per round)
- RND 17: SL ST in each stitch around to form a neat, finished top edge. (36 SL ST) Fasten off and weave in ends securely.
Optional Finishing Touches
- Sturdy Shape: If you want firmer baskets, use a fabric stiffener, crochet with tighter tension, or hold two strands of yarn together for added thickness.
- Handles: To add handles, skip 4 stitches on opposite sides of the basket and CH 6, then continue SC around, working into the chain spaces in the next round.
- Color Variation: Add a contrasting color for the last round to create a decorative border or try using multiple colors for a striped effect.
Quick Tips
- Use cotton yarn for a firmer, more structured basket; acrylic gives a softer drape.
- Keep a stitch marker at the start of each round to track rounds easily.
- Weave in ends securely and block gently if needed to even out the shape.
Enjoy making these small, practical baskets — they make great gifts, drawer organizers, or accent pieces for shelves and desks.
- Funny Pictures
-
 Weekly Treat of Funniest Parenting Memes for Good Laugh out Loud Right Now
-
 Really Funny Pics to End These Weekend Perfectly
-
 Incredibly Relatable Pics for Your Amusement
- Recipes
-
 Baked Sweet Potato Parmesan Tater Tots
-
 Saffron Lemon Chicken With Persian Rice
-
 Croatian Plum Dumplings
- Lifehacks
-
 Silt Crochet Stitch Photo Tutorial
-
 Crochet Mesh Stitch in Corner to Corner! A Lacy C2C Stitch Photo Tutorial
-
 Woven Shell Crochet Stitch Photo Tutorial
- Crochet Ideas
-
 DIY Crochet Mushroom Keychain — Easy Step-by-Step Pattern with Photos
-
 Make a Leafy Texture: Easy Crochet Sprig Stitch (Free UK Pattern)
-
 Free Crochet Sleep Mask Pattern — Cute DK Cotton Eye Mask (UK Terms, Advanced Beginner)
- DIY
-
 Cozy Crochet: Free Up-and-Down Stripe Cotton Washcloth Pattern (Quick & Easy)
-
 How to Make Realistic Crepe Paper Daffodils — Easy Step-by-Step DIY
-
 Make Adorable Easter Egg Bird Feeders — Easy DIY Seed Ornaments for Your Backyard
- Knitting Ideas
-
 Knit the Fish Scale Stitch: Easy 4-Row Pattern for a Textured, Scaly Look
-
 Knitted Camisole Party Frock — Vintage Pattern with Step-by-Step Instructions
-
 DIY Knitted Cuddly Cat Toy — Free Pattern & Step-by-Step Instructions