


Cute Crochet Mini Rooster Amigurumi Pattern — Quick 5 cm Make

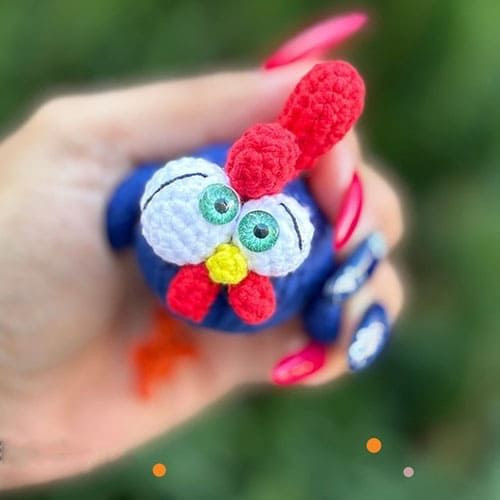
Make a charming Mini Rooster Amigurumi with this compact, free pattern. Perfect as a small gift, keychain, or shelf buddy, this little rooster measures about 5 cm when made with the materials listed below. The pattern includes body, beak, eyes, wings, combs, wattle, legs and tail pieces plus tips for finishing and assembly.
Before you begin, gather your materials and a stitch marker, and read the abbreviations list so the pattern flows smoothly. Work tightly so the stuffing does not show through the stitches.
Abbreviations
sc - single crochet
st - stitch
ch - chain
MR - magic ring
inc - increase
dec - decrease
FLO - front loop only
BLO - back loop only
slst - slip stitch
Materials
Yarnart Jeans (or similar DK/cotton yarn)
Crochet hook: 2.50 mm
Fiberfill
Needle, scissors, plastic eyes
Final Size
If using the above yarn and hook, the Mini Rooster will measure approximately 5 cm.
Body
RND 1: 6 sc in double adjustable ring.
RND 2: 6 inc (12sts)
RND 3: (sc, inc) * 6 times (18sts)
RND 4: sc, (inc, 2sc) * 5 times, inc, sc (24sts)
RND 5: (3sc, inc) * 6 times (30sts)
RND 6: 2sc, (inc, 4sc) * 5 times, inc, 2sc (36sts)
RND 7-14: sc in each stitch around, 36 sc (8 rnds)
RND 15: 2sc, (dec, 4sc) * 5 times, dec, 2sc (30sts)
RND 16: (3sc, dec) * 6 times (24sts)
RND 17: sc, (dec, 2sc) * 5 times, dec, sc (18sts)
RND 18: (sc, dec) * 6 times (12sts)
RND 19: 6 dec
Fasten off.
Yes, we have completed the body of the rooster. Actually, the hard part is over. Now we will make the other small parts.
Beak
RND 1: 4 sc in double adjustable ring.
RND 2-3: sc in each stitch around, 4 sc (2 rnd)
Big Eye
RND 1: 6 sc in double adjustable ring.
RND 2: 6 inc (12sts)
RND 3: (sc, inc) * 6 times (18sts)
RND 4-6: sc in each stitch around, 18 sc (3 rnd)
RND 7: (sc, dec) * 6 times (12sts)
RND 8: 6 dec
Fasten off.
Small Eye
RND 1: 6 sc in double adjustable ring.
RND 2: 6 inc (12sts)
RND 3-5: sc in each stitch around, 12 sc (3 rnd)
RND 6: 6 dec
Fasten off.
We’ve completed the eyes, now let’s move on to making the wings.
Wings
RND 1: 6 sc in double adjustable ring.
RND 2: 6 inc (12sts)
RND 3-5: sc in each stitch around, 12 sc (3 rnds)
RND 6: (2sc, dec) * 3 times (9sts)
RND 7: (sc, dec) * 3 times (6sts)
Big Comb
RND 1: 6 sc in double adjustable ring.
RND 2: 6 inc (12sts)
RND 3-6: sc in each stitch around, 12 sc (4 rnds)
RND 7: (2sc, dec) * 3 times (9sts)
RND 8: sc in each stitch around, 9 sc (1 rnd)
RND 9: (sc, dec) * 3 times (6sts)
RND 10: sc in each stitch around, 6 sc (1 rnd)
Small Comb
RND 1: 6 sc in double adjustable ring.
RND 2: (sc, inc) * 3 times (9sts)
RND 3-5: sc in each stitch around, 9 sc (3 rnd)
RND 6: (sc, dec) * 3 times (6sts)
RND 7: sc in each stitch around, 6 sc (1 rnd)
Wattle
RND 1: 4 sc in double adjustable ring.
RND 2: (sc, inc) * 2 times (6sts)
RND 3-4: sc in each stitch around, 6 sc (2 rnd)
Long Leg
RND 1: (3ch, sc in second ch from hook, sc, slst) * times, 10 ch.
We’ve made the rooster’s long legs, now let’s make the other short piece.
Short Leg
RND 1: (3ch, sc in second ch from hook, sc, slst) * 3 times, 7 ch.
Finally, we make the tail.
Tail
Join the yarn to the body using a slip stitch:
7 ch, sc in second ch from hook, 5 sc, slst, 11 ch, sc in second ch from hook, 9 sc, slst, 7 ch, sc in second ch from hook, 5 sc, slst.
Assembly & Finishing Tips
- Stuff parts firmly but not overstuffed so seams close neatly. Add stuffing gradually as you close rounds.
- Use a yarn needle to sew pieces on securely: position the big comb on top of the head, the beak centered below the eyes, and the wattle under the beak.
- Place the big and small eyes symmetrically before sewing; if using safety eyes, insert them before closing the head and secure the backs. For embroidered eyes, mark placement with pins.
- Sew wings and tail to the sides and back of the body, making sure they are balanced so the rooster can stand or sit as you intend.
- Attach legs centered under the body. For keychain or ornament use, add a hanging loop before closing the top of the head.
- Weave in all ends and trim threads closely for a neat finish.
Enjoy your Mini Rooster Amigurumi — small projects like this are great for practicing shaping and finishing. Share photos of your finished roosters with your crafting community!
- Funny Pictures
-
 Weekly Treat of Funniest Parenting Memes for Good Laugh out Loud Right Now
-
 Really Funny Pics to End These Weekend Perfectly
-
 Incredibly Relatable Pics for Your Amusement
- Recipes
-
 Baked Sweet Potato Parmesan Tater Tots
-
 Saffron Lemon Chicken With Persian Rice
-
 Croatian Plum Dumplings
- Lifehacks
-
 Silt Crochet Stitch Photo Tutorial
-
 Crochet Mesh Stitch in Corner to Corner! A Lacy C2C Stitch Photo Tutorial
-
 Woven Shell Crochet Stitch Photo Tutorial
- Crochet Ideas
-
 DIY Crochet Mushroom Keychain — Easy Step-by-Step Pattern with Photos
-
 Make a Leafy Texture: Easy Crochet Sprig Stitch (Free UK Pattern)
-
 Free Crochet Sleep Mask Pattern — Cute DK Cotton Eye Mask (UK Terms, Advanced Beginner)
- DIY
-
 Cozy Crochet: Free Up-and-Down Stripe Cotton Washcloth Pattern (Quick & Easy)
-
 How to Make Realistic Crepe Paper Daffodils — Easy Step-by-Step DIY
-
 Make Adorable Easter Egg Bird Feeders — Easy DIY Seed Ornaments for Your Backyard
- Knitting Ideas
-
 Knit the Fish Scale Stitch: Easy 4-Row Pattern for a Textured, Scaly Look
-
 Knitted Camisole Party Frock — Vintage Pattern with Step-by-Step Instructions
-
 DIY Knitted Cuddly Cat Toy — Free Pattern & Step-by-Step Instructions