Crochet Stars and Stripes Slippers


Looking for cozy and patriotic footwear? Look no further than the Crochet Stars and Stripes Slippers! These adorable slippers combine comfort with style, making them a perfect choice for lounging around the house or showing off your American pride. The stars and stripes design adds a fun and festive touch, making them a great accessory for any time of the year. Treat your feet to a pair of these charming slippers and add a touch of whimsy to your wardrobe!
Materials
Made with #5 Bulky yarn, I used Red Heart Super Saver Chunky, in three colors, 173 yards per skein – see chart below for yardage.
- Color 1 (Red)
- Color 2 (White)
- Color 3 (Blue)
- Hook US I/5.50 mm
- Buttons for decorating tops (optional)
- Stitch markers (8)
- Tapestry Needle
** I’ve had success in using two strands of worsted weight (#4) yarn together as well; just be sure to check gauge.
Gauge: 12 sc x 14 rows = approximately 4” – for best fit, please take the time to make a gauge swatch.
Abbreviations (US Terms)
- ch: chain
- dc: double crochet
- hdc: half double crochet
- sc: single crochet
- sl st: slip stitch
- st(s): stitch(es)
- tog: together
Notes
- Pattern written in US Standard terms.
- Weave in ends as you work.
- The ch1 at the beginning of a round does not count as a stitch.
- The stitch count is in ( ) at end of each round/row.
- Join rounds with slip stitch to first stitch of round.
- Start each round in the join.
Stars and Stripes Slipper Instructions
Sole (All Sizes) – 2 of Each in Colors 1 and 2:
For the Sole, the sl st used to join rounds counts as a stitch.
Starting Chain: Ch1, (14, 17, 20, 23, 26, 29)
Round 1: Starting in 2nd ch from hook, sc (7, 9, 11, 13, 15, 17) hdc (5, 6, 7, 8, 9, 10), hdc 8 in last ch; working along opposite side, hdc (5, 6, 7, 8, 9, 10), sc (6, 8, 10, 12, 14, 16), 2sc in next st, join. (34, 40, 46, 52, 58, 64 including sl st)
Round 2: Ch1, sc (14, 17, 20, 23, 26, 29), 2sc in each of next 4 sts, sc (14, 17, 20, 23, 26, 29), 2sc in next st, 1sc in sl st, join. (40, 46, 52, 58, 64, 70 including sl st)
Round 3: Ch1, sc (17, 20, 23, 26, 29, 32), 2sc in each of next 2 sts, sc (18, 21, 24, 27, 30, 33), 2sc in next st, sc in next st, 1 sc in sl st, join. (44, 50, 56, 62, 68, 74 including sl st)
Round 4: Ch1, sc in first st, hdc (17, 20, 23, 26, 29, 32), 2hdc in each of next 2 sts, hdc (17, 20, 23, 26, 29, 32), sc in next 3 sts, 2sc in next st, sc in next 2 sts, 1 sc in sl st, join. Fasten off. (48, 54, 60, 66, 72, 78 including sl st)
Repeat for next Sole.
Join Soles and Establish Sides
For remainder of pattern, sl st to join rounds does NOT count as a stitch.
Round 1: Place one of each color with wrong sides facing each other and match stitches. With Color 2 facing you, join Color 1 at Center Back heel, working through both thicknesses, sl st loosely around Round 4 of Sole to join soles together, join. (48, 54, 60, 66, 72, 78)
Round 2: Ch1, sc around each sl st from joining the two soles, to the end, join. (48, 54, 60, 66, 72, 78)
Note: photo above shows 2 colors for visual impact, this sole is designed in one color.
Round 3: Join Color 2, ch1, sc in each st to end, join. Fasten off. (48, 54, 60, 66, 72, 78)
Round 4: (BASE ROW): Mark center stitch at toe. With toe facing you, join Color 1 in stitch to the right of marked st, sc in each st to end, join. Fasten off. (48, 54, 60, 66, 72, 78)
Toe and Top
Crochet the top of the slipper starting at the toe and join it to the Sole section by picking up stitches on the BASE ROW at the end of each row, as you work toward the ankle section.
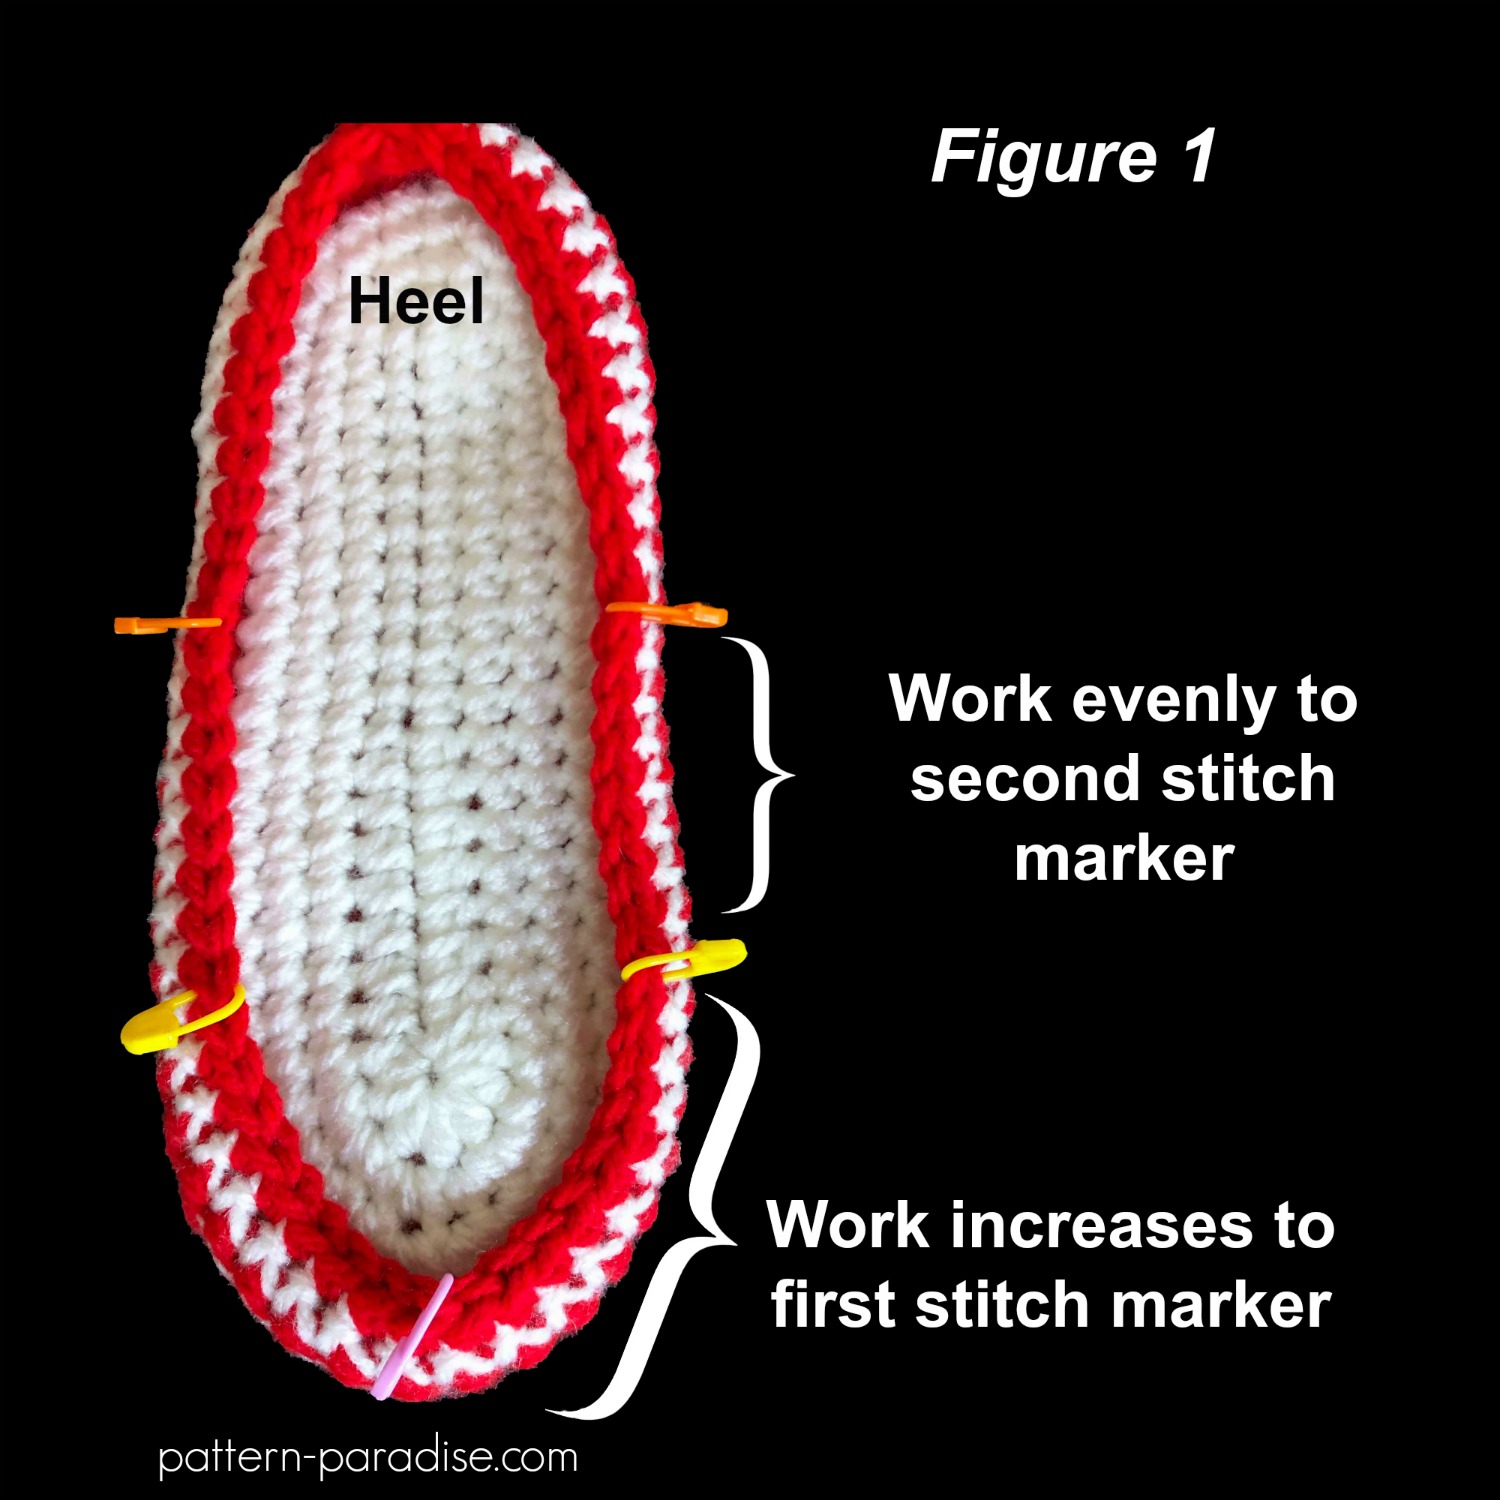
Before continuing with the next section, you will mark several stitches to help you with where to end increases and where to start the Heel section. You will increase one stitch each row up to the first stitch marker on either side of the center toe marker; you will continue with the same stitch count up to the second stitch marker on either side of the center toe marker.
Move stitch marker at center toe to current round. Mark the designated stitches to the right and left of center toe marker as follows (See Figure 1):
- Size 7.5”: Mark stitches 7 & 13
- Size 8.5”: Mark stitches 7 & 15
- Size 9.5”: Mark stitches 9 & 17
- Size 10.5”: Mark stitches 9 & 19
- Size 11.5”: Mark stitches 11 & 21
- Size 12.5”: Mark stitches 11 & 23
Row 1: Join Color 3, ch1, 2sc in same st, skip next st (the one with the marker in it), 2sc in next st. (4)
Row 2: DO NOT ch1, turn, skip first st, sc in each st of previous row, sc in next 2 sts in BASE ROW. (5)
Follow separate instructions for your size
For Size 7.5
- Rows 3 to 7: Repeat Row 2. This will increase stitch count by 1 for each row. (10 after last repeat)
- Rows 8 to 13: DO NOT ch1, turn, skip first 2 sts, sc in each st of the previous row, sc in next 2 sts in the BASE ROW. (10 sc)
- Place a stitch marker in the 2nd and next to the last stitch of the last row made.
Skip to Heel
For Size 8.5
- Rows 3 to 7: Repeat Row 2. This will increase stitch count by 1 for each row. (10 after last repeat)
- Rows 8 to 15: DO NOT ch1, turn, skip first 2 sts, sc in each st of the previous row, sc in next 2 sts in the BASE ROW. (10 sc)
- Place a stitch marker in the 2nd and next to the last stitch of the last row made.
Skip to Heel
For Size 9.5
- Rows 3 to 9: Repeat Row 2. This will increase stitch count by 1 for each row. (12 after last repeat)
- Rows 10 to 17: DO NOT ch1, turn, skip first 2 sts, sc in each st of the previous row, sc in next 2 sts in the BASE ROW. (12 sc)
- Place a stitch marker in the 2nd and next to the last stitch of the last row made.
Skip to Heel
For Size 10.5
- Rows 3 to 9: Repeat Row 2. This will increase stitch count by 1 for each row. (12 after last repeat)
- Rows 10 to 19: DO NOT ch1, turn, skip first 2 sts, sc in each st of the previous row, sc in next 2 sts in the BASE ROW. (12 sc)
- Place a stitch marker in the 2nd and next to the last stitch of the last row made.
Skip to Heel
For Size 11.5
- Rows 3 to 11: Repeat Row 2. This will increase stitch count by 1 for each row. (14 after last repeat)
- Rows 12 to 21: DO NOT ch1, turn, skip first 2 sts, sc in each st of the previous row, sc in next 2 sts in the BASE ROW. (14 sc)
- Place a stitch marker in the 2nd and next to the last stitch of the last row made.
Skip to Heel
For Size 12.5
- Rows 3 to 11: Repeat Row 2. This will increase stitch count by 1 for each row. (14 after last repeat)
- Rows 12 to 21: DO NOT ch1, turn, skip first 2 sts, sc in each st of the previous row, sc in next 2 sts in the BASE ROW. (14)
- Place a stitch marker in the 2nd and next to the last stitch of the last row made.
Heel
You will have (21, 23, 25, 27, 29, 31) stitches across the back (between the last two stitch markers) at this point.
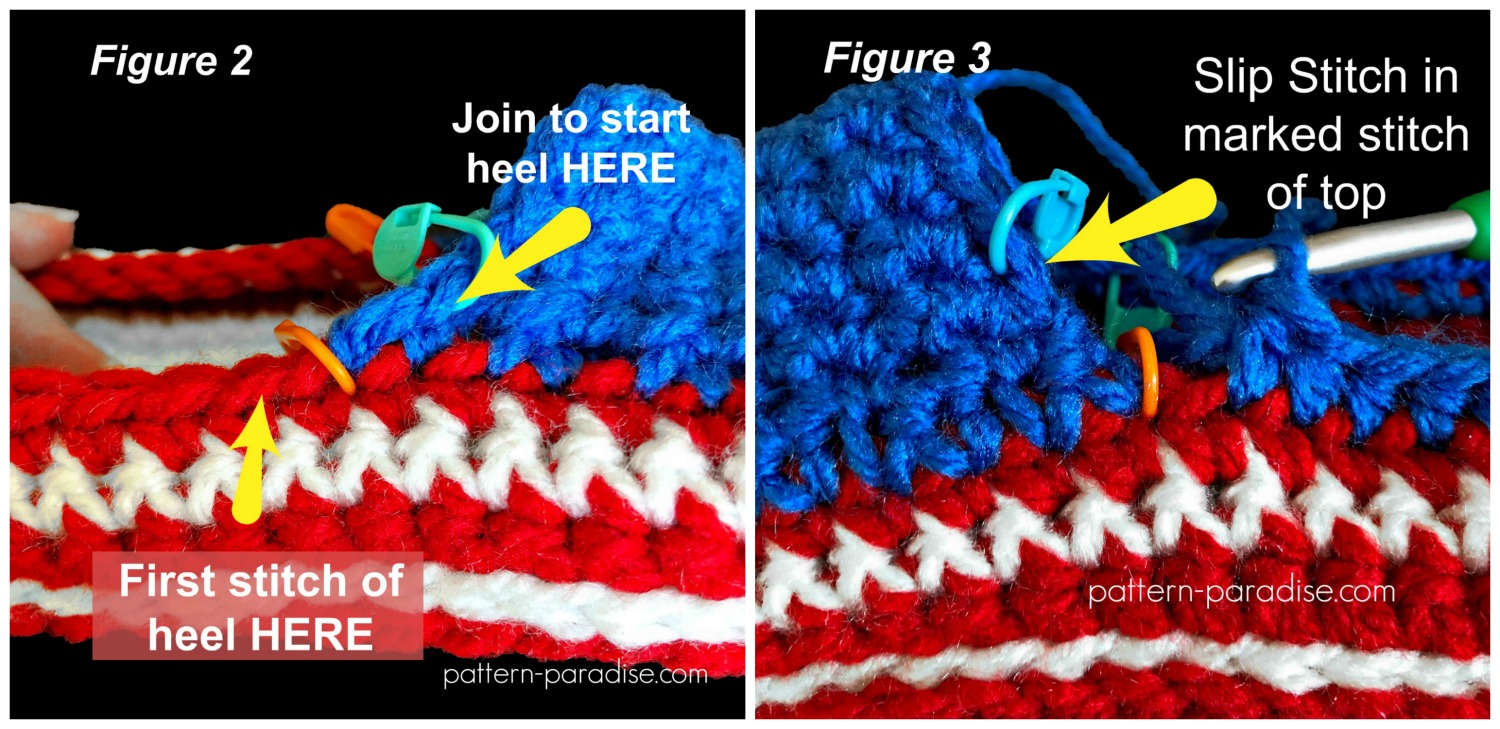
Round 1: Join Color 3 with a sl st in the first st of Row 1 of the Front Flap where you placed the stitch marker with a sl st in the marked stitch of the last row of the top, where you placed the stitch marker (See Figure 2), working in stitches around heel, hdc next (11, 12, 13, 14, 15, 16) sts, place marker in last st made – this is used as a guide for center back, hdc next (10, 11, 12, 13, 14, 15), sl st in the last st of Row 1 of the Front Flap (See Figure 3). (21, 23, 25, 27, 29, 31)
Round 2: DO NOT ch1, turn, skip the joining sl st, sl st in next st, sc (6, 7, 8, 9, 10, 11) sts, hdc 7 sts, sc (6, 7, 8, 9, 10, 11) sts, sl st in next st. (21, 23, 25, 27, 29, 31 sts including sl sts)
Round 3: DO NOT ch1, turn, skip first st, sl st in next st, sc (5, 6, 7, 8, 9, 10), hdc2tog, dc 3 sts, hdc2tog, sc (5, 6, 7, 8, 9, 10), sl st in next st, leave last st unworked. (17, 19, 21, 23, 25, 27 sts including sl sts)
Round 4: DO NOT ch1, turn, skip sl st, sl st in next st, sc (4, 5, 6, 7, 8, 9), hdc2tog, dc 1 st, hdc2tog, sc (4, 5, 6, 7, 8, 9), sl st in next st, leave last st unworked. (13, 15, 17, 19, 21, 23 sts including sl sts)
Round 5: DO NOT ch1, turn, working loosely, sl st in each st all around including Front Flap, join to first st with a sl st. Fasten off.
For a fun look, sew decorative buttons in place.
- Funny Pictures
-
 These are the Pics That Simply Describe Your Life
-
 Hilariously Accurate Parenting Memes That Show the Other Side of Parenthood
-
 Great Pics That Just Depict Our Lives
- Recipes
-
 Crispy Baked Avocado Fries
-
 Baked Beans and Hot Dogs with Biscuit Topping
-
 Roasted Rosemary Lemon Chicken Breasts
- Lifehacks
-
 Crochet Basics: Twisted Fringe
-
 7 Crochet Tips And Tricks
-
 How To Work Crochet Into Denim
- Crochet Ideas
-
 Crochet Snorlax Plushie Doll
-
 Crochet Cat in 1 Row
-
 Crochet Beautiful Penguin Toy
- DIY
-
 Popsicle Stick and Jingle Bell Christmas Tree Ornament
-
 Upcycled Mason Jar Chicken Vase
-
 Crochet Namaste Stephanie Doll
- Knitting Ideas
-
 Knitted Keepsake Bag
-
 Knitted Textured Heart Dishcloth
-
 Knitted Snowfall Dishcloth