Crochet Locker Pockets

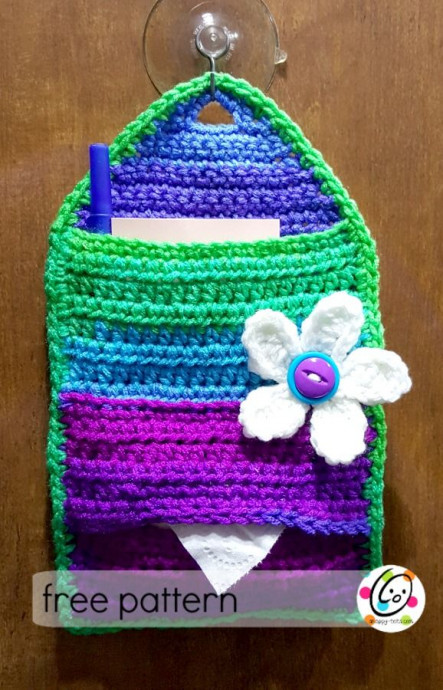
Crochet locker pockets are not only super cute but incredibly practical too! These handmade creations provide the perfect solution for keeping your small items organized and easily accessible in your locker. Whether you need a spot for your keys, lipstick, or spare change, these nifty little pockets have got you covered. Plus, the unique crochet design adds a touch of personality to your locker space. So go ahead and add some charm and functionality to your school day with these adorable crochet locker pockets!
Materials and Details
Yarn: worsted weight yarn in choice of colors
Sample: Red Heart Super Saver Stripes Parrot Stripe, White (flower)
Crochet Hook: H, I
Miscellaneous: yarn needle, 1 large button for flower center, 1 slightly smaller button to stack on top of flower center (optional), travel tissue pack
Gauge: not needed for this project
Measurements: 6” wide x 10” tall
Note: Instructions are written for colors of sample and may be substituted as desired.
Instructions
With H hook and yarn, ch 21, sc in 2nd ch from hook and in each ch across. (20 sts)
Ch 2, turn, hdc in each st to end of row.
Repeat row #2 until piece measures 14” from beginning edge. Add or subtract length to this section if desired.
Ch 1, turn, sc2tog, sc 16, sc2tog. (18 sts)
Ch 1, turn, sc2tog, sc 14, sc2tog. (16 sts)
Ch 1, turn, sc in each st to end of row.
Ch 1, turn, sc2tog, sc 12, sc2tog. (14 sts)
Ch 1, turn, sc2tog, sc 10, sc2tog. (12 sts)
Ch 1, turn, sc in each st to end of row.
Ch 1, turn, sc2tog, sc 8, sc2tog. (10 sts)
Ch 1, turn, sc2tog, sc, ch 4, sk 4, sc, sc2tog. (8 sts)
Ch 1, turn, sc2tog, sc 4 around ch, sc2tog. (6 sts) Finish off and weave in ends. Set aside.
Tissue Holder Pocket
Make 2:
1. Make sure the beginning chain isn’t too snug or this row won’t be as wide as the rest. With H hook and yarn, ch 21, sc in 2nd ch from hook and in each ch across. (20 sts)
2-4. Ch 2, turn, hdc in each st to end of row.
5-6. Ch 2, turn, hdc in same st, hdc 4, sc 10, hdc 5.
7. Ch 1, turn, sl st in each st to end of row. Finish off, leaving a tail for sewing to bag.
Flower
With H hook and yarn color of choice, start with a magic circle of 5 sts (or preferred method for starting a circle of 5 sc sts), join and pull closed. (5 sts)
Ch 5, 3dc in 3rd ch from hook, hdc, sc, sl st in next st on circle, repeat to end of round.
Sl st 4, 3sc in tip of petal, sl st 4, sl st between petals, repeat to end of round. Finish off, leaving a yarn tail for sewing flower to bag.
Assembly
Lay base piece on a flat surface. Fold piece so starting edge lines up with the last full row near the top (before decreases begin). Mark where the bottom edge will be when folded. Unfold piece.
Lay one tissue pocket piece so the straight edge is even with the row marked for the bottom fold. Last edge of each pocket piece is slightly arched and should be towards the middle of the pocket. Place second pocket piece directly above the first piece. First piece should overlap the second piece slightly. Pin edges to hold in place.
With yarn needle and matching yarn, sew pocket pieces along outer edges of bag. Do not sew center edges to the bag.
Place flower on bag with buttons on top of the flower center. With a needle and yarn tail, sew the buttons to the flower center and to the bag.
Outer Edge Trim
For this next part, take your time and be patient. We will be crocheting through several layers at once to sew our pieces together.
Attach yarn to outer edge of piece. With an I hook, sc evenly along edge of piece, working through all pocket layers. (2sc, ch 1, 2sc) in each corner. Continue working around piece. Sl st in first st to join. Finish off and weave in ends.
- Funny Pictures
-
 Hilarious Memes for Those Bored to Tears
-
 Weekly Treat of Funniest Parenting Memes for Good Laugh out Loud Right Now
-
 Really Funny Pics to End These Weekend Perfectly
- Recipes
-
 Crispy Baked Avocado Fries
-
 Scrambled Chickpea and Spinach Pitas
-
 Cinnamon Pancakes
- Lifehacks
-
 Crochet Basics: Aligned Cobble Stitch
-
 Brick Stitch Crochet Tutorial
-
 Crochet Basics: Wattle Stitch
- Crochet Ideas
-
 Crochet Snorlax Plushie Doll
-
 Crochet Beautiful Penguin Toy
-
 Crochet Tiny Snowman
- DIY
-
 DIY Santa Craft For Kids
-
 Paper Plate Angel Craft
-
 Upcycled Mason Jar Chicken Vase
- Knitting Ideas
-
 Knitted Bridger Cowl
-
 Knitted Keepsake Bag
-
 Knitted Cutie Cupcake Dolls