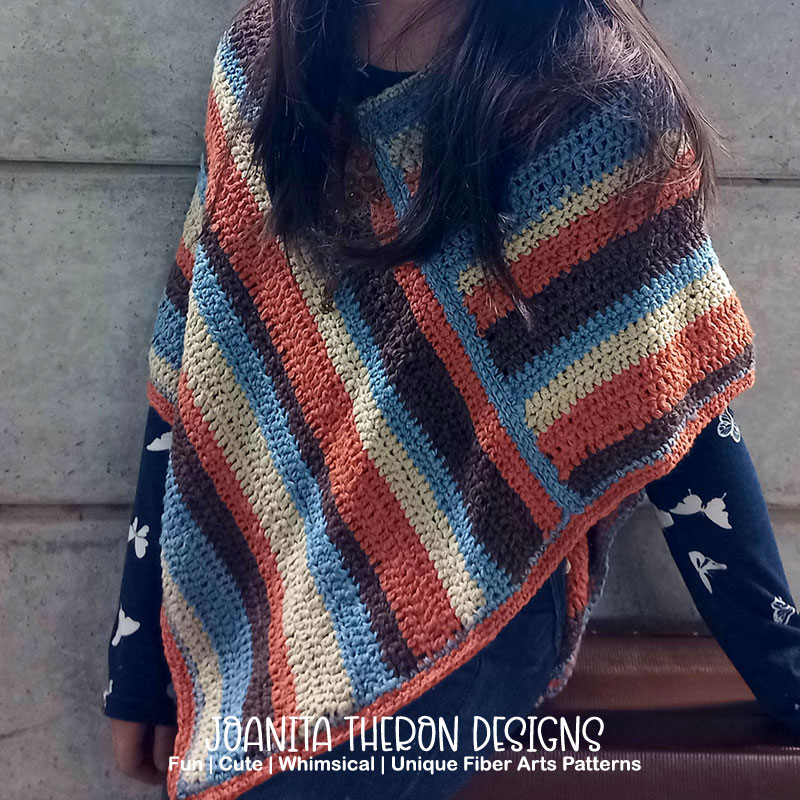
Crochet Beautiful Poncho

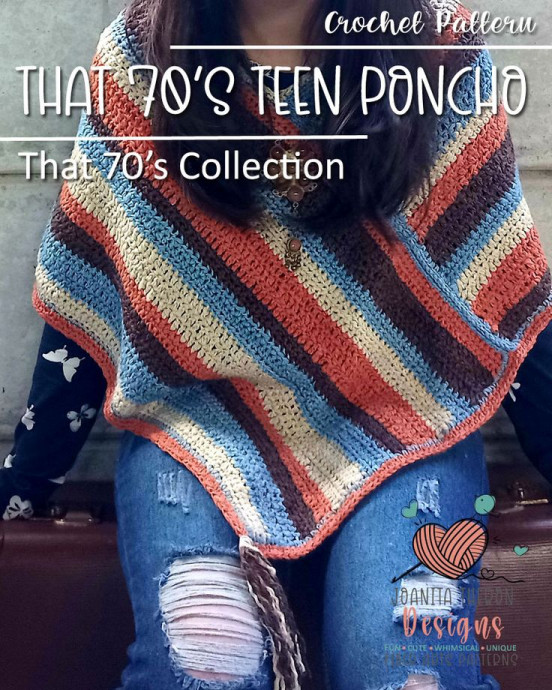
Crocheting a beautiful poncho can be such a delightful and rewarding project! The intricate patterns and cozy yarn make it a perfect combination for crafting a piece that's not only stylish but also warm and comfortable to wear. Whether you're a seasoned crocheter or just starting out, creating a beautiful poncho can be a fun and creative way to express your personal style. So, grab your favorite crochet hook, choose some lovely yarn colors, and get ready to stitch up a stunning poncho that will surely turn heads and keep you cozy all season long!
Materials
For this project I used:
- A – Dark Chocolate (2 x 50g)
- B – Mandarin (2 x 50g)
- C – Dunes (2 x 50g)
- D – Sky (2 x 50g)
Yarn Substitute
Using the same type of yarn throughout the project is recommended. The pattern suggests DK yarn, but you are not limited to this type of yarn. Any yarn can be used if you take into consideration your sizing for the project will differ.
Tension | Gauge
Gauge is NOT necessary for this project to be perfect.
Size
Fits – teen/adult small.
Size can be easily adjusted by lengthening the starting chain or using a larger hook than recommended.
- Adult Small – Rectangles 72 cm x 30 cm (28 inches x 12 inches)
- Adult Medium – Rectangles 80 cm x 45 cm (31 inches x 18 inches)
Remember – if you use/choose a different yarn weight/hook size your poncho will be a different size!
Instructions
Panel One
With A – CH 81 (Small)/ CH 101 (Medium)
ROW 1: Work 1 SC into 2nd CH from hook; work 1 SC into each CH across; TURN;
ROW 2/3: CH 1; work 1 SC into each SC across (80 SC);
TURN/ after last row fasten off and weave in ends.
With B – join into first ST
ROW 4/5/6: CH 2 (does not count as a ST); work 1 DC into each SC across (80 DC);
TURN/ after last row fasten off and weave in ends.
With C – join into first ST
ROW 7/8/9: CH 2 (does not count as a ST); work 1 HDC into each DC across (80 HDC);
TURN/ after last row fasten off and weave in ends.
With D – join into first ST
ROW 10/11/12: CH 1 (does not count as a ST); work 1 SC into each HDC across (80 SC);
TURN/ after last row fasten off and weave in ends.
With A – ROW 13/14/15 – Repeat ROW 4/5/6 (DC)
With B – ROW 16/17/18 – Repeat ROW 7/8/9 (HDC)
With C – ROW 19/20/21 – Repeat ROW 10/11/12 (SC)
With D – ROW 22/23/24 – Repeat ROW 4/5/6 (DC)
With A – ROW 25/26/27 – Repeat ROW 7/8/9 (HDC)
With B – ROW 28/29/30 – Repeat ROW 10/11/12 (SC)
With C – ROW 31/32/33 – Repeat ROW 4/5/6 (DC)
With D – ROW 34/25/36 – Repeat ROW 7/8/9 (HDC)
Panel Two
Note: color sequence has changed.
With C – CH 81 (Small)/ CH 101 (Medium)
ROW 1: Work 1 SC into 2nd CH from hook; work 1 SC into each CH across; TURN;
ROW 2/3: CH 1; work 1 SC into each SC across (80 SC);
TURN/ after last row fasten off and weave in ends.
With D – join into first ST
ROW 4/5/6: CH 2 (does not count as a ST); work 1 DC into each SC across (80 DC);
TURN/ after last row fasten off and weave in ends.
With A – join into first ST
ROW 7/8/9: CH 2 (does not count as a ST); work 1 HDC into each DC across (80 HDC);
TURN/ after last row fasten off and weave in ends.
With B – join into first ST
ROW 10/11/12: CH 1 (does not count as a ST); work 1 SC into each HDC across (80 SC);
TURN/ after last row fasten off and weave in ends.
With C – ROW 13/14/15 – Repeat ROW 4/5/6 (DC)
With D – ROW 16/17/18 – Repeat ROW 7/8/9 (HDC)
With A – ROW 19/20/21 – Repeat ROW 10/11/12 (SC)
With B – ROW 22/23/24 – Repeat ROW 4/5/6 (DC)
With C – ROW 25/26/27 – Repeat ROW 7/8/9 (HDC)
With D – ROW 28/29/30 – Repeat ROW 10/11/12 (SC)
With A – ROW 31/32/33 – Repeat ROW 4/5/6 (DC)
With B – ROW 34/25/36 – Repeat ROW 7/8/9 (HDC)
Border Rounds and Joining
With D – work SC around evenly all around each rectangle.
Join rectangles together
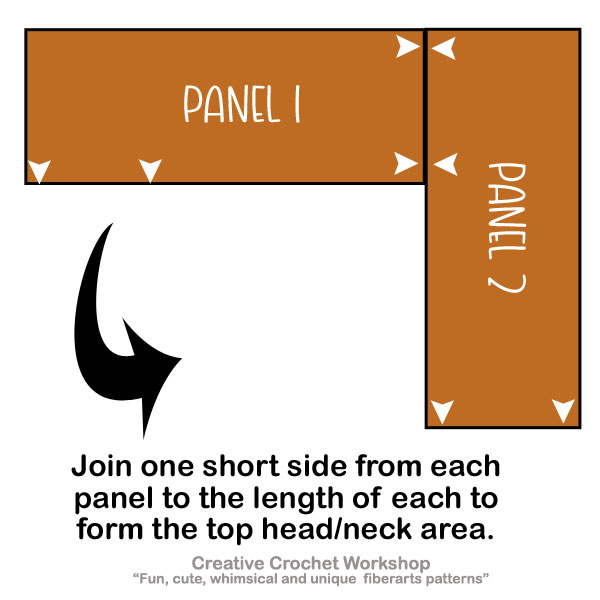
With C – Work SC evenly around neck area – work 2 SCtog over join/corner points.
With B: RND 1: Work SC evenly all-around bottom edge of poncho; work [1 SC; 2 CH; 1 SC] into corners.
RND 2: Work 1 SC into each SC all around; work [1 SC; 3 CH; 1 SC] into 2 CH corner spaces.
Fasten off and weave in ends.
With B – work DC all around poncho edge working 3 CH around each of the two corners.
Work tassels into 3 CH corner spaces with remaining yarn.
- Funny Pictures
-
 Hilarious Memes for Those Bored to Tears
-
 Weekly Treat of Funniest Parenting Memes for Good Laugh out Loud Right Now
-
 Really Funny Pics to End These Weekend Perfectly
- Recipes
-
 Crispy Baked Avocado Fries
-
 Scrambled Chickpea and Spinach Pitas
-
 Cinnamon Pancakes
- Lifehacks
-
 Crochet Basics: Aligned Cobble Stitch
-
 Brick Stitch Crochet Tutorial
-
 Crochet Basics: Wattle Stitch
- Crochet Ideas
-
 Crochet Snorlax Plushie Doll
-
 Crochet Beautiful Penguin Toy
-
 Crochet Tiny Snowman
- DIY
-
 DIY Santa Craft For Kids
-
 Paper Plate Angel Craft
-
 Upcycled Mason Jar Chicken Vase
- Knitting Ideas
-
 Knitted Bridger Cowl
-
 Knitted Keepsake Bag
-
 Knitted Cutie Cupcake Dolls