Crochet Watermelon Amigurumi Tutorial

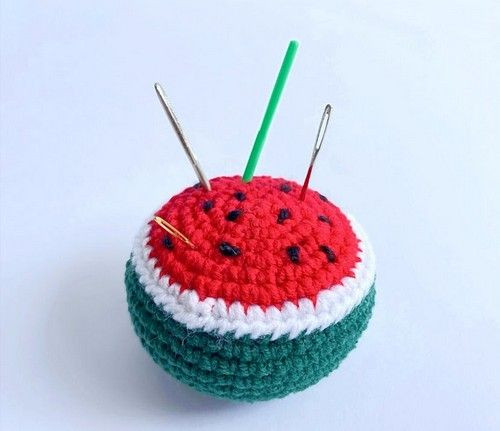
Crochet Watermelon Amigurumi is a delightful and fun craft project that brings a pop of summer vibes into your space. With its vibrant green and pink colors and cute seed details, creating a watermelon amigurumi is sure to bring a smile to your face. Whether you're a crochet enthusiast looking for a new challenge or a beginner eager to try your hand at amigurumi, this fruity creation is a great way to showcase your creativity and spread some joy. So grab your crochet hook and yarn, and get ready to stitch up a sweet and charming watermelon amigurumi to brighten up your day!
Materials Preparation
Gather your green, red, and white yarn, along with a crochet hook, yarn needle, black yarn for seeds, and scissors.
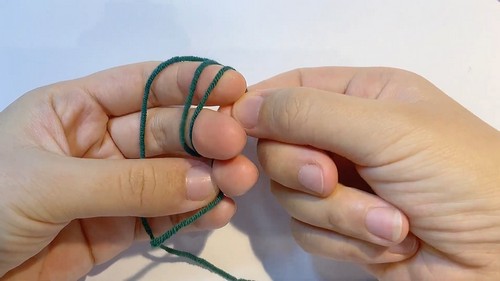
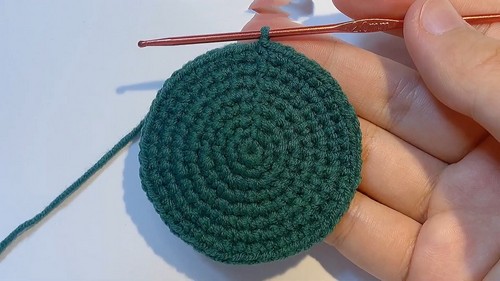
Starting with Green Yarn (Melon Skin)
Create a double ring with your fingers.
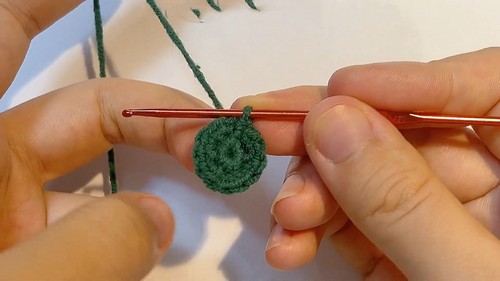
Work 6 single crochet (sc) stitches inside the double ring.
Use a stitch marker to mark the first sc if you’re a beginner.
Pull the tail to close the circle tightly and cut off the excess tail.
Increasing Rounds
Complete the round with a slip stitch (sl st) and chain 1 (ch 1).
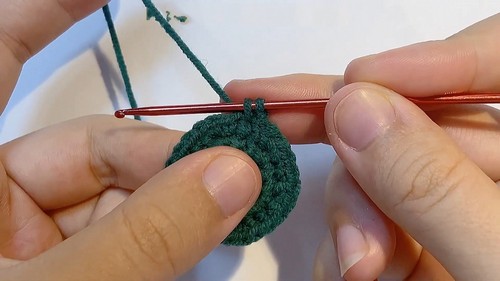
Round 2: Work 2 sc (an increase) in each stitch around for a total of 12 stitches.
Round 3: Sc in the next stitch, then 2 sc in the following stitch, repeat 6 times to get 18 stitches.
Round 4: Sc in the first 2 stitches, then 2 sc in the third stitch; repeat 6 times for a total of 24 stitches.
Round 5: Adjust the position of your increases to avoid polygon shape, sc in the first stitch, 2 sc in the next stitch, and sc in each of the following two stitches; repeat 6 times to get 30 stitches.
Round 6: Sc in the next 4 stitches, then increase in the fifth; repeat 6 times for 36 stitches in total.
Round 7: Change the increase position again, sc for 6 stitches, and in the 7th and 8th stitches work 2 sc; repeat 6 times.
Round 8: Continue with the increase pattern, working an increase in every 7th stitch, for a total of 42 stitches.
Forming the Pot-Like Structure
Rounds 9 to 13: Work 1 sc in each stitch around, sl st to join, and ch 1 to start a new round.
At the end of round 13, cut off the green yarn and secure the end.
Working the Watermelon Pulp
Switch to red yarn and repeat rounds 1 to 7.
In the last stitch of round 7, prepare to change to white yarn.
Start the sc with red yarn, but before completing the stitch, switch to the white yarn to finish it off.
Adding the White Rind
Continue with Round 8 using white yarn, maintaining the previous increase pattern.
Work in ends as you go, and trim any excess.
Finishing with Invisible Slip Stitch
Once you have completed Round 8 with white yarn, cut the yarn and pull through.
Use a yarn needle to create an invisible close by threading the yarn through the first stitch and the outside half of the last stitch.

Creating Melon Seeds
Using a yarn needle and black yarn, add seeds by sewing small stitches scattered over the red part of the watermelon.
Assembly
Stitch the red and white part of the watermelon together with your green base to complete the watermelon crochet project.
- Funny Pictures
-
 Hilarious Memes for Those Bored to Tears
-
 Weekly Treat of Funniest Parenting Memes for Good Laugh out Loud Right Now
-
 Really Funny Pics to End These Weekend Perfectly
- Recipes
-
 Crispy Baked Avocado Fries
-
 Scrambled Chickpea and Spinach Pitas
-
 Cinnamon Pancakes
- Lifehacks
-
 Crochet Basics: Aligned Cobble Stitch
-
 Brick Stitch Crochet Tutorial
-
 Crochet Basics: Wattle Stitch
- Crochet Ideas
-
 Crochet Snorlax Plushie Doll
-
 Crochet Beautiful Penguin Toy
-
 Crochet Tiny Snowman
- DIY
-
 DIY Santa Craft For Kids
-
 Paper Plate Angel Craft
-
 Upcycled Mason Jar Chicken Vase
- Knitting Ideas
-
 Knitted Bridger Cowl
-
 Knitted Keepsake Bag
-
 Knitted Cutie Cupcake Dolls