How to Make a Crochet Pincushion Ring

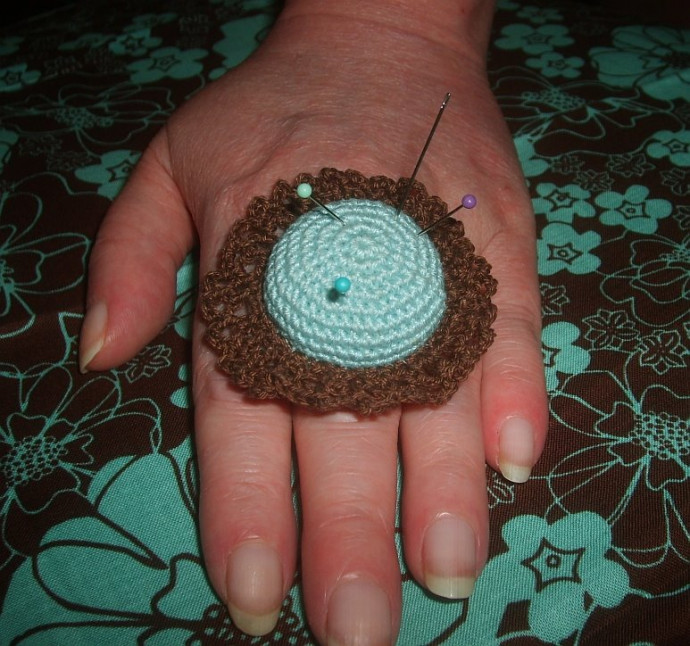
The Crochet Pincushion Ring is a charming and practical accessory for any craft enthusiast! It's not just a stylish addition to your craft table, but it also serves as a convenient way to keep your pins and needles close at hand while working on your latest project. With its cute design and functionality, this pincushion ring is sure to become your new favorite crafting companion. So go ahead, slip it on your finger, and enjoy the ease of having your essential tools right at your fingertips!
Materials
- #10 Crochet thread in Robin's Egg Blue and Milk Chocolate Brown
- Size 7 steel crochet hook
- Fiberfill (or a couple of cotton balls)
- Plastic from a milk jug or water bottle
- Small piece of elastic (to fit around your finger)
Note
I wouldn't leave out the step of adding the plastic to the pin cushion. That's what will stop the pins/needles from going through the cushion and stabbing your hand. Any hard plastic will work; I used a bit of a milk jug for it and it worked perfectly and is easily cut with any good pair of scissors.
If you use a different size of thread or a different size of hook, you will need to make the 'base' circle first, then use that circle to determine the size of plastic disc you will need. Using the materials listed above, a quarter is the perfect size to use to cut your circle of plastic.
On this pattern, I chose to join each round with a slip stitch to the first single crochet of the round. If you are more comfortable working in continuous rounds, by all means, do so.
Base Circle
Instructions
Using blue:
Rnd 1: 8 sc in magic ring (8)
Rnd 2: 2 sc in each sc around (16)
Rnd 3: sc in next sc, 2 sc in next sc around (24)
Rnd 4: sc in next 2 sc, 2 sc in next sc around (32)
Rnd 5: sc in next 3 sc, 2 sc in next sc around (40)
F/O.
Top/Dome
Instructions
Using blue:
Rnd 1: 8 sc in magic ring (8)
Rnd 2: 2 sc in each sc around (16)
Rnd 3: sc in next sc, 2 sc in next sc around (24)
Rnd 4: sc in next 2 sc, 2 sc in next sc around (32)
Rnd 5: sc in next 3 sc, 2 sc in next sc around (40)
Rnd 6-8: sc in each sc around (40)
F/O. (this part is going to appear to be much larger than the base; don't worry, it will fit)
Using a quarter as a guide, draw a circle on the milk jug plastic and cut out (make sure it's from a flat portion of the jug).
Sew the dome to the base in the back loops of the last rounds (leaving a 'free' loop to the outside of the rim). Insert the plastic disc to rest on the base circle and begin stuffing the 'dome'. As you continue to sew up the pieces, continue to add stuffing. When you have just a few stitches left to sew up, use a yarn needle or toothpick to ensure that the dome is very firmly stuffed and close up the cushion.
Frill
Instructions
Attach the brown thread to one of the 'free loops' at the base of the dome part of the cushion and chain 1. Single crochet in the same loop as you attached the thread, 2 single crochets in the next free loop, single crochet in the next free loop. Repeat all the way around.
Next round: chain 3, skip one single crochet, single crochet in the next single crochet. *Chain 3, skip one single crochet, single crochet in the next single crochet* repeat from * to * around to the first single crochet. Slip stitch to the first single crochet and then into the first chain 3 loop.
Next round: Single crochet in the same chain 3 loop, chain 4, single crochet in the next chain 3 loop. *Chain 4, single crochet in the next chain 3 loop* repeat around and slip stitch to the first single crochet.
F/O
Weave in all ends.
Taking the elastic piece, sew to the flat bottom of the cushion checking to see that it will fit snugly around your finger (but not so tight that it's uncomfortable).
- Funny Pictures
-
 Hilarious Memes for Those Bored to Tears
-
 Weekly Treat of Funniest Parenting Memes for Good Laugh out Loud Right Now
-
 Really Funny Pics to End These Weekend Perfectly
- Recipes
-
 Crispy Baked Avocado Fries
-
 Scrambled Chickpea and Spinach Pitas
-
 Cinnamon Pancakes
- Lifehacks
-
 Crochet Basics: Aligned Cobble Stitch
-
 Brick Stitch Crochet Tutorial
-
 Crochet Basics: Wattle Stitch
- Crochet Ideas
-
 Crochet Snorlax Plushie Doll
-
 Crochet Beautiful Penguin Toy
-
 Crochet Tiny Snowman
- DIY
-
 DIY Santa Craft For Kids
-
 Paper Plate Angel Craft
-
 Upcycled Mason Jar Chicken Vase
- Knitting Ideas
-
 Knitted Bridger Cowl
-
 Knitted Keepsake Bag
-
 Knitted Cutie Cupcake Dolls