Crochet Little Wise Man Toy Pattern

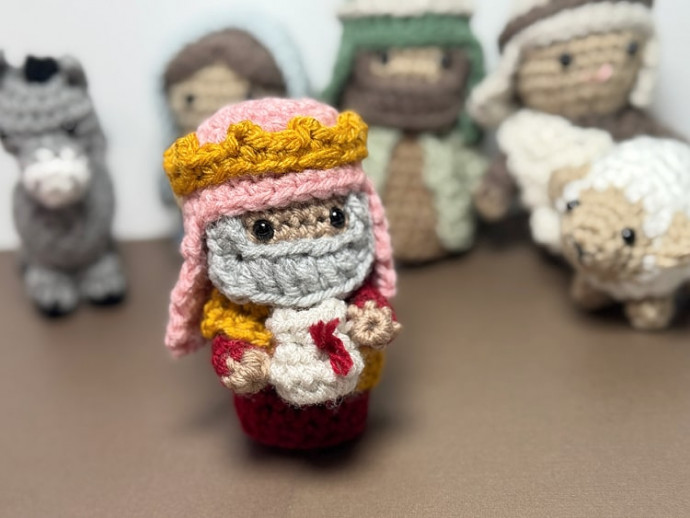
The Crochet Little Wise Man Toy is an adorable and whimsical creation that brings joy to both children and adults alike. With its intricate details and charming design, this toy is sure to spread holiday cheer and warmth wherever it goes. Whether displayed as a festive decoration or used as a cuddly companion, this sweet crochet creation is bound to bring a smile to anyone's face. Handcrafted with care and love, the Crochet Little Wise Man Toy is a delightful addition to any collection.
Finished Size: about 4" tall.
You Will Need:
- Worsted weight yarn in 6 colors: skin tone, hair color, 3 colors for clothing (possibly an additional color for the crown if not using gold in the clothing), and 1 for the pouch. (Sample made with Loops & Threads Impeccable in Soft Taupe, Pale Gray, Claret, Gold, Soft Rose, and Loops and Threads Soft Classic in Mushroom)
- G crochet hook (4/4.25 mm)
- 2- 6mm safety eyes
- Stuffing
- Yarn needle
- Stitch markers
- Scissors
- Optional: if you want to add weighted bases to your figures, you will need some scrap fabric and Poly-Pellets.
Instructions:
Most of the pieces are made beginning with a magic ring. The only exceptions are the crown, the beard, and the sash.
*If you want to add weighted bases to the bottom of your figures, you can cut out a circle of fabric about 3" in diameter, work a running stitch all the way around the outside edge, cinch it to make a little bowl shape, add a little bit of poly-pellets to the circle, then cinch closed. The base of the figure is only about 1.5" in diameter, so it needs to be kept pretty small. If using a weighted base, place it in the bottom of the figure when the pattern says to begin stuffing, then continue with stuffing. This does help keep your figures upright easier but is an optional step.
Body/Head
Make 1 starting with robe color/red, changing to skin tone/tan where directed, beginning with magic ring.
Round 1: in mr, ch 1, 6 sc (6 sc)
Round 2: 2 sc in each st (12 sc)
Round 3: [2 sc in first st, 1 sc in next st] repeat around (18 sc)
Round 4: 1 sc in blo of each st (18 sc)
Rounds 5-9: 1 sc in each st (18 sc)
Begin stuffing and continue stuffing as you work.
Round 10: [sc2tog, sc in next 4 sts] repeat around (15 sc)
Round 11: [sc2tog, sc in next 3 sts] repeat around (12 sc)
Round 12: [sc2tog, sc in next 2 sts] repeat around (9 sc)
Change to skin tone/tan yarn.
Round 13: 2 sc in each st (18 sc)
Round 14: [2 sc in first st, 1 sc in next 2 sts] repeat around (24 sc)
Rounds 15-18: 1 sc in each st (24 sc)
Round 19: [sc2tog, sc in next 2 sts] repeat around (18 sc)
Insert safety eyes between rounds 16 and 17 about 3 stitches apart.
Round 20: [sc2tog, sc in next st] repeat around (12 sc)
Round 21: sc2tog around (6 sc)
Finish off, weave in ends.
Arms
Make 2 starting with skin tone/tan yarn and changing to robe color/red where directed, beginning with a magic ring.
Round 1: in mr, ch 1, 6 sc (6 sc)
Change to robe color/red yarn.
Rounds 2-5: 1 sc in each st (6 sc)
Finish off and cut yarn leaving a long tail for sewing.
Sew the two arms to the sides of the body sticking out towards the front so they can hold the gift.
Sash
Make 1 with sash color/gold yarn, beginning with a chain and working back and forth in rows.
Beginning chain counts as a double crochet.
Chain 4.
Row 1: sc in second ch from hook and each ch to the end (3 sc).
Rows 2-27: ch 1, turn, 1 sc in each st (3 sc).
Finish off and cut yarn, leaving a long tail for sewing. Wrap the sash around the body with one side going over the arm and the other side going under the arm. Stitch the ends together on the side under the arm to make a loop and stitch in place to secure.
Beard
Make 1 with beard color/gray yarn, beginning with a chain.
ch 12.
Row 1: 1 sc in second ch from the hook, 1 sc in next st, [sc, 2 hdc] in next st, 1 dc in next 5 sts, [2 hdc, sc] in next st, sc in next 2 sts.
Finish off and cut yarn leaving a long tail for sewing.
Sew to the face so it sits just below the eyes with the ends on either side of the eyes.
Head Cover
Make 1 with head cover color/pink yarn, beginning with a magic ring, then working back and forth in rows.
Round 1: in mr, ch 1, 6 sc (6 sc).
Round 2: 2 sc in each st (12 sc).
Round 3: [2 sc in first st, 1 sc in next st] repeat around (18 sc).
Round 4: [2 sc in first st, 1 sc in next 2 sts] repeat around (24 sc).
Rounds 5-7: 1 sc in each st (24 sc).
At this point you will start working back and forth in rows rather than rounds.
Row 8: 1 sc in next 16 sts (16 sc).
Rows 9-14: ch 1, turn, 1 sc in each st (16 sc).
Finish off and cut yarn leaving a long tail for sewing. Place the head covering on top of the head and stitch in place to secure it to the head.
Crown
Make 1 with crown color/gold yarn.
ch 27.
Row 1: sc in 2nd ch from hook, sc in next ch, [ch 2, sl st in first ch to make picot, sc in next 3 sts] repeat to the end.
Finish off leaving a long tail for sewing. Wrap the crown around the head covering and stitch the ends together, then make a couple of stitches around to tack in place. Weave in ends.
Pouch
Make one with pouch color/beige yarn, beginning with magic ring.
Round 1: in mr, ch 1, 6 sc (6 sc).
Round 2: 2 sc in each st (12 sc).
Rounds 3-4: 1 sc in each st (12 sc).
Round 5: [sc2tog, 1 sc in next 2 sts] repeat around (9 sc).
Finish off, leaving a long tail for sewing. Add a tiny bit of stuffing to the pouch. Thread a length of yarn on a needle and weave around the top of the pouch between rounds 4-5, pull to cinch and tie closed. Trim ends.
Sew the pouch to the hands of the wiseman so that he is holding it out in front of him.
- Funny Pictures
-
 Cute Cat Memes That Will Make Your Day Brighter
-
 Spot-on and Funny Memes About Introverts Struggles
-
 Top Wonderful Cat Memes on Their Way to Better Your Day
- Recipes
-
 Creamy Old Fashioned Rice Pudding
-
 Russian Tea Cakes (Snowball Cookies)
-
 Rigatoni with Sausage, Tomatoes, and Zucchini
- Lifehacks
-
 How to Crochet a Harlequin Stitch
-
 Removing The Toughest Stains
-
 Crochet Basics: Crumpled Griddle Stitch
- Crochet Ideas
-
 Crochet Christmas Tree
-
 Crochet Goblet of Fire
-
 Crochet Adorable Ammonite
- DIY
-
 DIY Snowman Wreath
-
 Mini Santa Sleigh Ornament
-
 Crochet Gingerbread House Blanket
- Knitting Ideas
-
 Knitted Easter Bunny
-
 Knitted Mobile Phone/Glasses Case
-
 Knitted Cabled Wallet