Crochet Milk Bottle Amigurumi: Whimsical Crafting Fun

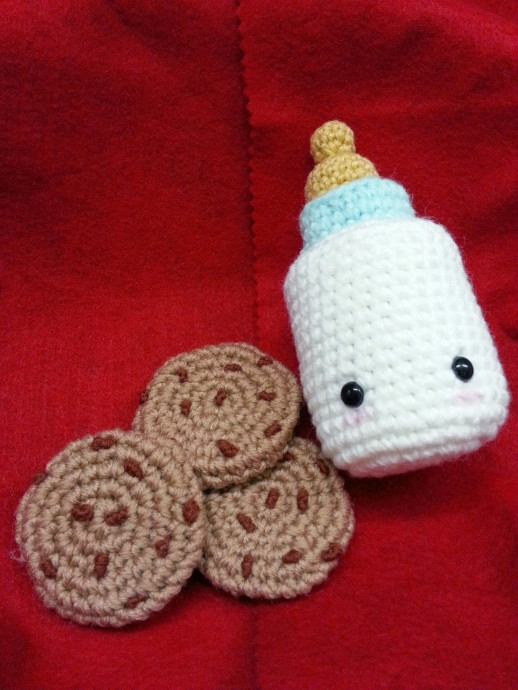
Crochet Milk Bottle Amigurumi is a delightful and charming project that brings a touch of whimsy to your crafting repertoire. Creating this adorable amigurumi involves working with soft yarns in creamy white shades to mimic a classic milk bottle shape, and adding cute details like a smiley face or tiny bow for that extra dose of cuteness. Whether you're a seasoned crocheter or just starting out, this project is a fun and rewarding way to show off your skills and creativity. Imagine displaying your finished amigurumi on a shelf or gifting it to a friend – it's sure to bring smiles and warm hearts wherever it goes. So grab your crochet hook, cozy up with some yarn, and let's craft a little piece of joy together!
What You’ll Need (Materials)
- Worsted-weight yarn, Blue, White & Yellow colour
- F/5 3.75mm crochet hook
- Poly-Fil or any stuffing of your choice
- Yarn needle
- Two 8.5mm plastic safety eyes
Abbreviation Key
- sc = single crochet
- tr = triple crochet
- ch = chain
- sl st = slip stitch
- dec = decrease (join next 2 sts into 1)
- inc = increase (2 sc in next st)
- BLO = back loop only
- FLO = front loop only
Notes
Gauge is not important – just keep maintaining consistent tension throughout the entire project.
Crochet in a spiral. Use something to mark the first stitch of a round, and move it up as you work.
“The Magic Circle” is used to start each piece. Alternative technique: ch 2, then sc x6 into the second chain away from the hook. Slip stitch to join the round. This creates Round 1.
Milk Bottle Body
Use White colour yarn.
Round 1: Magic Circle with a base of 6 stitches
Round 2: inc x6 = 12 sts
Round 3: (1 inc, sc in next st) x6 = 18 sts
Round 4: (1 inc, sc in next 2 sts) x6 = 24 sts
Round 5: (1 inc, sc in next 3 sts) x6 = 30 sts
Round 6-19: sc in next 30 stitches = 30 sts
Round 20: (1 dec, sc in next 3 sts) x6 = 24 sts
Round 21: (1 dec, sc in next 2 sts) x6 = 18 sts
Round 22: (1 dec, sc in next st) x6 = 12 sts
*sl st and leave a 6” tail for sewing.
**Insert the Plastic Safety Eyes between Round 15 & Round 16 and attach washers. Eyes should be about 6 sts apart.
Milk Bottle Cap
Use Blue colour yarn.
Round 1: Magic Circle with a base of 6 stitches
Round 2: inc x6 = 12 sts
Round 3: (1 inc, sc in next st) x6 = 18 sts
Round 4: tr BLO in next 18 stitches = 18 sts
*sl st and leave a 12” tail for sewing. Stuff Cap with Poly-Fil. Position and sew Cap & Teat onto the Milk Bottle’s Body.
Milk Bottle Silicone Teat
Use Yellow colour yarn.
Round 1: Magic Circle with a base of 6 stitches
Round 2-3: sc in next 6 stitches = 6 sts
Round 4: inc x6 = 12 sts
Round 5: sc in next 12 stitches = 12 sts
*sl st and leave an 8” tail for sewing. Stuff Silicone Teat with Poly-Fil. Position and sew the Teat to the Milk Bottle’s Cap.
- Funny Pictures
-
 Cute Cat Memes That Will Make Your Day Brighter
-
 Spot-on and Funny Memes About Introverts Struggles
-
 Top Wonderful Cat Memes on Their Way to Better Your Day
- Recipes
-
 Creamy Old Fashioned Rice Pudding
-
 Russian Tea Cakes (Snowball Cookies)
-
 Rigatoni with Sausage, Tomatoes, and Zucchini
- Lifehacks
-
 How to Crochet a Harlequin Stitch
-
 Removing The Toughest Stains
-
 Crochet Basics: Crumpled Griddle Stitch
- Crochet Ideas
-
 Crochet Christmas Tree
-
 Crochet Goblet of Fire
-
 Crochet Adorable Ammonite
- DIY
-
 DIY Snowman Wreath
-
 Mini Santa Sleigh Ornament
-
 Crochet Gingerbread House Blanket
- Knitting Ideas
-
 Knitted Easter Bunny
-
 Knitted Mobile Phone/Glasses Case
-
 Knitted Cabled Wallet