How to Crochet an American Flag Placemats

Crocheting an American flag placemat can be a delightful and patriotic project to add a touch of charm to your dining table decor. With its red, white, and blue colors, this craft allows you to showcase your creativity and patriotism in a functional way. Whether you're a seasoned crocheter or a beginner looking for a fun project, working on this design can be both relaxing and rewarding. Imagine serving up your favorite dishes on a handmade flag-inspired placemat, adding a cozy and personal touch to meal times. So, grab your yarn, crochet hook, and let's get started on creating a beautiful American flag masterpiece for your table setting!
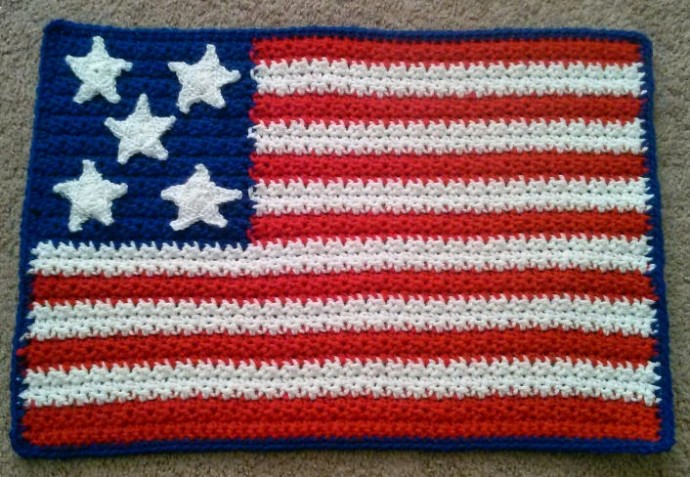
I used Red Heart yarn and a size I (5.50mm) hook and got a finished size of 13" x 19". I like my placemats a bit bigger; if you want them a bit smaller, maybe try the next hook size down. You will want to use a lighter weight yarn or crochet thread with the appropriate size hook for the stars so they will all fit. Alternatively, you could use a worsted weight yarn and make one large star in place of the 5 small ones.
Pattern Instructions
Basic Rows
(with red) ch 62
Row 1: sc in 2nd ch from hook, *hdc in next ch, sc in next ch, repeat from * to end of row, turn
Row 2: ch 2 (counts as first hdc), *sc in next hdc, hdc in next sc repeat from * to end of row, turn
Row 3: ch 1, *sc in next hdc, hdc in next sc, repeat from * to end of row, turn
Color Changes
Switch to white
Row 4: repeat row 2
Row 5: repeat row 3
Row 6: repeat row 2
Switch to Red
Row 7: repeat row 3
Row 8: repeat row 2
Row 9: repeat row 3
Switch to white
Row 10: repeat row 2
Row 11: repeat row 3
Row 12: repeat row 2
Switch to Red
Row 13: repeat row 3
Row 14: repeat row 2
Row 15: repeat row 3
Switch to white
Row 16: repeat row 2
Row 17: repeat row 3
Row 18: repeat row 2
Switch to Red
Row 19: repeat row 3, working the first 40 stitches with red, then switch to blue and work the last 21 stitches
Row 20: repeat row 2, working the first 21 stitches with blue, then switch to red and work the last 40 stitches
Row 21: repeat row 3, working the first 40 stitches with red, then switch to blue and work the last 21 stitches
Row 22: repeat row 2, working the first 21 stitches with blue, then switch to white and work the last 40 stitches
Row 23: repeat row 3, working the first 40 stitches with white, then switch to blue and work the last 21 stitches
Row 24: repeat row 2, working the first 21 stitches with blue, then switch to white and work the last 40 stitches
Switch to Red
Row 25: repeat row 3, working the first 40 stitches with red, then switch to blue and work the last 21 stitches
Row 26: repeat row 2, working the first 21 stitches with blue, then switch to red and work the last 40 stitches
Row 27: repeat row 3, working the first 40 stitches with red, then switch to blue and work the last 21 stitches
Row 28: repeat row 2, working the first 21 stitches with blue, then switch to white and work the last 40 stitches
Row 29: repeat row 3, working the first 40 stitches with white, then switch to blue and work the last 21 stitches
Row 30: repeat row 2, working the first 21 stitches with blue, then switch to white and work the last 40 stitches
Switch to Red
Row 31: repeat row 3, working the first 40 stitches with red, then switch to blue and work the last 21 stitches
Row 32: repeat row 2, working the first 21 stitches with blue, then switch to red and work the last 40 stitches
Row 33: repeat row 3, working the first 40 stitches with red, then switch to blue and work the last 21 stitches
Row 34: repeat row 2, working the first 21 stitches with blue, then switch to white and work the last 40 stitches
Row 35: repeat row 3, working the first 40 stitches with white, then switch to blue and work the last 21 stitches
Row 36: repeat row 2, working the first 21 stitches with blue, then switch to white and work the last 40 stitches
Switch to Red
Row 37: repeat row 3, working the first 40 stitches with red, then switch to blue and work the last 21 stitches
Row 38: repeat row 2, working the first 21 stitches with blue, then switch to red and work the last 40 stitches
Row 39: repeat row 3, working the first 40 stitches with red, then switch to blue and work the last 21 stitches
Star Pattern
- Funny Pictures
-
 Hilarious Memes for Those Bored to Tears
-
 Weekly Treat of Funniest Parenting Memes for Good Laugh out Loud Right Now
-
 Really Funny Pics to End These Weekend Perfectly
- Recipes
-
 Crispy Baked Avocado Fries
-
 Scrambled Chickpea and Spinach Pitas
-
 Cinnamon Pancakes
- Lifehacks
-
 Crochet Basics: Aligned Cobble Stitch
-
 Brick Stitch Crochet Tutorial
-
 Crochet Basics: Wattle Stitch
- Crochet Ideas
-
 Crochet Snorlax Plushie Doll
-
 Crochet Beautiful Penguin Toy
-
 Crochet Tiny Snowman
- DIY
-
 DIY Santa Craft For Kids
-
 Paper Plate Angel Craft
-
 Upcycled Mason Jar Chicken Vase
- Knitting Ideas
-
 Knitted Bridger Cowl
-
 Knitted Keepsake Bag
-
 Knitted Cutie Cupcake Dolls