Crochet Mom's Kitchen Set Potholder: A Perfect Blend of Style and Functionality

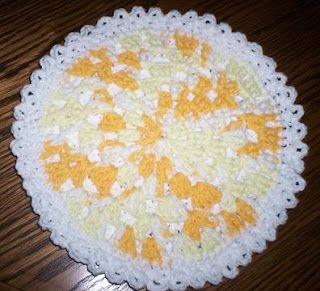
The Crochet Mom's Kitchen Set Potholder is the perfect addition to any kitchen, bringing both style and functionality to your cooking space. Handcrafted with love and care, these potholders are not only practical for handling hot pots and pans, but they also add a touch of charm to your home. The intricate crochet work gives them a unique and cozy feel that will make you smile every time you use them. Whether you're an experienced chef or just starting out in the kitchen, these potholders are a must-have accessory that will make your cooking experience even more enjoyable. So go ahead, treat yourself to the Crochet Mom's Kitchen Set Potholder and add a sprinkle of warmth and cheer to your culinary adventures!
Materials Required
- 1 ball #165 Daisy Ombre
- 1 ball #1 White
- "G" hook
Potholder Instructions
Front
With Daisy Ombre, chain 4, join with sl st to form a ring.
Rnd 1: Ch 4, *dc in ring, ch 1; repeat from * 11 times. Join with a sl st in 3rd ch of beg ch-3. (12 dc)
Rnd 2: Sl st in next ch-1 sp, ch 3, dc in same space, ch 1; *2 dc in next ch 1 space, ch 1. Repeat from * 11 times. Sl st in top of beg ch-3. (12 ch-1 sp).
Rnd 3: Sl st across to ch-1 sp, (ch 3, 2 dc in same sp), ch 1, *3 dc in next ch 1 sp, ch 1. Repeat from * around. Sl st in top of beg ch 3. (12 ch-1 sp)
Rnd 4: Sl st across to ch 1 sp, (ch 3, 3 dc in same place) ch 1, *4 dc in next ch 1 sp, ch 1, repeat from * around. Sl st in top of beg ch 3. (12 ch-1 sp).
Rnd 5: Sl st across to ch 1 sp, (ch 3, 1 dc, ch 1, 2 dc in same place). Ch 1, *2 dc, ch 1, 2 dc in next ch 1 sp, ch 1, repeat from * around. Sl st in beg of ch 3. (24 ch-1 sp)
Rnd 6: Sl st across to ch-1 sp, (ch 3, 2 dc in same sp), ch 1, *3 dc in next ch 1 sp, ch 1. Repeat from * around. Sl st in top of beg ch 3. (24 ch-1 sp, fasten off).
Back
With White, ch 4, join with slip stitch to form ring.
Rd 1: Ch 3, 12 dc in ring, join with slip stitch now and thru out, (13 dc)
Rd 2: Ch 3, 1 dc in same place, 2 dc in each dc around, join, (26 dc)
Rd 3: Ch 3, 1 dc in same place, *1 in next dc, 2 in next dc, repeat from * around, join, (38 dc)
Rd 4: Ch 3, 1 dc in same place, *1 in next 2 dc, 2 in next dc, repeat from * around, join, (50 dc)
Rd 5: Ch 3, 1 dc in same place, *1 in next 3 dc, 2 in next dc, repeat from * around, join, (62 dc).
Rd 6: Ch 3, 1 dc in same place, *1 in next 4 dc, 2 in next dc, repeat from * around, join, (74 dc)
Rd 7: With wrong sides facing, join back to front with sc's, join.
Edging
Rd 8: Ch 3, 1 dc in same place, *skip 1 sc, sc in next sc, ch 3, 1 dc in same place, repeat from * around, end Sl st in bottom of first ch-3. Fasten off and weave in end.
- Funny Pictures
-
 These are the Pics That Simply Describe Your Life
-
 Hilariously Accurate Parenting Memes That Show the Other Side of Parenthood
-
 Great Pics That Just Depict Our Lives
- Recipes
-
 Crispy Baked Avocado Fries
-
 Baked Beans and Hot Dogs with Biscuit Topping
-
 Roasted Rosemary Lemon Chicken Breasts
- Lifehacks
-
 Crochet Basics: Twisted Fringe
-
 7 Crochet Tips And Tricks
-
 How To Work Crochet Into Denim
- Crochet Ideas
-
 Crochet Snorlax Plushie Doll
-
 Crochet Cat in 1 Row
-
 Crochet Beautiful Penguin Toy
- DIY
-
 Popsicle Stick and Jingle Bell Christmas Tree Ornament
-
 Upcycled Mason Jar Chicken Vase
-
 Crochet Namaste Stephanie Doll
- Knitting Ideas
-
 Knitted Keepsake Bag
-
 Knitted Textured Heart Dishcloth
-
 Knitted Snowfall Dishcloth