Crochet Scallop Potholder: A Charming Addition to Your Kitchen

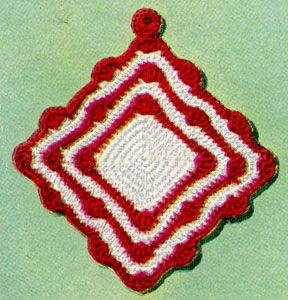
Are you looking to add a touch of handmade charm to your kitchen? Why not try crocheting a scallop potholder? Not only is it a fun and satisfying project, but it also serves as a practical and stylish addition to your cooking space. With its intricate design and soft texture, the crochet scallop potholder is perfect for protecting your hands from hot pans and dishes. Whether you're an experienced crocheter or just starting out, this project is a delightful way to unleash your creativity and create something functional for your home. So grab your yarn and hook, and let's get crocheting!
Materials Required
For this project, you will need the following materials:
- 1 skein each of White and Red or desired colors to make 3 potholders
- Steel crochet hook No. 0
Instructions
Start with the Base:
With White, ch 2, 8 s c in 2nd st from hook, do not join rows. Place a marker at the beginning of each row.
Row Instructions
2nd Row: * 3 s c in next s c, 1 s c in next s c, repeat from * 3 times.
3rd Row: 1 s c in next s c, 3 s c in next s c (corner), * 1 s c in each of the next 3 s c, 3 s c in next s c (corner), repeat from * twice, 1 s c in each of the last 2 s c.
4th Row: 1 s c in each of the next 2 s c, 3 s c in next s c, * 1 s c in each of the next 5 s c, 3 s c in next s c, repeat from * twice, 1 s c in each of the next 3 s c.
5th Row: 1 s c in each of the next 3 s c, 3 s c in next s c, * 1 s c in each of the next 7 s c, 3 s c in next s c, repeat from * twice, 1 s c in each of the next 4 s c.
6th Row: 1 s c in each of the next 4 s c, 3 s c in next s c, * 1 s c in each of the next 9 s c, 3 s c in next s c, repeat from * twice, 1 s c in each of the next 5 s c, sl st in next s c to even row, cut yarn.
Adding Color and Texture
7th Row: Attach Red in center st at corner, ch 4, 3 d c with ch 1 between each d c in the same space, * ch 1, skip 1 s c, 1 s c in each of the next 9 s c, ch 1, skip 1 s c, 4 d c with ch 1 between each d c in next st (shell), repeat from * twice, ch 1, skip 1 s c, 1 s c in each of the next 9 s c, ch 1, join in 3rd st of ch, cut yarn.
8th Row: Attach White and working in back loop of sts only work 1 s c in each s c and 1 s c in each ch 1 and each d c, join.
9th Row: Working through both loops work 1 s c in each s c and 3 s c in center st at each corner, join, cut White.
10th Row: Attach Red in center st at corner, ch 4, 3 d c with ch 1 between each d c in the same space, * ch 1, skip 1 s c, 1 s c in each of the next 7 s c, ch 1, skip 1 s c, shell in next s c, repeat from * all around ending with ch 1, skip 1 s c, 1 s c in each of the next 7 s c, ch 1, join in 3rd st of ch, cut yarn.
Final Touches
11th Row: Attach White in back loop of 1st ch 1 to the right of corner and working in back loop of sts only, s c in the same space, * s c in next d c, s c in next ch 1, repeat from * 3 times, 1 s c in each of the next 7 s c, skip next ch 1, 1 s c in each of the next 4 d c of next shell (do not work in the ch 1 between the d c's of shell), skip next ch 1, 1 s c in each of the next 7 s c, s c in next ch 1, repeat from 1st * all around ending to correspond, join.
12th Row: Working through both loops work 1 s c in each s c, join, cut White.
13th Row: Attach Red in center st at corner, ch 4, 3 d c with ch 1 between each d c in the same space, * ch 1, skip 1 s c, 1 s c in each of the next 4 s c, ch 1, skip 1 s c, shell in next s c, ch 1, skip 2 s c, 1 s c in each of the next 8 s c, ch 1, skip 2 s c, shell in next s c, ch 1, skip 1 s c, 1 s c in each of the next 4 s c, ch 1, skip 1 s c, shell in next s c (corner), repeat from * all around ending to correspond, join, cut yarn. With Red cover a bone ring in s c and sew to corner of potholder.
- Funny Pictures
-
 Hilarious Memes for Those Bored to Tears
-
 Weekly Treat of Funniest Parenting Memes for Good Laugh out Loud Right Now
-
 Really Funny Pics to End These Weekend Perfectly
- Recipes
-
 Crispy Baked Avocado Fries
-
 Scrambled Chickpea and Spinach Pitas
-
 Cinnamon Pancakes
- Lifehacks
-
 Crochet Basics: Aligned Cobble Stitch
-
 Brick Stitch Crochet Tutorial
-
 Crochet Basics: Wattle Stitch
- Crochet Ideas
-
 Crochet Snorlax Plushie Doll
-
 Crochet Beautiful Penguin Toy
-
 Crochet Tiny Snowman
- DIY
-
 DIY Santa Craft For Kids
-
 Paper Plate Angel Craft
-
 Upcycled Mason Jar Chicken Vase
- Knitting Ideas
-
 Knitted Bridger Cowl
-
 Knitted Keepsake Bag
-
 Knitted Cutie Cupcake Dolls