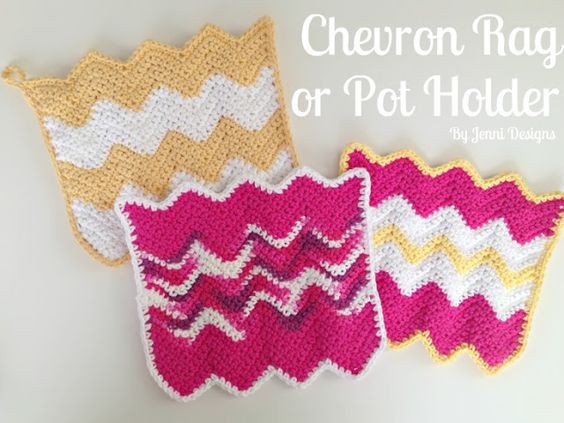
Handmade Crochet Chevron Rag or Pot Holder

Looking to add a touch of handmade charm to your kitchen? Look no further than the delightful Crochet Chevron Rag or Pot Holder! This versatile and stylish piece not only brightens up your cooking space but also serves a practical purpose. With its chevron design, it brings a trendy and timeless appeal to your kitchen decor. Whether you need a reliable pot holder for grabbing hot cookware or a cute rag for wiping down surfaces, this crocheted beauty has got you covered. Handcrafted with love, it makes for a thoughtful gift or a special treat for yourself. Get ready to bring a pop of color and a dash of creativity to your kitchen with the Crochet Chevron Rag or Pot Holder!
Skill Level
Easy
Finished Size
9" x 9"
Supplies
- Worsted Weight Cotton Yarn, approx. 65 yds. per 1 rag
- Size I (5.5 mm) Crochet Hook
- Tapestry Needle
- Scissors
Abbreviations (US Terms)
- Ch - Chain
- Sc - Single Crochet
- Sl St - Slip Stitch
- Sk - Skip
- Sp - Space
Note:
-Stitches placed between these brackets [ ] indicate a group of stitches to all be working into the same space.
Gauge
4 sc = approx. 1"
Instructions
For a Pot Holder
RND 1: Make 2
For a Rag
RND 1: Make 1
Row Instructions
Row 1: Ch 46, 2 sc in 2nd ch from hook. *Sc in 4, sk 2, sc in 4, 3 sc in next.* Repeat *to* across until you have one sp left. 2 sc in last. Ch 1, turn. (45 sc)
Row 2-4: 2 sc in first. *Sc in 4, sk 2, sc in 4, 3 sc in next.* Repeat *to* across until you have one sp left. 2 sc in last. Ch 1, turn. (45 sc)
Row 5: 2 sc in first. *Sc in 4, sk 2, sc in 4, 3 sc in next.* Repeat *to* across until you have one sp left. 2 sc in last. (45 sc)
Fasten off and join new color with sl st & ch 1.
Row 6-9: 2 sc in first. *Sc in 4, sk 2, sc in 4, 3 sc in next.* Repeat *to* across until you have one sp left. 2 sc in last. Ch 1, turn. (45 sc)
Row 10: 2 sc in first. *Sc in 4, sk 2, sc in 4, 3 sc in next.* Repeat *to* across until you have one sp left. 2 sc in last. (45 sc)
Fasten off and join new color with sl st & ch 1.
Row 11-14: 2 sc in first. *Sc in 4, sk 2, sc in 4, 3 sc in next.* Repeat *to* across until you have one sp left. 2 sc in last. Ch 1, turn. (45 sc)
Row 15: 2 sc in first. *Sc in 4, sk 2, sc in 4, 3 sc in next.* Repeat *to* across until you have one sp left. 2 sc in last. (45 sc)
Fasten off and join new color with sl st & ch 1.
Row 16-19: 2 sc in first. *Sc in 4, sk 2, sc in 4, 3 sc in next.* Repeat *to* across until you have one sp left. 2 sc in last. Ch 1, turn. (45 sc)
Row 20: 2 sc in first. *Sc in 4, sk 2, sc in 4, 3 sc in next.* Repeat *to* across until you have one sp left. 2 sc in last. (45 sc)
Completion
For a Pot Holder: Fasten off, make your 2nd rag. When the 2nd rag is complete, hold together the two rags and work the edge below working through both rags as you go.
For a Rag: Do not fasten off, continue below with the edge (or you can leave the edge off if you like).
Edge Instructions
Edge:
Sc around the entire edge of the rag. At each corner/point work the following: [sc, ch 2, sc].
After you have worked all the way around the rag/potholder if you would like a loop for hanging work the following into the last sp: [ch 8, sl st] then join to the first sc you made for the edging.
Fasten off and sew in ends.


