How to Crochet Your Very Own Adorable Puppy

Create your very own adorable puppy using the art of crocheting. Craft a lovable companion that will surely melt your heart with its cuteness. By following a crochet pattern, you can bring to life a fluffy and irresistible puppy that you can cuddle with or display proudly in your home. Crocheting allows you to customize the colors and details of your puppy, making it a unique and special creation that reflects your personal style. With just a few skeins of yarn, a crochet hook, and some stuffing, you can embark on a creative journey to make a one-of-a-kind puppy that will bring joy to your life. Let your imagination run wild as you crochet each stitch, shaping your puppy into a delightful work of art that will be cherished for years to come.
Skill Level
Easy
Required Supplies
- RED HEART Boutique Fur: 3 balls 9100 Polar A, 1 ball 9012 Slate B
- RED HEART Super Saver: 1 skein each of 312 Black C, 706 Perfect Pink D, and 316 Soft White E
- Note: Only small amounts of C, D, and E are needed.
- Susan Bates Crochet Hooks: 16mm [US Q] and 4mm [US G-6]
- Removable stitch marker (optional)
- Yarn needle
Additional Supplies Needed
- Polyester fiberfill for stuffing
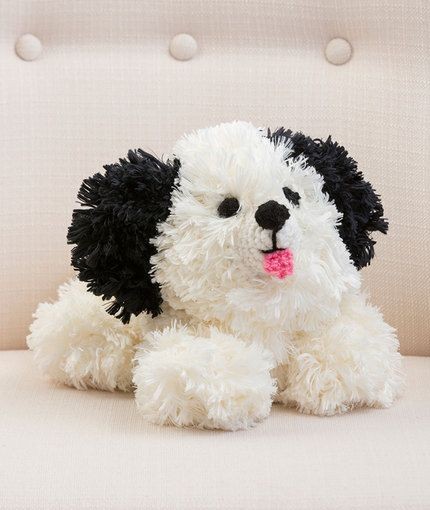
This cuddly little fella is a perfect gift for a child or for a person of any age that needs a comforting gift. Crochet him in two colors of Fur for a playful look that is oh so huggable!
Gauge/Tension
GAUGE: Gauge is not critical for this project.
Puppy Size
Puppy measures about 13” [33 cm] long (from end of nose to tip of tail).
Notes
- Body, head, legs, ears, tail, and spot are worked with a larger hook and Fur yarn.
- Snout, nose, tongue, and eyes are worked with a smaller hook and Super Saver.
- All pieces are sewn together with yarn needle and Super Saver.
Special Stitch
sc2tog (single crochet 2 stitches together) = [Insert hook in next stitch, yarn over and pull up a loop] twice, yarn over and draw through all 3 loops on hook.
Body
Beginning at front end of body, with larger hook and A, ch 4.
Row Instructions
- Row 1: Work 2 sc in 2nd ch from hook, 2 sc in each of next 2 ch—6 sc.
- Row 2: Ch 1, turn, sc in each st across.
- Row 3: Ch 1, turn, [sc in next st, 2 sc in next st] 3 times—9 sc.
- Row 4: Ch 1, turn, sc in each st across.
- Row 5: Ch 1, turn, [sc in next 2 sts, 2 sc in next st] 3 times—12 sc.
- Rows 6 and 7: Ch 1, turn, sc in each st across.
- Row 8: Ch 1, turn, [sc in next 2 sts, sc2tog] 3 times—9 sc.
Fasten off.
Finishing Body
Fold last row (Row 8) in half. With E, beginning at fold, sew halves of Row 8 together for back end of body, then sew side edges of piece together for bottom seam, stuffing as you go. Weave E through base of stitches of first row, pull tight to gather. Weave in end securely.
Head
With larger hook and A, ch 4.
Row Instructions
- Row 1: Work 2 sc in 2nd ch from hook, 2 sc in each of next 2 ch—6 sc.
- Row 2: Ch 1, turn, sc in each st across.
- Row 3: Ch 1, turn, [sc in next st, 2 sc in next st] 3 times—9 sc.
- Row 4: Ch 1, turn, sc in each st across.
- Row 5: Ch 1, turn, [sc2tog] 4 times, sc in last st—5 sc.
Fasten off.
Finishing Head
Weave E through stitches of last row (Row 5) and pull to gather, then sew side edges of piece together, stuffing as you go. Weave E through the base of stitches of the first row, pull tight to gather. Weave in end securely.
Legs (Make 4)
With larger hook and A, ch 5.
Row Instructions
- Row 1: Sc in 2nd ch from hook and in next 3 ch—4 sc.
- Rows 2 and 3: Ch 1, turn, sc in each st across.
Fasten off.
Finishing Leg
Fold last row (Row 3) in half. With E, beginning at fold, sew halves of Row 3 together, then sew side edges of piece together for the inside seam, stuffing as you go, then sew opening at end closed. Weave in end securely.
Tail
With larger hook and A, ch 4.
Row Instructions
- Row 1: Sc in 2nd ch from hook and in next 2 ch—3 sc.
Fasten off.
Ear (Make 2)
With larger hook and B, ch 4.
Row Instructions
- Row 1: Sc in 2nd ch from hook and in next 2 ch—3 sc.
Fasten off.
Spot
With larger hook and B, ch 3.
Row Instructions
- Row 1: Sc in 2nd ch from hook and next ch—2 sc.
Fasten off.
Snout
Beginning at tip of snout, with a smaller hook and E, ch 2.
Round Instructions
- Round 1: Work 6 sc in 2nd ch from hook; do not join, work in continuous rounds (spiral)—6 sc. Note: If desired, place a marker in the last stitch worked to indicate the end of the round. Move marker up as each round is completed.
- Round 2: Work 2 sc in each st around—12 sc.
- Round 3: Sc in each st around.
- Round 4: [Sc in next st, 2 sc in next st] 6 times—18 sc.
- Round 5: Sc in each st around.
Fasten off, leaving a long tail for sewing. Stuff and sew in place on the front of the head.
Nose
With smaller hook and C, ch 2.
Round Instructions
- Round 1: Work 6 sc in 2nd ch from hook; do not join, work in continuous rounds (spiral)—6 sc. Note: If desired, place a marker in the last stitch worked to indicate the end of the round. Move marker up as each round is completed.
- Round 2: Work 2 sc in each st around—12 sc.
- Round 3: Sc in each st around.
Fasten off, leaving a long tail for sewing. Weave tail through stitches of last round and pull to gather slightly (leaving a small opening). Stuff nose lightly and sew in place on the tip of the snout. With C, using a photograph as a guide, embroider straight stitches for the mouth below the nose.
Tongue
With a smaller hook and D, ch 2.
Row Instructions
- Row 1: Work 3 sc in 2nd ch from hook—3 sc.
- Rows 2 and 3: Ch 1, turn, sc in each st across.
Fasten off, leaving a long tail for sewing. Sew tongue to snout at embroidered mouth.
Eye (Make 2)
With a smaller hook and C, ch 2.
Round Instructions
- Round 1: Work 6 sc in 2nd ch from hook.
- Round 2: Work 2 sc in each st around; slip st in first sc—12 sc.
Fasten off, leaving a long tail. Thread tail onto the yarn needle and weave tail in and out of the outer edge, pulling to gather. Sew eyes to the front of the head above the snout. To help eyes show up, trim a little of the fur around the eyes, if desired.
Finishing
Assembly
Refer to the photograph for placement of all pieces. With E, sew head to the top of the front end of the body, sewing around the head a couple of times and making sure that you sew through the stitches (not just the outer layer of fur). Sew front legs forward as if the puppy is lying down, sewing firmly in place. Sew back legs alongside the front legs, sewing firmly in place. Sew tail to back end of the body. With yarn needle and C, sew ears to the top of the head. Sew spot to one side of the body.
Weave in any remaining ends.
Abbreviations
- A, B, C = Color A, Color B, Color C etc;
- ch = chain;
- sc = single crochet;
- st(s) = stitch(es);
- [ ] = work directions in brackets the number of times specified.
- Funny Pictures
-
 Hilarious Memes for Those Bored to Tears
-
 Weekly Treat of Funniest Parenting Memes for Good Laugh out Loud Right Now
-
 Really Funny Pics to End These Weekend Perfectly
- Recipes
-
 Crispy Baked Avocado Fries
-
 Baked Beans and Hot Dogs with Biscuit Topping
-
 Roasted Rosemary Lemon Chicken Breasts
- Lifehacks
-
 Crochet Basics: Twisted Fringe
-
 7 Crochet Tips And Tricks
-
 How To Work Crochet Into Denim
- Crochet Ideas
-
 Crochet Snorlax Plushie Doll
-
 Crochet Cat in 1 Row
-
 Crochet Beautiful Penguin Toy
- DIY
-
 DIY Santa Craft For Kids
-
 Paper Plate Angel Craft
-
 Upcycled Mason Jar Chicken Vase
- Knitting Ideas
-
 Knitted Bridger Cowl
-
 Knitted Keepsake Bag
-
 Knitted Cutie Cupcake Dolls