Crochet Hibiscus Hexagon Potholder

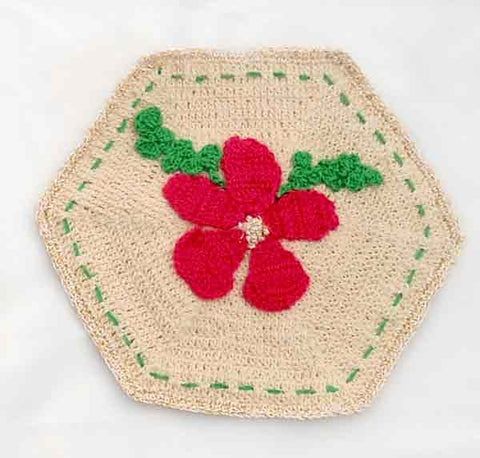
Discover the enchanting art of creating a vibrant and eye-catching Crochet Hibiscus Hexagon Potholder. Immerse yourself in the world of crochet as you embark on this delightful project that combines both functionality and beauty. With its intricate hexagonal shape and the delicate petals of the hibiscus flower, this potholder is sure to add a touch of elegance to your kitchen decor.
This project is a perfect blend of functionality and aesthetics, serving as a reliable potholder while enhancing your kitchen decor. The intricate hexagonal shape, combined with the delicate petals of the hibiscus flower, creates a visually stunning piece that will surely catch the eye of anyone who enters your kitchen.
Skill Level
Easy Skill
Size
About 6 inches diameter
Materials
- Size 10 Cotton Thread: White (125 yds), Pink (25 yds), Green (10 yds), Gold Metallic (30 yds), Plastic Ring (for hanger).
- Crochet Hook: Size 7 (1.65 mm).
Abbreviations
- beg: beginning
- rnd: round
- ch: chain
- sc: single crochet(s)
- dc: double crochet
- sl st(s): slip stitch(es)
- lp(s): loop(s)
- sp(s): space(s)
- rem: remaining
- st(s): stitch(es)
- rep: repeat
- yo: yarn over
Joining with SC
When instructed to join with sc, begin with a slip knot on hook. Insert the hook in the stitch or space indicated, yarn over and pull up a loop, yarn over and draw through both loops on hook.
Special Stitches
French Knot
Bring the yarn threaded needle up from the wrong side to the right side of work at point A. Wrap yarn twice around the needle. Tighten the twists and insert the needle again at A. Pull the needle with firm, even pressure until the yarn slides through the wrapped yarn, forming a knot that lies on the right side.
Sides (Make 2)
RND 1: Starting at top, with White, ch 6, sl st in first ch to form a ring. Ch 3 (counts as first dc now and throughout), 11 dc in ring; join with sl st to first dc. JOIN ALL DC ROUNDS IN THIS MANNER. DO NOT TURN EACH RND. (12 dc)
RND 2: Ch 3, dc in same dc as joining, (2 dc in next dc) around; join. (24 dc)
RND 3: Ch 3, dc in same dc as joining, dc in next 3 dc, (3 dc in next dc, dc in next 3 dc) around, dc in same first st; join. (36 dc)
RND 4: Ch 3, dc in same st as joining, dc in next 5 dc, (3 dc in next dc, dc in next 5 dc) around, dc in same first st; join. (48 dc)
RND 5: Ch 3, dc in same st as joining, dc in next 7 dc, (3 dc in next dc, dc in next 7 dc) around, dc in same first st; join. (60 dc)
RND 6: Ch 3, dc in same st as joining, dc in next 9 dc, (3 dc in next dc, dc in next 9 dc) around, dc in same first st; join. (72 dc)
RND 7: Ch 3, dc in same st as joining, dc in next 11 dc, (3 dc in next dc, dc in next 11 dc) around, dc in same first st; join. (84 dc)
RND 8: Ch 3, dc in same st as joining, dc in next 13 dc, (3 dc in next dc, dc in next 13 dc) around, dc in same first st; join. (96 dc)
RND 9: Ch 3, dc in same st as joining, dc in next 15 dc, (3 dc in next dc, dc in next 15 dc) around, dc in same first st; join. (108 dc)
RND 10: Ch 3, dc in same st as joining, dc in next 17 dc, (3 dc in next dc, dc in next 17 dc) around, dc in same first st; join. (120 dc)
RND 11: Ch 3, dc in same st as joining, dc in next 19 dc, (3 dc in next dc, dc in next 19 dc) around, dc in same first st; join. (132 dc)
RND 12: Ch 3, dc in same st as joining, dc in next 21 dc, (3 dc in next dc, dc in next 21 dc) around, dc in same first st; join. (144 dc)
RND 13: Ch 3, dc in same st as joining, dc in next 23 dc, (3 dc in next dc, dc in next 23 dc) around, dc in same first st; join. (156 dc)
RND 14: Ch 3, dc in same st as joining, dc in next 25 dc, (3 dc in next dc, dc in next 25 dc) around, dc in same first st; join. (168 dc)
Finish off and weave in ends.
Flower (Make 5)
Row 1: (Right Side) Starting at center, with Pink, ch 3, 2 dc in 3rd ch from hook. (3 dc)
Row 2: Ch 3, dc in first dc, dc in next dc, 2 dc in last dc. (5 dc)
Rows 3-5: Ch 3, dc in first dc, dc across to last dc, 2 dc in last dc. (7, 9, 11 dc) DO NOT FINISH OFF.
Row 6: Ch 1, skip first dc, sc in next dc, hdc in next dc, dc in next dc, 2 dc in next 2 dc, dc in next dc, hdc in next dc, sc in next dc, sl st in last dc.
Row 7: Ch 1, turn, sl st in each st across. Finish off leaving a long end.
Leaves (Make 3)
RND 1: (Right Side) Starting at center, with Green, (ch 6, 3 dc in 3rd ch from hook) 3 times, ch 6, (4 dc, ch 3, sl st) in 3rd ch from hook (top leaf), working down the other side, (sl st to next leaf, in same ch opposite leaf, work (ch 3, 2 dc, ch 3, sl st) 3 times, sl st in last 3 ch. Finish off leaving a long end.
Assembly
- Using one Side, with right side facing, arrange petals around the center of Side with points meeting in the middle. Using long ends, sew in place.
- Position and with long ends, sew Leaves around Flower.
- Using Metallic thread, embroider 5 French Knots in the center of the Flower.
Edging
RND 1: Using both Sides, with right sides facing (wrong sides together), working through both thicknesses, join Gold Metallic with sc to any corner center dc, sc in same dc, (sc in next dc) across to next corner, * 3 sc in center corner dc, (sc in next dc) across to next corner; rep from * around, sc in same first dc; join with sl st to first sc.
RND 2: Ch 1, 2 sc in first sc, (sc in next dc) across to next corner, * 3 sc in center corner dc, (sc in next dc) across to next corner; rep from * around, sc in same first dc; join with sl st to first sc. Finish off and weave in ends.
- Funny Pictures
-
 Relatable and Funny Memes to Distract You From the Routine
-
 Hilarious Cat Snapchats That Will Leave You With the Biggest Smile
-
 Today’s Top Funny Tweets to Scroll Before Bed
- Recipes
-
 Cappuccino Brownies
-
 Chicken Mushroom Tortellini Bake
-
 Spinach Pie
- Lifehacks
-
 8 Necessary Tips for Baking Bread
-
 Tips & Hacks for Clean Carpets
-
 10 Uses For Old TV Armoires
- Crochet Ideas
-
 Crochet Watermelon Amigurumi
-
 Crochet Flower Hat for your Pet
-
 Crochet Sophia and Bennet Love Birds
- DIY
-
 DIY Beaded Christmas Tree
-
 Crochet Titus the Barn Owl
-
 DIY Washer Ornaments
- Knitting Ideas
-
 Knitted Star Square Dishcloth
-
 Knitted Free 2025 Year Dishcloth
-
 Knitted Ribbed Adult Hat