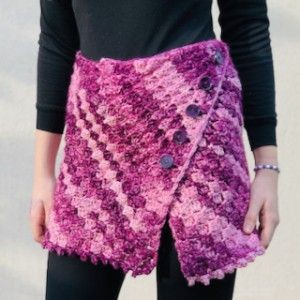
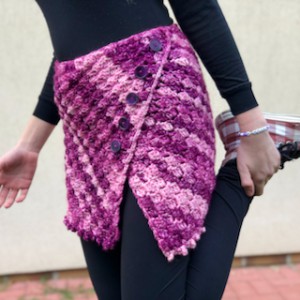
Crochet C2C Skirt

Discover the art of creating a stunning Crochet C2C Skirt that will make heads turn wherever you go. This unique crochet technique, known as Corner-to-Corner (C2C), allows you to create a beautiful and intricate design that is sure to impress. With this pattern, you can unleash your creativity and customize the skirt to your liking, whether you prefer a bold and vibrant color palette or a more subtle and elegant look. Let your imagination run wild as you choose from a wide range of yarn colors and textures to bring your C2C Skirt to life. Whether you're a seasoned crocheter or a beginner looking for a new challenge, this pattern will guide you through each step with clear instructions and helpful tips. Get ready to turn heads and receive compliments as you showcase your stunning Crochet C2C Skirt, a true masterpiece that combines creativity, craftsmanship, and style.
C2C Skirt Directions
This lovely C2C skirt is super easy to make.
The pattern uses only basic crochet stitches.
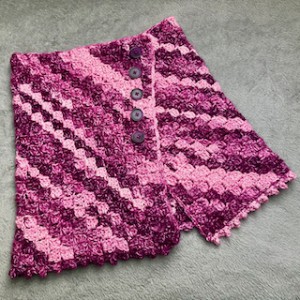
This skirt is crochet as a rectangle from the right bottom corner to left top corner. You just need to measure the waist circumference and crochet the waist part accordingly.
The direction shown are for teenage size (13 years) but can be easily converted into bigger size or smaller size – just by making your rectangle wider or narrower.
For this skirt girls size you will need 2,5 skeins of Brigita yarn.
Brigita: 100% acrylic, 100g / 200m
For this pattern you will need 5.50 mm crochet hook.
Difficulty Level: Level 1 – Easy, for beginners
US crochet term:
SlSt – slip stitch
CH/s – chain/s
SC – single crochet
DC - double crochet
DTR - double tripple crochet
SK - skip
T - turn
ST/s - stitch(es)
REP - repeat
Special technic: double treble crochet or also called double triple and abbreviated as DTR - this is another basic stitch that's the next step up in height from the treble crochet stitch.
The first step is to yarn over the hook three times. This makes sense when you consider the other basic crochet stitches. For example, when you make a double crochet stitch, you yarn over once. When you make a treble crochet stitch, you yarn over twice. Since the double treble is the next tallest stitch, it's only natural that you will yarn over three times.
Insert the hook into the next stitch where you want to create the double treble crochet stitch. Yarn over the hook and draw yarn through the stitch—there are now five loops on the hook. Loop the yarn over the hook and draw through two of the loops on your hook—leaving four loops on the hook. Essentially you are repeating step three with fewer loops left on the hook each time. Yarn over the hook and draw through two loops—there are now three loops remaining on the hook. Keep repeating this pattern. Yarn over the crochet hook and draw through two loops—two loops will be left on the hook. Again, loop the yarn over the hook and draw through the last two loops on the hook—only one loop will remain, just like at the end of any other basic crochet stitch.
Pattern Notes
1) Before you start take a waist measurement and add about plus 1/3 of your measurement. For example: your waist is 75 cm and 1/3 is 25 cm, the total length should be about 100 cm.
2) This pattern is for teenage size but you can easily changed to bigger size by making more or less rows.
3) Follow the instruction for classic C2C stitches.
4) Make a border along the bottom side
Instructions:
This pattern is written for Girls Sizes (10-13 years), if you need your size to be larger no worries, just remember you will need more yarn for larger sizes.
So, enjoy customising it for you, your loved ones, and your friends!
CORNER TO CORNER (C2C)
C2C is so versatile. Once you learn it, you can make blankets, wall-hanging decor, pillow covers, dish towels, coasters, and many other types of projects. It’s just truly a beautiful stitch!
The size of the project is determined by when you start to ‘decrease’. The design will keep getting bigger in both width and height until you start to decrease on 1 and eventually both sides.
This is pretty cool because you don’t necessarily need to have the exact dimensions planned out ahead of time, you can make these decisions as you go!
C2C SKIRT
Pick up the 5.00 mm hook and let’s make a starting chain.
Corner to corner crochet instructions:
ROW 1:
Step 1: Chain 6
Step 2: Double crochet into the fourth chain from the hook
Step 3: Double crochet in the next two chain
ROW 2:
Step 4: Chain 6
Step 5: Double crochet in fourth chain from the hook and next two chains
Step 6: Slip stitch into the ch-3 turning chain from the previous row
Step 7: Chain 3
Step 8: Double crochet 3 in ch-3 turning chain
ROW 3 and beyond:
Repeat steps 4-8
Row 4 and after will follow the instructions for generic C2C increase, which means you’re continuing to make your project both taller and wider. Repeat row 4 over and over until you need to decrease.
Make 19 rows / 19 blocks in total.
Let's do the measurement: the side has 40 cm and this is how your skirt will be long.
Now start decreasing on one side, so one side will stay flat.
NOTE: If you start to decrease at the same time on both sides, your finished project will be a square (because it will have the same number of tiles on both parallel sides)!
If you decrease on 1 side and continue to work 7 more rows (my skirt size) before you decrease on the other side, your finished project will be a rectangle, where one side will be 7 blocks longer than the other.
Make 7 rows / 7 blocks decrease one side.
Let's do the measurement of your longer side: the side has 92 cm and this is how your skirt will be wide (please see the instructions above).
Once you start decreasing on both sides, the project gets smaller and smaller, which is also great for us because time flies by at the end! :)
Make 18 rows decreasing on both sides.
How to C2C Crochet Decrease
The “decrease” term can be slightly confusing because when this stitch is worked, the row doesn’t actually look as if it’s decreasing. Instead, it looks like a flat edge. In reality, the decrease stitch is eliminating one block from each row you’re crocheting.
To start, instead of <ch6, dc in 4th ch and next 2 ch>, you will NOT do this step. That ‘chain 6’ step is how you “increase” the height of the project.
The only difference between increasing and decreasing is Step 1 – either you increase the height or keep it at the same height.
Step 1: Instead of chaining 3 as you usually would, slip stitch in each double crochet
Step 2: Slip stitch into ch-3 turning chain
Step 3: Chain 3
Step 4: Double crochet 3 in ch-3 turning chain of previous row.
Repeat from * until you complete all the tiles in the row.
THE FINAL SIZE MEASUREMENT:
Waist = waist circumference: 15.75 inch / 40 cm
Skirt long in total: 16.5 inch / 42 cm long
For longer skirt, you will need to add more "increasing" rows until you reach the length you desire.
For wider skirt, you will need to add more "decreasing" flat row until you reach the width you desire.
Remember that when making your skirt longer and wider you will need more yarn.
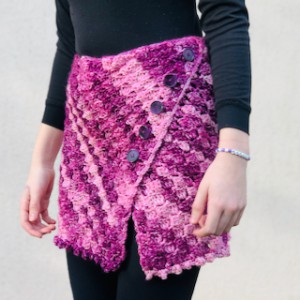
CUTE LITTEL POM-POMs BORDER
You can decorate your skirt with cute little pompom border.
Pick up the 5.00 mm hook and let’s make a slip knot.
Start in the bottom corner and crochet along side up.
R1: ch1, 1sc, REPEAT till end of side: ch3, skip one block, 1sc between blocks. 1sc, ch3 and 1sc in the corner.
Now work the top border till end of side: ch2, 1sc between blocks. 1sc, ch3 and 1sc in the corner.
Then continue from top down along side till end of side: ch3, 1sc between blocks. 1sc, ch3 and 1sc in the corner.
Then continue along the bottom side till end of side: ch3, 1sc between blocks. Turn your work.
R2: in each ch3 space: 1sc, 1dtr, 1sc (this will create a nice small pom-pom) + ch1 to move to next ch3 space.
Till you reach the end of row.
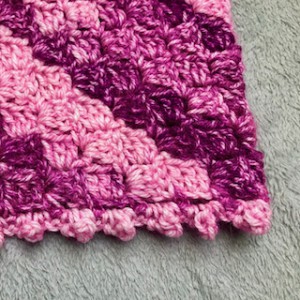
Fasten off, hide all loose tails in the back of your work and you are all done my friends.
You just created a beautiful C2C skirt
BUTTONS
Attached the buttons on the back of your skirt and make a "hidden" closing:
Arrange the buttons in a way that makes you happy and hand sew them on the wrong side.
Start in the top corner and sew buttons on the waist side.
I attached 5 buttons and skipped 2 blocks between the buttons.
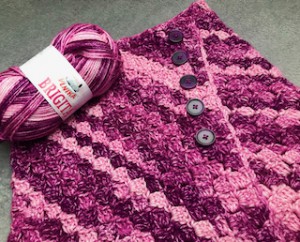
If you want attached some buttons also on the right side - just for decoration - use tapestry needle to fasten buttons into desired places along the short side.
- Funny Pictures
-
 Feline Memes to Feel Better
-
 Best Funny Pics of the Day Especially for You
-
 Pictures That Have No Right to be This Funny
- Recipes
-
 Strawberry Banana Bread
-
 Kraut-Tots
-
 Chocolate Delight Dessert
- Lifehacks
-
 7 Crochet Tips & Tricks
-
 Raspberry Crochet Stitch
-
 Crochet Tutorial: Popcorn Stitch + Printed PDF
- Crochet Ideas
-
 Crochet Snorlax Plushie Doll
-
 Crochet Cat in 1 Row
-
 Crochet Tiny Chick Amigurumi
- DIY
-
 Popsicle Stick and Jingle Bell Christmas Tree Ornament
-
 Upcycled Mason Jar Chicken Vase
-
 Make A Candle Holder From Plastic Spoons
- Knitting Ideas
-
 Knitted Newborn Striped Beanie
-
 Knitted Chunky Newborn Pixie Hat
-
 Knitted Big Bow Hat